Tag Archives: Security Assertion Markup Language (SAML)

The power of Affordance + Citriẋ for the Future of Work

What is “Affordance”? It’s Design Thinking terminology summarised as follows – you can look at a product or service and visualise in your mind how it works a great example is of this is the play ▶️ and stop 🛑 buttons you can use these to interact with a product or service to start or stop the action, interactivity or stream.

Another example is volume controls on car radio its usually round nob and to turn the volume up you turn the round nob clock wise and the reverse to lower the volume.

Now that you have a simple understanding of what I mean by affordance let’s get started.

We live in an age of a complex technology spectrum, that is suppose to remove friction and barriers for employees but its actually in many instances making it worse, to achieve more while in some cases through people cultures at companies its driving productivity trends in the wrong direction inclusive of negative affect’s on employee (human) well-being. A recent “The Economist” article puts the remote workforce working up to a 30% more during the pandemic yet there are productivity inefficiencies, the link to the article is available at – https://www.economist.com/business/2021/06/10/remote-workers-work-longer-not-more-efficiently.

How does Citrix aim solve some of that complexity in the technology spectrum? It embraces the power of Affordance enabling employees (humans) to work on there own terms to achieve more in meaningful ways through flexible work-styles. Today many talk about a hybrid workforce, its staple founding principle upon which Citrix was  built upon and its in its DNA with over 30 years of tenure enabling the hybrid operating model between the physical workplaces, at home or somewhere in between with different marketing lines my favourite – Work is not a place.

I know invite you to watch the following 3 minute demonstration where I’ll take a vanilla windows endpoint and I’ll enable Signal Sign-On (SSO) to a Software-as-a-Service (SaaS) web apps in my example i’ll SSO to Salesforce in several ways to demonstrate the Affordance of Citrix enabling employees (humans) to work on there own terms on any endpoint.

Demonstration of the Employee Affordance powered by Citrix

In the video you see a Windows endpoint that doesn’t having access to Salesforce that’s because it’s a SaaS web app and you typically access those types of apps using your web browser not via the Start Menu on a Windows endpoint or the Dock on Mac OS X.

Once the employee completes a sign-in to Citrix Workspace much like the Netflix app on your smart TV it provides you with recommendations; access to stream either  movies, TV series of documentaries and in Citrix Workspace app it allows access to stream different web, SaaS and micro apps with SSO enabled so its seamless.

The difference between the Netflix and Citrix Workspace apps is that the Citrix Workspace app (CWa) supports different affordance in how a employee (human) may want to work vs. how IT and security teams determine the “How” employee (human) consume these apps – local, sandboxed, traffic reflection or a combination inclusive of security depth in by enforcing session watermarking, restrictions on cut, copy, paste and printing e.t.c 

I know invite you to study the below hand drawn diagram, to make the experience hopefully more personal. The diagram depicts the entire demonstration above and how the flow of traffic and data is controlled and how contextual security access can be applied to different web, SaaS and micro apps using cloud native turn-key Citrix Cloud Platform services.

Time line of the Demo

Time 0 min 0 seconds
The Citrix apps has already been installed onto the employee (human) endpoint, this could be achieved by using Citrix’s own Endpoint management service vs. another or alternatively by some other legacy/traditional means e.g Domain joined endpoint using a full device VPN.

Time 0 min 13 seconds
On-board employee (human) + endpoint with Citrix Workspace for modern secure data, web & SaaS app delivery with SSO.

Time 0 min 29 seconds
Once Citrix Workspace app (CWa) is signed and is beginning to retreive and layer in the right and relevant SaaS, Web, (Virtual Apps & Virtual Desktops – optional) with Windows Start Menu or Mac OS X Dock integration by entitlement by job role vs. Business function. You will notice that while CWa is initializing there is NO Salesforce in the Windows start menu.

Time 0 min 55 seconds

Citrix Workspace app (CWa) enables a effortless Single Sign-On (SSO) experience using a magic token to SSO the Citrix Files app to gain access to the employees (humans) Cloud “My Docs” managed by Citrix or allows access to OneDrive for Business, Google Drive, Box, Dropbox e.t.c – Note the employee will need to sign-in only once to any of these Enterprise File Sync and Share (EFSS) platforms to then allow CWa to SSO the employee (human) to any of these EFSS platform which IT can control and allow access to.

Time 1 min 26 seconds

CWa has layered in all the employees (humans) web and SaaS apps into the Windows Start Menu, which the human can now search for and launch with just in time security and SSO after the click on the icon.

There are two version in this demo Salesforce and Salesforce Secure this is to show the different types of contextual security that can be enforced or ON vs. OFF at app vs. network latitudes.

Citrix Workspace affordance enabling frictionless access including SSO to SaaS e.g. Salesforce via Windows Start Menu integration launching the preferred native local endpoint with the browser traffic protected by Citrix Secure Internet Access (SIA) Service and the SSO to Salesforce is handed by the Citrix Gateway Service configured by IT for SSO e.g SAML.

When accessing Salesforce even though IT has turn OFF all app security enforcement policies at the OS and presentation layer e.g what the human sees and interacts with e.g Start Menu and Chrome Browser so its a native experience, the Citrix SIA Service is capturing and redirecting all the network traffic prior to traversing the endpoints network interfaces and forcing the traffic to a centralised Citrix SIA service tenant in the Citrix Cloud Platform that allows for IT and Security teams to enforce just in time cloud network security policy adds/moves/changes in near to real-time all without impacting and employee affordance by avoiding pushing down any type of update/patch/upgrade software package.

Time 1 min 48 seconds

Citrix Workspace app inclusive of the web browser portal version allows employees to use the Citrix Universal Search to search for web, SaaS apps and content from within the portal if this is how they choose to work and then access the same Salesforce SaaS app with the same SSO and network security enforced when using the CWa.

Time 1 min 57 seconds

In this example searching and starting the Salesforce Secure SaaS app and in this example IT has turned ON all the app security enforcement policies at the OS and presentation layers to add further depth and breathe avoiding any IP, Pii exfiltration and more.

When app security polices for web, SaaS apps are configured, then depending upon how the employee (human) intends to access his/her web, SaaS apps e.g Salesforce Secure it will make a decision based upon the individual employees (humans) preffered Affordance access method how to securely deliver Salesforce Secure e.g at 2 min 29 seconds you’ll see that its open, SSOed, running in a local sandboxed browser that is session watermarked with cut/copy/paste and printing denied or disabled between the sandbox and endpoint.

Time 2 min 44 seconds

What if the employee (human) decides actually I am going to bypass all of Citrix’s security policies and governance? We’ll guess what that just in time at a network level protected by Citrix SIA Service will intercept and enforce app security policies, in the example I open a new tab navigate to Salesforce type in my tenant and attempt to sign-in outside of Citrix Workspace app and bypass all that security, the Citrix SIA Service intercepts the request between endpoint (source) and destination (https://<tenant>.my.salesforce.com  and recognises that method requires a remote browser isolation session to avoid and de-risk IP, Pii exfiltration and lateral movements. IT can choose to enforce or allow cut/copy/paste and printing from these remote browser isolation services that are intercepted by the Citrix SIA Service.

DT Architecture Diagram

What services where used to achieve this experience? 
Secure Internet Access – https://www.citrix.com/products/citrix-secure-internet-access/
Secure Private Access (formerly Access Control and Secure Workspace Access) –https://www.citrix.com/products/citrix-secure-private-access/
Secure Browsing Service – https://www.citrix.com/products/citrix-secure-browser/
Citrix Analytics for Security – https://www.citrix.com/products/citrix-analytics-security/

All of these services are turn-key S/PaaS in nature powered by the Citrix Cloud Platform – https://citrix.cloud.com/ and have good IT Affordance meaning they aren’t difficult to setup, configure and manage, you’re talking  about handful or minutes or a few hours to get a Minimal Viable Product or Prototype (MVP) into your employees (humans) hands to test and provide you with insights and feedback to refine your MVP.

The views expressed here are my own and do not necessarily reflect the views of Citrix.
Azure AD SAML Sign-in with Virtual Smartcard to Citrix Virtual Apps & Desktops

Consider this an evergreen post as of 10/06/2020

Introduction
The purpose of this blog post to aim for a consistent modern authentication experience for employees when consuming Citrix Virtual Apps & Desktops (CVAD) + CVAD Service regardless of where the (CVAD) workloads are running, either in *Azure, *AWS, *GCP or *On-Premises. The primary priority is that the employees identity is owned and managed by a cloud identity platform e.g Azure Active Directory (AAD) and the employees identity within each resource location* for CVAD usage maps to AD shadow accounts. These AD shadow accounts represent the employee as a UPN e.g human.name@domain, with a RANDOM long complex password that the employee doesn’t need to ever know and all IT is required to do beyond creating a AD shadow account is then assign the right vs. relevant security privileges and access to CVAD including Policies meeting local, geo of industry compliance and governance while maintaining a great employee experience.

The second priority is that the employees device can frictionlessly access CVAD resources using either a Forward Proxy, SD-WAN Overlay Network or ICA Proxy. I do recognise that many organisations are still required to make use of a VPN style strategy at the current moment and therefore this solution can also work for those devices as well repurposing the existing Citrix Gateway to also support a Full VPN beyond ICA Proxy or you can use other well established and trusted VPN solution providers.

Leveraging a Bring Your Own “either Enterprise vs. Personal” Identity (ByoI) is a concept I ponded way back in 2017 and now feels like the right time to pick that up concept again during the current Workplace transformation happening all around the world due to world wide COVID-19 pandemic. Using a ByoI strategy as high level vision you can efficiently deploy CVAD to any *Azure, *AWS, *GCP region or *On-Premises with less friction and you don’t need to be worry about “Password Syncing” just replicate the employee’s UPN + AD Security Privileges + CVAD Access & Policies where its required. It has the added benefit if you want do mix and match public cloud workloads to avoid lock-in amongst other topics, you’ll be providing a common and consistent login interface + experience irrespective of where the workload is sat.

It another brilliant benefit is the on-boarding of 3rd Parties (3P’s) using ByoI concept with a business check at the edge, the 3P brings there owned Identity and in the current world we live in I don’t think that is bad thing it could even strength that employees individual security as there identity will be bound to a smartphone which knows more about your individuals habits and you that you know yourself. If we can unlock a co-shared responsibility identity model between the individual + organisation we can truly aim for a passwordless workspace that only uses virtual smartcards or tokens.

Finally the on-boarding of M&A employees can be faster as you can generate them a few days after commercial signing with a new brand identity that resides in Azure AD (or Google, OKTA e.t.c) whilst they continue accessing existing workplace apps + data with current AD credentials, IT + HR + Business can choose when to layer in the “NEW” Workspace Platform for Work from group perspective into the existing Workspace with less friction and complexity. Yes this final topic is complex when we think about merging different Business IT and IT Systems together, a CVAD strategy with FAS bridges the GAP reducing friction and complexity for IT to sun rise a new Workspace stack for that newly acquired organisation while sunsetting the exciting Workspace stack and those new M&A employees get to on-board beyond the Workspace into there new organisations people, its culture, vision and values and avoids the IP drain that often can easily happen.

The Employee Experience

High Level Architecture
The scenario below depicts accessing a StoreFront server on any device type from within the Workplace fabric in any office locally or world wide or from a IT managed device that makes use of a Full VPN, Forward Proxy technology; WFH Citrix SD-WAN appliance where traffic passes over an SD-WAN overlay network; Citrix Endpoint Management enrolled smart device with per-app mVPN configured and finally irrespective of the devices management status you can use ICA Proxy* to access CVAD resources anywhere over the internet inclusive of any home via a Citrix ADC (formerly NetScaler) using the Gateway functionality which is “VPN-Less*”.

Systems Requirements & Pre-requisites
1. A UAT or Test CVAD 1912 LTSR Site that already setup. My personal one runs in AWS EC2 as it retains hosting connections or public clouds to preform MCS provisioning of machines from customer own and managed control plane. You can also use the Citrix Virtual Apps & Desktops (CVAD) Service or sign-up at https://citrix.cloud.com/ and engage your local Citrix representatives to get a trial setup for the CVAD Service.
2. Deploy a new VM which will run the following Citrix 1912 LTRS StoreFront and Federated Authentication Service (FAS) roles to create a new “Store” on StoreFront called “AAD” which will be configured to accept the Azure AD SAML token which will then convert the AAD SAML tokens into a Citrix virtual smartcard to SSO the employee onto CVAD resources.
3. Install StoreFront – https://docs.citrix.com/en-us/storefront/1912-ltsr/install-standard.html after reading the system requirements – https://docs.citrix.com/en-us/storefront/1912-ltsr/system-requirements.html.
4. Setup and Configure FAS Role on your StoreFront Server – https://docs.citrix.com/en-us/federated-authentication-service/1912/install-configure.html after reading the system requirements carefully – https://docs.citrix.com/en-us/federated-authentication-service/1912/system-requirements.html, this part shouldn’t be a problem e.g leaning on on Security teams whom control the Enterprise CA Admins as you’ll hopefully be using a proper UAT or Test CVAD environment with all the Microsoft management servers and roles including an Enterprise CA which FAS requires and access to AD introduce new GPO’s.
5. An Azure AD “personal or business test” tenant.

Deployment Guide

Azure AD Setup & Configuration – Personal Home Lab Edition
If you have a separate Azure AD tenant in Azure you can proceed to the next section, however if you are an IT Pro that wants to test out how to convert Azure AD SAML logins to Citrix virtual smartcards for CVAD the following the below guidance below for setting up a personal ADD tenant with a personal Azure account for your home lab. WARNING I am not an Azure AD nor on-premises AD expert, therefor follow the leading practises found in Microsofts documentation for Azure AD.

1. Navigate to https://portal.azure.com and sign-in with your live vs. personal Microsoft account. Select “Create a resource”.
2. Select “Identity” then select “Azure Active Directory”.
3. Enter in an “Organisation Name, Initial domain name and select your Country or region”.
4. The wizard will begin creating your AAD tenant .
5. Once it completes click the hyperlink within “Click here to manage your new directory”.
6. At the Overview page of your new AAD tenant select “Users” under “Manage” section.
7. Select “+ New user” under the “All Users (Preview)” Overview you’ll notice your personal email addr.
8. You’ll notice when creating a new employee account for your AAD tenant that you can only append domain.onmicrosoft.com to the username, I’ll explain how-to convert that to user@domain and remove the UPN requirement of user@doamin.onmicrosoft.com in the next few steps. For now fill the following fields “User name”; “Name”; “First name”; “Last name”; “Password” (choose or auto-generate) and the select “Create” keeping the defaults as they are.
9. Your new AAD employee is successful created, you can assign roles. NOTE for my personal testing purposes I didn’t configure anything as I’ll delete that test employee AAD account after my testing.
10. At this point I’m not going to deploy nor setup the “Azure AD Connect” in my Citrix Cloud Resource Location as I want the employees primary identity to always reside in Azure AD as the single source of truth, and then bring that identity to my Citrix Cloud Resource Location e.g Bring your own Identity (ByoI) and after a successful AAD SAML login map that to a hardened AD Shadow account with long complex password that the employee will never know and all I need to do it assign the AD security privilege and access for CVAD resources. This approach means that employee will NEVER enter in a AD password within a Citrix Cloud Resource Location that is configured for AAD (or Google, OKTA e.t.c) when using CVAD 1912 LTSR StoreFront and the Federated Authentication Service (FAS) in a Resource Location(s). For complex environments yes you’ll likely deploy the “Azure AD Connect” software as a role somewhere to replicate the employees but you don’t need to replicate there passwd or you can provision the employee twice once in AAD as in the example above and then again manually in AD in the Resource Location as there corresponding AD shadow account which matches the UPN from AAD when authenticating using SAML to StoreFront, the choice is yours but I found for testing purposes a manual in each is far less frictionless.

On-Premises Active Directory (AD) within your Resource Location
1.Create a new AD “Shadow” account that matches the “User Principal Name (UPN)” in AAD e.g user@domain, generate a random long complex password which they don’t need know and then assign or inherit the right vs. relevant AD security groups, GPOs that you would usually assign to a CVAD consumer.
2. On-board your domain into Azure AD which required verifying it with a MX record to avoid using user@domain.onmicrosoft.com so that you can use user@domain keeping it simple and less complex.

Installation and Configuring the Federated Authentication Service (FAS)
1. On the new VM that you just installed 1912 LTSR StoreFront role onto from the existing mounted ISO run the autorun splash screen and select “Federated Authentication Service”.
2.Read the EULA which you’ll need to “Accept the Licenses Agreement” to continue.
3. Accept the defaults and select “Next” on the “Core Components” page.
4. Accept the defaults and select “Next” on the “Firewall” page.
5. Once the installer is finished select “Finish” to close.
6. Open a PowerShell window in Admin mode then copy & paste the following code below, which will enable a trust between the CVAD Controller and the StoreFront server, minimise this window you’ll require it later.

Set-BrokerSite -TrustRequestsSentToTheXmlServicePort $true

7. Navigate to the following path “C:\Program Files\Citrix\Federated Authentication Service\PolicyDefinitions\” on the current StoreFront server that you installed FAS role onto, copy the following two files “CitrixFederatedAuthenticationService.admx” and “CitrixBase.admx” the entire folder “en-US” to a network share which will need to be accessible from your Windows Domain Controller or WDC.
8. Connect to your Windows Domain Controller (WDC) via RDS from the current StoreFront + FAS server and copy the two *.admx FAS files including folder “en-US” from your network share to the following path on the “C:\Windows\PolicyDefinitions” on your WDC.
9. Open an “MMC” console and load the “Group Policy Management Editor” snap-in, at the prompt for a Group Policy Object, select “Browse and then select ”Default Domain Policy”.
10. In the MMC console navigate to “Default Domain Policy [server name] > Computer Configuration > Policies > Administrative Templates > Citrix Components > Authentication” and you should see the following three policies available “Federated Authentication Service”, “StoreFront FAS Rule” and “In-session Certificates”.
11. Select and open the “Federated Authentication Service” policy, next select to “Enable” it followed by selecting the “Show” button parallel to “DNS Addresses” label and enter in the FQDN e.g. “server.domain” of your StoreFront + FAS server and then select “OK” and then select “OK” to save the policy configuration and enabling FAS.
12. Next select and open “In-session Certificates” and select “Enabled” and in the “Consent timeout (seconds):” field type in a value of “30” which is the default.
13. Next close the MMC console and open up the existing PowerShell (Admin mode) and copy and paste the following code to force a Group Policy Update. 

gpupdate /force

14. Minimise the RDS connection from your WDC so that you are back on your StoreFront + FAS server. Search and open up Citrix FAS in Admin mode, if you don’t you will be notified in the UI and then select “run this program as administrator” which will reload the FAS UI in Admin mode.
15. Select to “Deploy” for “Deploy certificate templates”.
16. Select “Ok” on the pop-up window that appears.
17. You’ve now successfully deployed the certificate templates, now select “Publish” for “Set up a certificate authority”.
18. Select the right Enterprise Certificate Authority (CA) from the available list and select “Ok”.
19. You’ve now deployed the certificate templates successfully to your Enterprise CA, now select “Authorize” for “Authorize this service”.
20. Select the right Enterprise Certificate Authority (CA) from the available list (same as above) and select “Ok”.
21. The FAS UI will display a spinning icon as the authorisation request is pending on the Enterprise CA server. 
22. Connect to your Enterprise CA via RDS and the “Microsoft Certification Authority” MMC Console and navigate to “CA > CA Server > Pending Requests” you’ll see pending certificate right click it select “All Tasks > Issue” and the certificate will be issued. 
23. Verify the issues certificates are issued by selecting “Issued Certificates” and verify you can see two issues certificated that begin with “Citrix_RegistrationAu…”.
24. Minimise your RDS session to your Enterprise CA and return to the StoreFront + FAS server, you now notice the “Authorize this service” says “Reauthorize” which is correct as the FAS service is now authorised with the Enterprise CA. Next select “Create” for “Create a rule”, which launch a new window.
25. Accept the default “Create the default rule (recommended)” and select “Next”.
26. Accept the default “Citrix_SmartcardLogon (recommended)” and select “Next”.
27. Select the previously selected and configured Enterprise CA you Authorised and select “Next”.
28. Select “Allow in-session use” and select “Next” if you enabled the following policy “In-session Certificates” earlier.
29. Select “Manage StoreFront access permissions (access is currently denied)” in red text which will open a new window.
30. Remove “Domain Computers” and add the “Server” running the StoreFront + FAS roles and under “Permissions” to “Allow” then select “Apply” and “Ok”.
31. The screen will update with “Manage StoreFront access permissions” to now be in blue text, now select “Next”.
32. Select “Manage user access permissions (all users are currently allowed)” in red text which will open a new window.
33. You can change to default “Domain Users” to your own test AD security group, then under “Permissions” to “Allow” then select “Apply” and “Ok”.
34. The screen will update with “Manage user permissions (all users are currently allowed)” to now be blue text, now select “Manage VDA permissions (all VDAs are currently allowed)” which is in red text.
35. You can change to default “Domain Computers” to your own test AD security group that your Citrix Virtual Delivery Agents (VDA) are found within, then under “Permissions” to “Allow” then select “Apply” and “Ok”.
36. The screen will update with “Manage VDA permissions (all VDAs are currently allowed)” to now in blue text, now select “Next”.
37. Now select “Create” and a “Default” FAS rule.
38. You have now successfully setup and configured Citrix FAS, you still need to enable FAS Claims for your “AAD” store on StoreFront which is covered later in this blog post.

Creating a new Store call “AAD” for Azure AD SAML Authentication in StoreFront
1. Open Studio and select “StoreFront” then select “Stores” and the on the “Actions tab” select “Create Store”.
2. On the splash screen select “Next“.
3. Type in “AAD” for the “Store Name” field and click “Next”.
4. Select “Add” list a CVAD controller, a new window will appear where you need provide the following information a “Display Name” e.g Citrix Cloud Connectors vs. CVAD 1912 LTSR, for the “Type” select “Citrix Virtual Apps and Desktops” and under “Servers” list select “Add” and type in the Citrix Cloud Connector or CVAD 1912 LTSR addresses and choose “Transport type” either HTTP 80 or HTTPS 443 (Preferred) and click “OK”.
5. You are now returned to the “Delivery Controller” page with a list of either Citrix Cloud Connectors or CVAD Controllers 1912 LTSR, click “Next“.
6. Now on the “Configure Authentication Methods” page select “SAML Authentication” and leave “User name and password” checked as YES, then click “Next”.
7. Ignore “Remote Access” configuration and click “Next“. NOTE: I will update this blog post at a later date with the Remote Access via Citrix Gateway formerly NetScaler Gateway.
8. Accept the default’s on the “Configure XenApp Services URL” and click “Create”.
9. StoreFront will begin creating your new “AAD” Store on your StoreFront server, once the wizard completes select “Test Site” to verify you can see a webpage that displays Citrix Receiver or you can navigate to “https://FQDN/Citrix/AADWeb/” replacing the FQDN with your own to verify the webpage is available.

Generating AAD SAML Configuration for StoreFront
1. In the Azure AD UI in the Azure Portal select “Enterprise applications” node.
2. When the UI updates in the centre select “Select “New application”.
3. You are taken to the “Add an Application” wizard and presented with three options select “Non-gallery application“.
4. Next provide a name for your own application e.g AAD-SAML-CVAD1912LTSR and then click “Add” at the bottom.
5. The AAD wizard completes and you are taken to the “Overview” page for “AAD-SAML-CVAD1912LTSR“, now select “Users and groups” from within this view.
6. Add an native AAD user(s). Note do not add any employee that does not have a AD shadow account setup and configured in the Citrix Cloud Resource Location (RL).
7. Now from the same “Overview” page for “AAD-SAML-CVAD1912LTSR” select “Single Sign-on” and on the “Select a single sign-on method” wizard select “SAML” and will start the AAS SAML wizard.
8. Select the pencil icon for “Basic SAML Configuration” to configure the following fields as follows below and select “Add“.

Identifier (Entity ID): https://FQDN/Citrix/AADAuth
Reply URL (Assertion Consumer Service URL):https://FQDN/Citrix/AADAuth/SamlForms/AssertionConsumerService
Sign on URL: https://FQDN/Citrix/AADWeb

9. Check under “User Attributes & Claims” portion that the “Name” field is configured to “user.userprincipalname”.
10. Scroll to “SAML Signing Certificate” and click to download the “Federation Metadata XML” e.g. AAD-SAML-CVAD1912LTSR.xml, now save or transfer it to your StoreFront server at C:\Temp.

Create and Configure a Azure AD SAML Trust in StoreFront
1. If you have transferred the *.xml file e.g “AAD-SAML-CVAD1912LTSR.xml“, then on your StoreFront server create a folder called “Temp” on “C:\” and transfer the downloaded *.xml file.
2.Open PowerShell in admin mode or launch it from Studio 1912 LTSR. Copy & paste the following code below, however if opening the PowerShell with Admin privileges without Studio 1912 LTSR then copy & paste this cmdlet first before proceeding with the configuration & “$Env:PROGRAMFILES\Citrix\Receiver StoreFront\Scripts\ImportModules.ps1“. You will notice the virtual path for the Store is already set here to AAD so you can copy and paste it as is. This code sets up and configures SAML for the ADD Store.

$storeVirtualPath = “/Citrix/AAD” 
$auth = Get-STFAuthenticationService -Store (Get-STFStoreService -VirtualPath $storeVirtualPath) 
$spId = $auth.AuthenticationSettings[“samlForms”].SamlSettings.ServiceProvider.Uri.AbsoluteUri 
$acs = New-Object System.Uri $auth.Routing.HostbaseUrl, ($auth.VirtualPath + “/SamlForms/AssertionConsumerService”) 
$md = New-Object System.Uri $auth.Routing.HostbaseUrl, ($auth.VirtualPath + “/SamlForms/ServiceProvider/Metadata”) 
$samlTest = New-Object System.Uri $auth.Routing.HostbaseUrl, ($auth.VirtualPath + “/SamlTest”) 
Write-Host “SAML Service Provider information: 
Service Provider ID: $spId 
Assertion Consumer Service: $acs 
Metadata: $md 
Test Page: $samlTest “
 

3. Next copy and paste the following code which will ingest SAML configuration from the Azure AD *.xml that you downloaded earlier and copied to C:\Temp on the StoreFront server.

Get-Module “Citrix.StoreFront*” -ListAvailable | Import-Module
# Remember to change this with the virtual path of your Store.
$StoreVirtualPath = “/Citrix/AAD”
$store = Get-STFStoreService -VirtualPath $StoreVirtualPath
$auth = Get-STFAuthenticationService -StoreService $store
Update-STFSamlIdPFromMetadata -AuthenticationService $auth -FilePath “C:\Temp\AAD-SAML-CVAD1912LTSR.xml”


4. Validate there are not error(s) on screen that need resolving.
5. Minimise your PowerShell window you’ll need it again shortly, now open up Studio or StoreFront MMC console and navigate to the “Stores” and select “AAD” and select “Manage Authentication Methods“.
6. Select the cog icon parallel to “SAML Authentication” and then select “Identity Provider” you should see that your AAD SAML configuration is setup and configured, leave it as is DO NOT TOUCH it!
7. Close all windows including Studio or StoreFront.

Enabling FAS for Converting Azure AD SAML Tokens to Virtual Smartcards
1.Open up your existing PowerShell window and copy and paste the following code below, which will ENABLE FAS for your ADD Store to convert AAD SAML tokens received into virtual smartcard that will be used to SSO the employee onto his/her Citrix virtual app and or desktop. You’ll notice the code is configured for the “AAD” Store so you can copy and paste as is.

Get-Module “Citrix.StoreFront.*” -ListAvailable | Import-Module
$StoreVirtualPath = “/Citrix/AAD”
$store = Get-STFStoreService -VirtualPath $StoreVirtualPath
$auth = Get-STFAuthenticationService -StoreService $store
Set-STFClaimsFactoryNames -AuthenticationService $auth -ClaimsFactoryName “FASClaimsFactory”
Set-STFStoreLaunchOptions -StoreService $store -VdaLogonDataProvider “FASLogonDataProvider”


2. Validate there are not error(s) on screen that need resolving, if there are none you can nose close the PowerShell window.

Testing your Azure AD SAML to Virtual Smartcard Login
1. Navigate to https://FQDN/Citrix/AADWeb which will redirect you to a AAD login.
2. Enter in your UPN e.g user@domain and then complete the required 2FA vs. MFA requirements setup by your organisation as requirement onscreen.
3. You will be returned to https://FQDN/Citrix/AADWeb and SSOed onto UI, depending on your setting your desktop will either auto launch of you’ll have to manually launch it yourself. The initial login will take slightly longer than usual as its generating you that initial virtual smartcard between StoreFront, FAS, AD and your Enterprise CA.
4. Your Citrix vDesktop or vApp should launch successfully and SSO the on without prompting for any credentials.

Troubleshooting
1.If you receive ANY error once returned to https://FQDN/Citrix/AADWeb post the AAD SAML login open a new browser tab in the same session and copy and paste the following URL https://FQDN/Citrix/StoreAuth/SamlTest to see if you have any oblivious errors e.g user@domain.onmicrosoft.com from Azure AD which doesn’t map to the AD Shadow account that is user@domain so its a UPN mismatch and the sign-on will continue to fail.
2. If the employee can sign on to https://FQDN/Citrix/AADWeb and the Citrix vApp or vDesktop launches but they see a credential prompt with “Other User” check and see that you configured FAS for the correct Store with SAML Authentication setup and configured if not using my example of “AAD” as the Store setup and configured on StoreFront.

ICA Proxy Remote Access with Azure AD SAML
Coming…

Concept on Bring your own Identity (ByoI) Strengthening Security through Co-Shared Responsibility owned by IT with different operating models
Its a simple concept which I like and yes it adds in complexity but it times today its far better to harden against unwanted 3rd party access whilst making it harder to achieve lateral movements. If the employee’s account is compromised by a 3rd party, they would need to compromise the employees identity in the cloud directory e.g AAD and in Active Directory (AD) on-premises as both passwords are completely different with different types of multi-factor authentication methods bound including access privileges.

The views expressed here are my own and do not necessarily reflect the views of Citrix.

SAML Sign-in to Virtual Smartcard for Virtual Apps & Desktops

The following content is a brief and unofficial prerequisites guide to setup, configure and test accessing virtual apps and desktops authenticated via SAML IdP (Google OAuth) powered by XenApp & XenDesktop 7.14.1+ and NetScaler Unified Gateway 11.1 prior to deploying a PoC, Pilot or Production environment by the author of this entry. The views, opinions and concepts expressed are those by the author of this entry only and do not necessarily conform to industry descriptions or leading best practises. The views expressed here are my own and do not necessarily reflect the views of Citrix.

Shortened Names
FEDERATED AUTHENTICATION SERVICE – fas
SECURITY ASSERTION MARKUP LANGUAGE – saml
IDENTITY PROVIDER – idp
SERVICE PROVIDER – sp
USER AGENT – ug
NETSCALER UNIFIED GATEWAY – nug or netscaler ug
XENAPP – xa
XENDESKTOP – xd
XENAPP/XENDESKTOP – xad
STOREFRONT – sf

What is OAuth?
Wikipedia definition – https://en.wikipedia.org/wiki/OAuth and Google’s definiton – https://developers.google.com/identity/protocols/OAuth2.

What is SAML?
Wikipedia definition – https://en.wikipedia.org/wiki/Security_Assertion_Markup_Language.

Why this blog article?
For me as organisations begin shifting to a Cloud native or Cloud First (i prefer hybrid cloud) stratergy they begin too embrace PaaS e.g Citrix Cloud, Office 365 BUT a common major problem is where does the users identity live and do I need replicate it (read-only, passwd hashes e.t.c) and secondly mobilising of data repositories is another major requirement vs. problem. ShareFile can help in solving your data mobilisation problems which I will follow up in a separate blog article in the future to expand upon this, but for now back to SAML and Identity.

Utilising the Federation Authentication Service or FAS for short which is part of XenApp and XenDesktop (see feature matrix – https://www.citrix.co.uk/products/xenapp-xendesktop/feature-matrix.html) in-line with NetScaler UG enables organisations to solve numerous problems about identity (where is lives vs. its synced to data centres A through C e.t.c) enabling access to any type of app fronted by NetScaler Unified Gateway working inline with FAS.

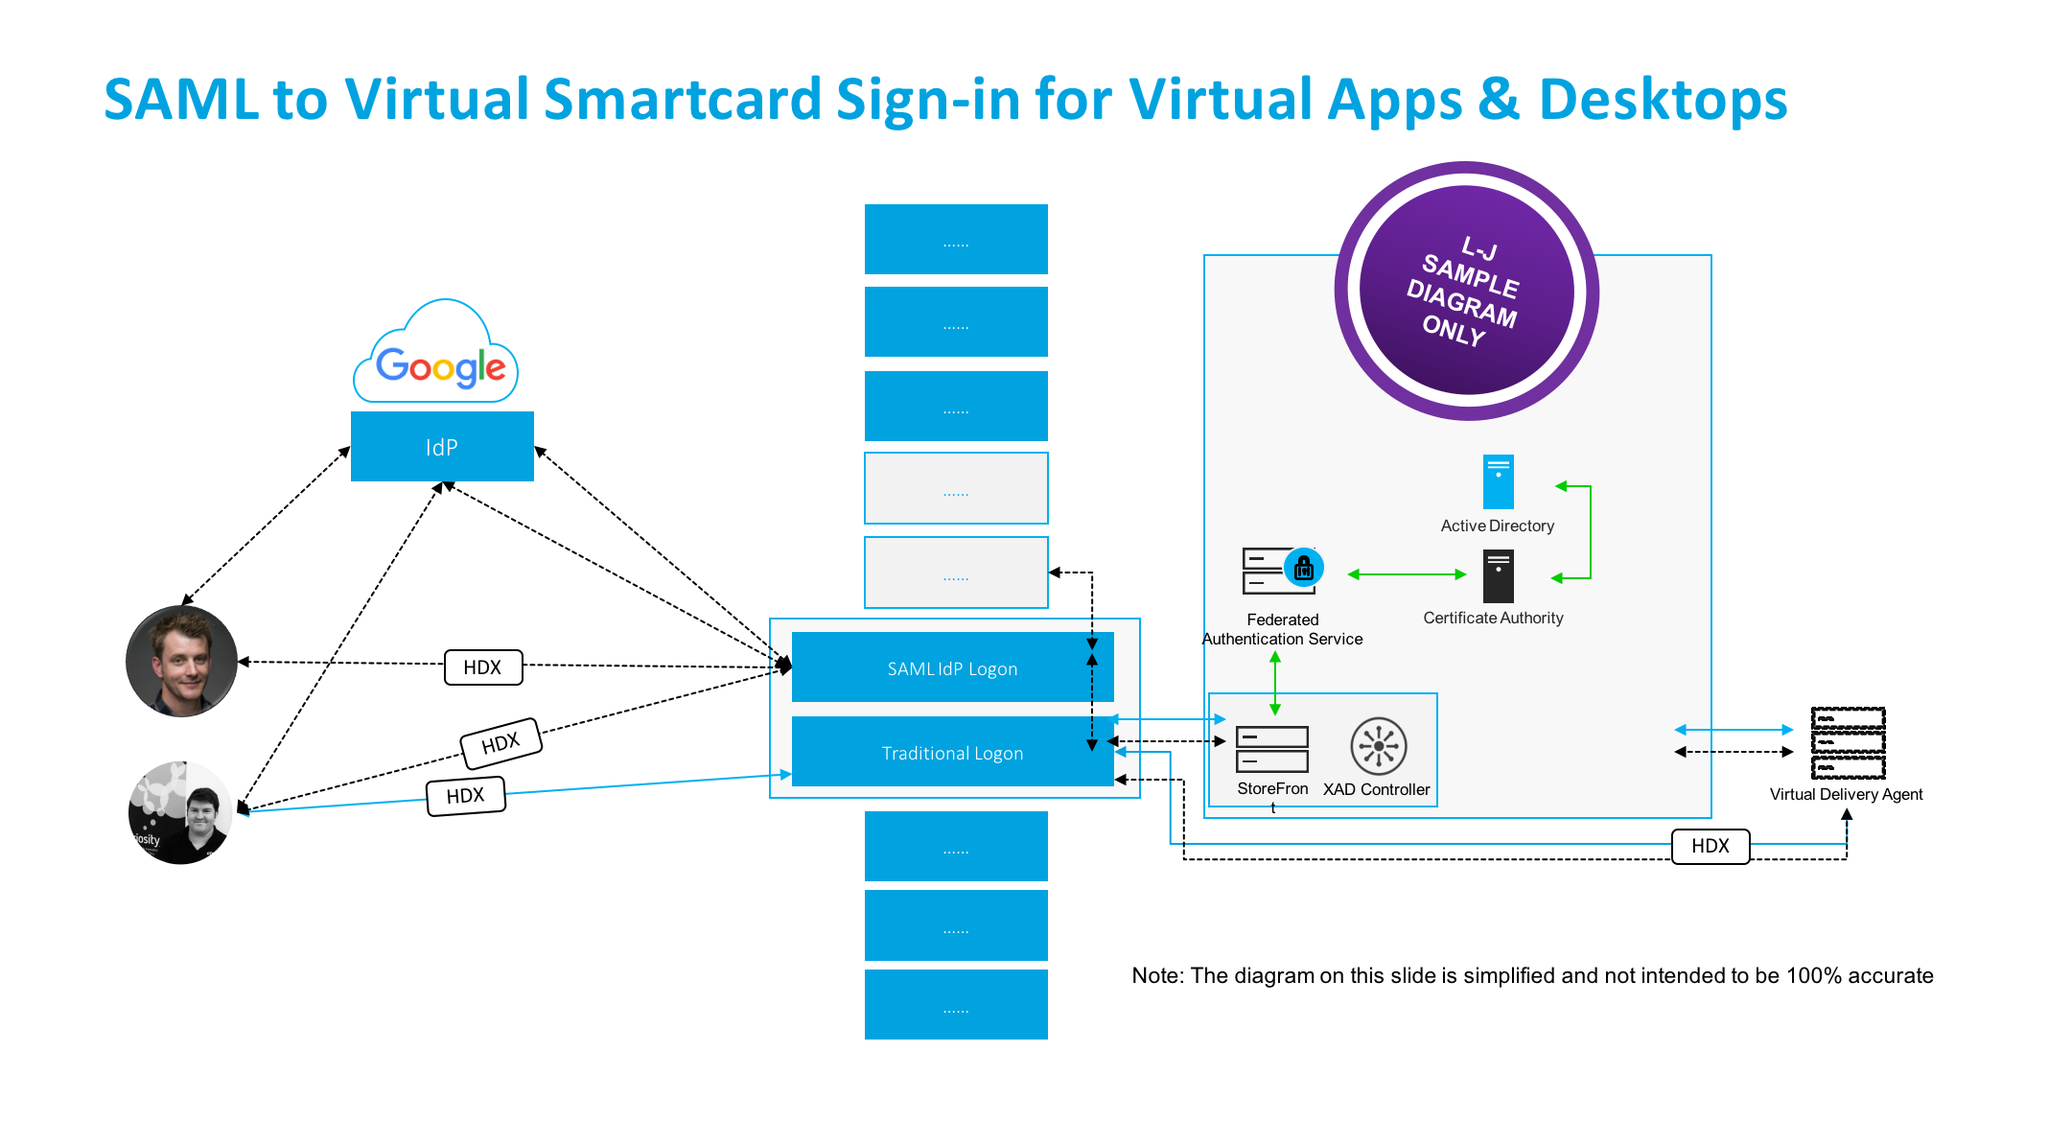
NetScaler for me is your organisations front door (knock knock) e.g https://go.axendec.com or if you know me #10 Downing Street from on any device and it controls how the users authenticates requirements e.g AD, AAD, SAML vs. OAuth 2.0, Biometrics (e.g VeridiumID watch – https://www.veridiumid.com/video-citrix-ready-partnerspeak-veridium/ which is Citrix Ready and be sure to check out https://www.veridiumid.com/biometric-authentication-technology/biometric-connectors/), however in this scenario i’ll focus on access from devices that support a modern web browser (HTML5) to keep it simple. The below table depicts a user that has successfully loaded onto NUG with SMAL vs. OAuth 2.0 credentials and they can go left towards SaaS web apps or right towards virtual apps & desktops where FAS + StoreFront + Int Windows CA will generate a virtual smart card from the SAML token passed from NetScaler to SSO onto the required resource e.g Windows Server 2016 virtual desktop.

SaaS NetScaler Unified Gateway Virtual Apps & Desktops
User logins with SAML credentials e.g AAD, Google OAuth 2.0
← SAML or OAuth 2.0 Token →
Office365 XenApp & XenDesktop,
StoreFront, FAS & Internal Windows CA

PoC SuGgEsTeD Architecture Diagram – BASIC
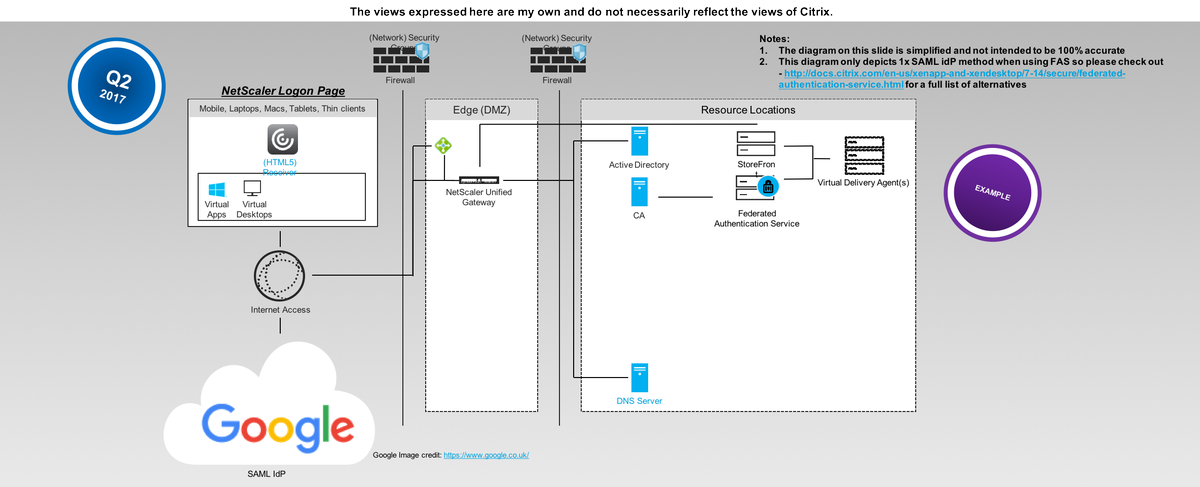
I have gone for a very simple diagram approach here to help those will little to no knowledge on SAML, OAuth 2.0, AD Shadow accts, virtual smart cards get up to speed.

User Login Flow (Not Step by Step its High Level)
1. The user navigates to the SAML IdP logon webpage setup, configured and hosted by NetScaler UG.
2. The user is automatically redirect to the Google auth login web page to authenticate.
3. Once the user is successfully authenticated at Google they are re-directed back to the NetScaler UG and auto signed in and auto redirected (Responder Policy) to the configured Unified Gateway (my use case here) or ICA Proxy vServer.
4. The user can then select from a choice of Full vs. Clientless VPN or Virtual Apps & Desktops (Selected). Note that in the username will be user@domain while still on the NetScaler UG.
5. The user is SSO onto ReceiverforWeb hosted + powered by StoreFront and the user selects to launch an there choosen HDX virtual app and or desktop(s), you’ll now notice that the username is now first, last name.
6. StoreFront initiates and generates a ICA/HDX file for the user while communicating with FAS + internal Windows CA to generate a virtual smart card for the user that will be used to SSO the user onto there requested resource(s) e.g a Virtual Desktop.
7. The user receives the ICA/HDX file and Receiver automatically launches his/her virtual app and or desktop.

Demonstration WhoamI?

PoC SuGgEsTeD Architecture Diagram – ADVANCED

The Actual Login Flow
Coming…*

Pre-requistes & System Requirements – Google OAuth 2.0
1. Navigate to https://console.developers.google.com/projectselector/apis/credentials and sign-in with your Google credentials.
2. Select “Credentials” under API Manager then select to “Create” a Project
3. Enter in a new “Project Name” and read and review Googles EULA and notification service about updates etc.
4. Google will create your Project
5. Select “Create credentials” and from the drop down select “OAuth client ID”
6. Configure “OAuth consent screen” the bare minimum is to select “Product name shown to users” e.g MYProJectName and then select “Save” you can return later and complete …
7. Now you need to create a client ID select the application type to be “Web Application”
Enter in a friendly name:
– For “Authorized JavaScript origins” enter in “:4443”
– https://YOUR-FQDN:4443
– For “Authorized redirect URIs” enter in “:4443”
– https://YOUR-FQDN:4443/oauth/login
– Select “Create” twice
Google will now create your OAuth credentials and a popup screen will appear with your “Client ID” e.g xnxnxnxnxnxnxnxnxnxnx.apps.googleusercontent.com and “Client Secret” e.g 123456789xnxnxn
8. Now store of copy of these for later in a safe please as you’ll need it for the NetScaler configuration later.

Pre-requistes & System Requirements – Citrix
NetScaler
1. Review the deploying NetScaler guide for your chosen resource location at – http://docs.citrix.com/en-us/netscaler/12/deploying-vpx.html. If your wondering what a Resource Location click this link – http://docs.citrix.com/en-us/citrix-cloud/overview/about/what-are-resource-locations.html.
2. Download vs. deploy your NetScaler virtual appliance on your own terms e.g upload and boot on a hypervisor vs. deployed via a IaaS market place.

– Traditional hypervisors configurations for PoC vs. Home purposes only 2vCPU 2-4GB of RAM
– Cloud hypervisors e.g Azure, AWS for PoC vs. Home purposes only 2vCPU 3.5GB or RAM

3. Licensing Your NetScaler
3.1 You’ll need to license the appliance so obtain trial of e.g VPX 1000 and or 3000 from http://store.citrix.com/store/citrix/en_US/pd/productID.278306700/ThemeID.33753000 or search for Citrix Eval Store at Google.com.
3.2 The above link should redirect your to the NetScaler ADC part of the Eval Store
3.4 Select model type of “VPX” then select variation e.g “1000 vs. 3000 Platinum” and for duration select “30, 60 or 90 Days“.
3.5 Complete the onscreen steps and please note that you will require a valid Citrix.com account or you need to create an account in order to complete the trial request to obtain the eval license.
3.6 Once you’ve received your eval license via email navigate to at https://www.citrix.com/account/toolbox/manage-licenses/allocate.html and select find and allocate your licenses or look for the licensing button (link) and select it.
3.7 If your eval license it not visible e.g created by a Citrix rep or one of our partners –https://www.citrix.com/buy/partnerlocator/ select “Don’t see your product?” top right-hand side (small text!). A pop-up appears now enter in the eval lic provided in the format of “NNNN-XXXXX-XXXXX-XXXXX-XXXXX” and select to continue.
3.8 You will need to enter in the Host Id of your NetScaler it can be found once logged in using the NS Admin Web UI “NetScaler -> System -> System Information” then look under the heading “Hardware Information” and you find “Host Id” copy and paste it into the required field and then download the license file.
3.9 In the NS Admin Web UI click the cog icon top right then select licensing and upload the license and select to reboot the NS to apply the license.
3.10 Your NetScaler is now licensed now simple enable the required features that you need vs. require by right clicking a feature e.g NetScaler Gateway select “enable” e.t.c

4. If your in a Public Cloud setup your (Network) Security Groups to allow you external traffic to your NetScaler and i’d suggest that your disable SSH on port 22 from the world and only enable https 443 and use a Windows server + PuTTY within your Azure RG vs. EC2 VPC to interact with your NetScaler. Note: I am keeping it simple here re DMZ/Edge vs. TRU vs. Mgmt networks. Traditional rules apply for Private Cloud setups or WWW vs. DMZ vs. TRU vs. Mgmt networks.

Federated Authentication Service (FAS)
1. Download FAS Software is part of the XAD 7.9+ ISO – https://www.citrix.co.uk/downloads/xenapp-and-xendesktop/ and select 7.15 LTSR
2.
System Requirements – http://docs.citrix.com/en-us/xenapp-and-xendesktop/7-13/secure/federated-authentication-service.html
3. Deploy GPO Policies – http://docs.citrix.com/en-us/xenapp-and-xendesktop/7-13/secure/federated-authentication-service.html#par_anchortitle_6ba9/
– List + Enable XAD Broker/Controller
– Enable in-session certificate support
4. Certificate Authority – http://docs.citrix.com/en-us/xenapp-and-xendesktop/7-13/secure/federated-authentication-service.html#par_anchortitle_27dd. You may require or choose an Internal Microsoft Windows CA 2012 R2 or 2016 (Test with in this PoC)
Active Directory Certificate Services – https://technet.microsoft.com/en-us/library/hh831740.aspx
– Configuring Windows for Certificate Logon – http://support.citrix.com/article/CTX206156
– Setup Certificate Authority – http://docs.citrix.com/en-us/xenapp-and-xendesktop/7-13/secure/federated-authentication-service.html#par_anchortitle_8dfa
5. VERY IMPORTSANT When Configuring User Rules for FAS list all the required StoreFront Servers, VDA’s and User(s) either by individual object or group e.g. AD Security group PoC SAML Users – http://docs.citrix.com/en-us/xenapp-and-xendesktop/7-13/secure/federated-authentication-service.html#par_anchortitle_6ba3
6. Enable FAS for the default or custom Store on StoreFront – http://docs.citrix.com/en-us/xenapp-and-xendesktop/7-13/secure/federated-authentication-service.html#par_anchortitle_32e2
7. A full AD Admin account for all components will help and save time during the PoC

Deploying @gmail login to NetScaler using OAuth 2.0 / SAML
Coming….

Recommended Reading
– Credit to Citrix *CTP Dave Brett – http://bretty.me.uk/citrix-xendesktop-7-9-google-accounts-and-fas-for-xendesktop/ and I’d strongly recommend your read his blog post! His approach vs. requirements differs slightly from that of my own requirements. He saved me a lot of time and in testing + reading through eDocs so @dbretty thank you!
– Configure StoreFront with OKTA (CTX232042) – https://support.citrix.com/article/CTX232042
Integrating NetScaler with Microsoft Azure Active Directory
– Credit to Citrix CTP Aaron Parker – Integrating Citrix NetScaler with Azure AD and Conditional Access


#CitrixPartnerLove
However in the *interim if your a Citrix Partner and you want to learn more and how to deploy this today! You can access the following on-demand entitled “SAML to Virtual Smartcard Sign-in for Virtual Apps & Desktops” at – http://enablement.citrix.com/library/items/1261 BUT you will require a valid Citrix partner login.