The following content is a brief and unofficial prerequisites guide to setup, configure and test accessing virtual apps and desktops authenticated via SAML IdP (Google OAuth) powered by XenApp & XenDesktop 7.14.1+ and NetScaler Unified Gateway 11.1 prior to deploying a PoC, Pilot or Production environment by the author of this entry. The views, opinions and concepts expressed are those by the author of this entry only and do not necessarily conform to industry descriptions or leading best practises. The views expressed here are my own and do not necessarily reflect the views of Citrix.
Shortened Names
FEDERATED AUTHENTICATION SERVICE – fas
SECURITY ASSERTION MARKUP LANGUAGE – saml
IDENTITY PROVIDER – idp
SERVICE PROVIDER – sp
USER AGENT – ug
NETSCALER UNIFIED GATEWAY – nug or netscaler ug
XENAPP – xa
XENDESKTOP – xd
XENAPP/XENDESKTOP – xad
STOREFRONT – sf
What is OAuth?
Wikipedia definition – https://en.wikipedia.org/wiki/OAuth and Google’s definiton – https://developers.google.com/identity/protocols/OAuth2.
What is SAML?
Wikipedia definition – https://en.wikipedia.org/wiki/Security_Assertion_Markup_Language.
Why this blog article?
For me as organisations begin shifting to a Cloud native or Cloud First (i prefer hybrid cloud) stratergy they begin too embrace PaaS e.g Citrix Cloud, Office 365 BUT a common major problem is where does the users identity live and do I need replicate it (read-only, passwd hashes e.t.c) and secondly mobilising of data repositories is another major requirement vs. problem. ShareFile can help in solving your data mobilisation problems which I will follow up in a separate blog article in the future to expand upon this, but for now back to SAML and Identity.
Utilising the Federation Authentication Service or FAS for short which is part of XenApp and XenDesktop (see feature matrix – https://www.citrix.co.uk/products/xenapp-xendesktop/feature-matrix.html) in-line with NetScaler UG enables organisations to solve numerous problems about identity (where is lives vs. its synced to data centres A through C e.t.c) enabling access to any type of app fronted by NetScaler Unified Gateway working inline with FAS.
NetScaler for me is your organisations front door (knock knock) e.g https://go.axendec.com or if you know me #10 Downing Street from on any device and it controls how the users authenticates requirements e.g AD, AAD, SAML vs. OAuth 2.0, Biometrics (e.g VeridiumID watch – https://www.veridiumid.com/video-citrix-ready-partnerspeak-veridium/ which is Citrix Ready and be sure to check out https://www.veridiumid.com/biometric-authentication-technology/biometric-connectors/), however in this scenario i’ll focus on access from devices that support a modern web browser (HTML5) to keep it simple. The below table depicts a user that has successfully loaded onto NUG with SMAL vs. OAuth 2.0 credentials and they can go left towards SaaS web apps or right towards virtual apps & desktops where FAS + StoreFront + Int Windows CA will generate a virtual smart card from the SAML token passed from NetScaler to SSO onto the required resource e.g Windows Server 2016 virtual desktop.
| SaaS |
NetScaler Unified Gateway |
Virtual Apps & Desktops |
|
User logins with SAML credentials e.g AAD, Google OAuth 2.0 |
|
|
← SAML or OAuth 2.0 Token → |
|
| Office365 |
|
XenApp & XenDesktop,
StoreFront, FAS & Internal Windows CA |
PoC SuGgEsTeD Architecture Diagram – BASIC
I have gone for a very simple diagram approach here to help those will little to no knowledge on SAML, OAuth 2.0, AD Shadow accts, virtual smart cards get up to speed.
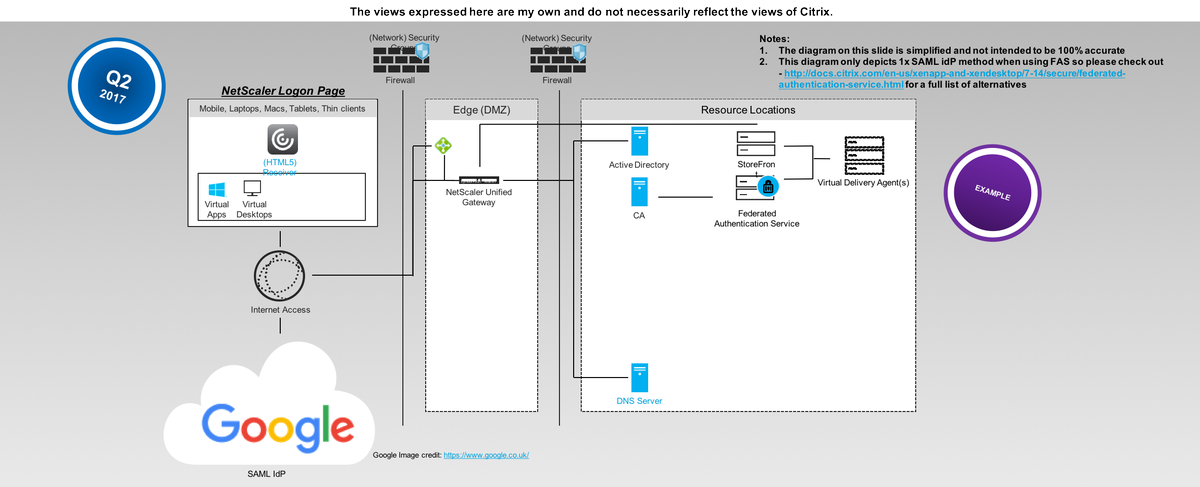
User Login Flow (Not Step by Step its High Level)
1. The user navigates to the SAML IdP logon webpage setup, configured and hosted by NetScaler UG.
2. The user is automatically redirect to the Google auth login web page to authenticate.
3. Once the user is successfully authenticated at Google they are re-directed back to the NetScaler UG and auto signed in and auto redirected (Responder Policy) to the configured Unified Gateway (my use case here) or ICA Proxy vServer.
4. The user can then select from a choice of Full vs. Clientless VPN or Virtual Apps & Desktops (Selected). Note that in the username will be user@domain while still on the NetScaler UG.
5. The user is SSO onto ReceiverforWeb hosted + powered by StoreFront and the user selects to launch an there choosen HDX virtual app and or desktop(s), you’ll now notice that the username is now first, last name.
6. StoreFront initiates and generates a ICA/HDX file for the user while communicating with FAS + internal Windows CA to generate a virtual smart card for the user that will be used to SSO the user onto there requested resource(s) e.g a Virtual Desktop.
7. The user receives the ICA/HDX file and Receiver automatically launches his/her virtual app and or desktop.
Demonstration WhoamI?
PoC SuGgEsTeD Architecture Diagram – ADVANCED
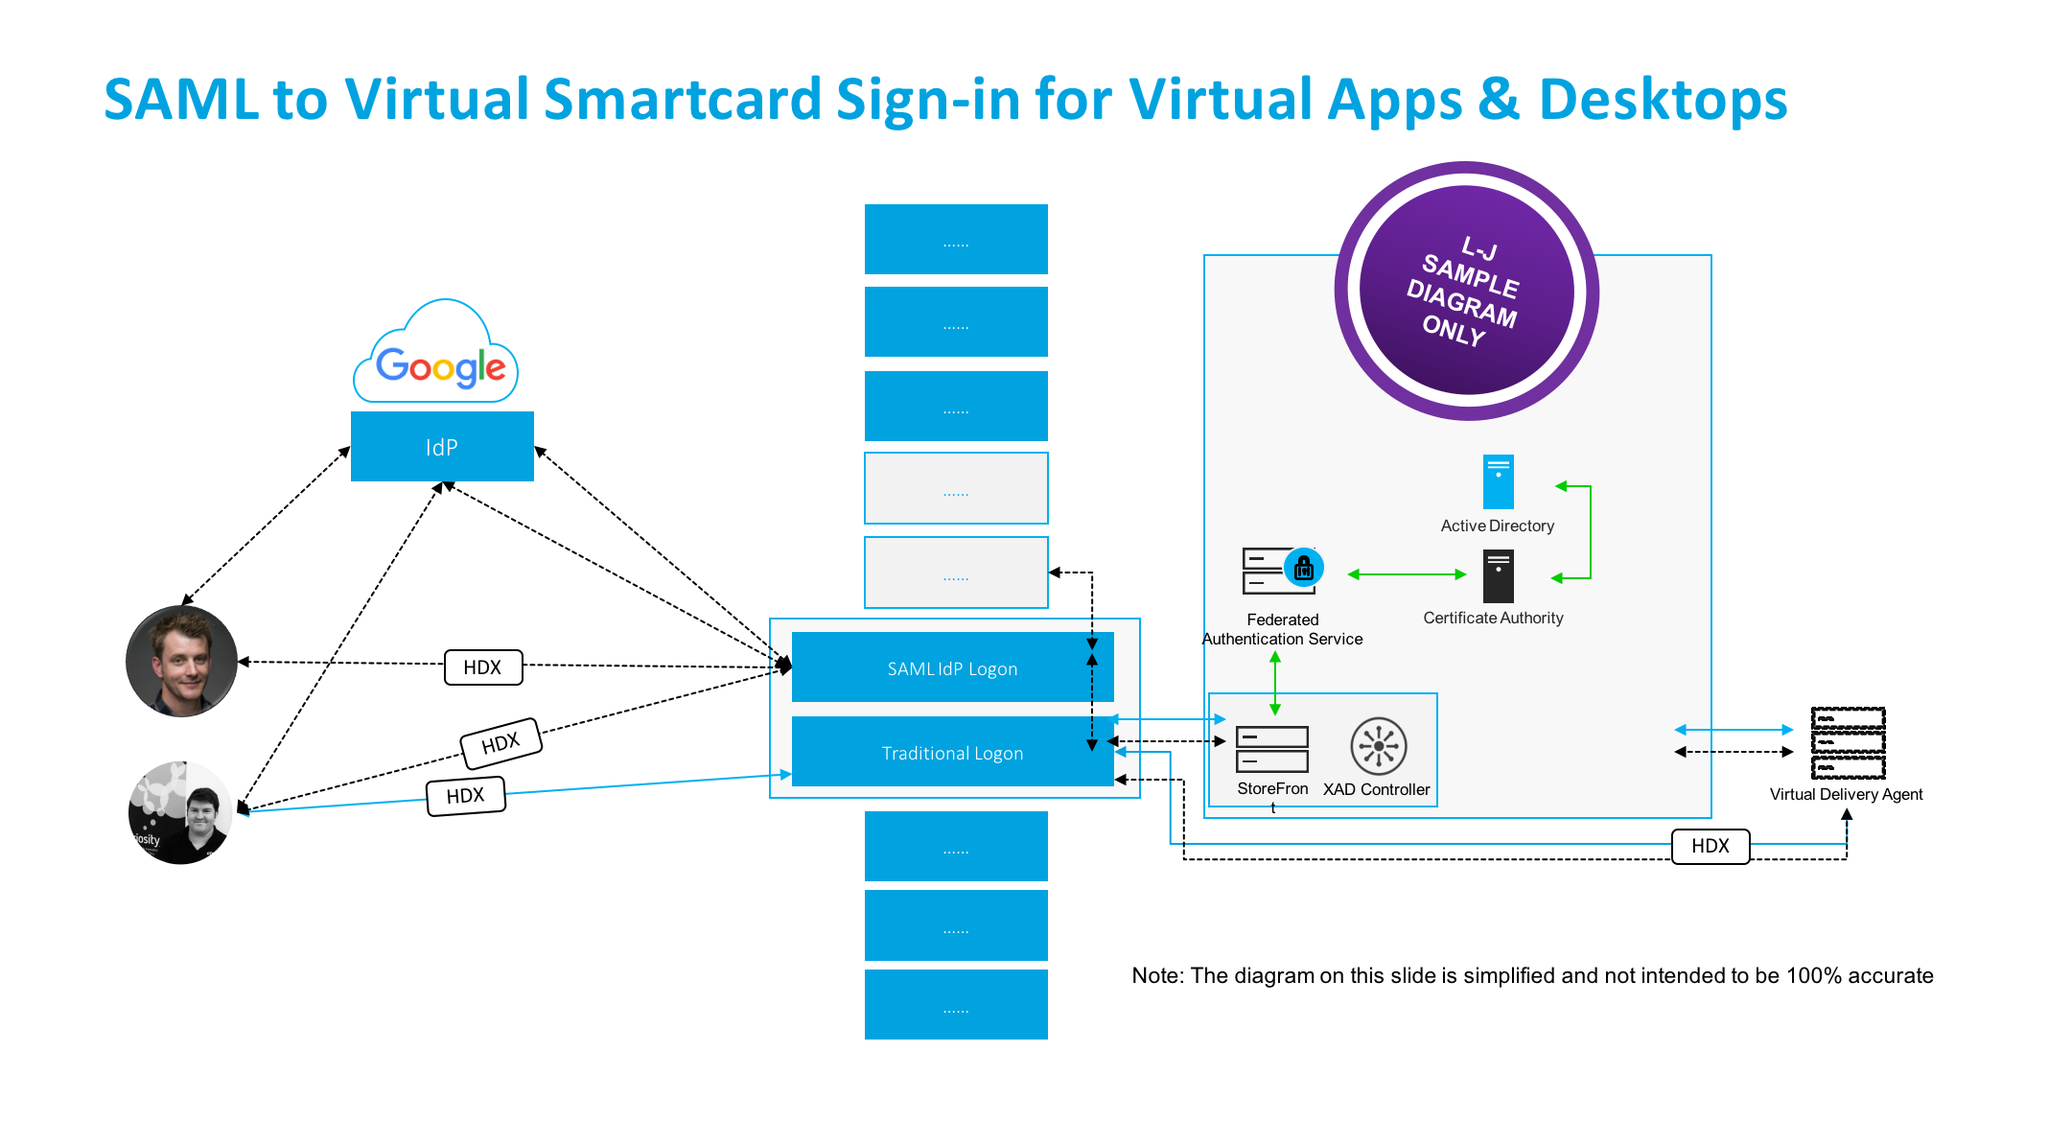
The Actual Login Flow
Coming…*
Pre-requistes & System Requirements – Google OAuth 2.0
1. Navigate to https://console.developers.google.com/projectselector/apis/credentials and sign-in with your Google credentials.
2. Select “Credentials” under API Manager then select to “Create” a Project
3. Enter in a new “Project Name” and read and review Googles EULA and notification service about updates etc.
4. Google will create your Project
5. Select “Create credentials” and from the drop down select “OAuth client ID”
6. Configure “OAuth consent screen” the bare minimum is to select “Product name shown to users” e.g MYProJectName and then select “Save” you can return later and complete …
7. Now you need to create a client ID select the application type to be “Web Application”
Enter in a friendly name:
– For “Authorized JavaScript origins” enter in “:4443”
– https://YOUR-FQDN:4443
– For “Authorized redirect URIs” enter in “:4443”
– https://YOUR-FQDN:4443/oauth/login
– Select “Create” twice
Google will now create your OAuth credentials and a popup screen will appear with your “Client ID” e.g xnxnxnxnxnxnxnxnxnxnx.apps.googleusercontent.com and “Client Secret” e.g 123456789xnxnxn
8. Now store of copy of these for later in a safe please as you’ll need it for the NetScaler configuration later.
Pre-requistes & System Requirements – Citrix
NetScaler
1. Review the deploying NetScaler guide for your chosen resource location at – http://docs.citrix.com/en-us/netscaler/12/deploying-vpx.html. If your wondering what a Resource Location click this link – http://docs.citrix.com/en-us/citrix-cloud/overview/about/what-are-resource-locations.html.
2. Download vs. deploy your NetScaler virtual appliance on your own terms e.g upload and boot on a hypervisor vs. deployed via a IaaS market place.
– Traditional hypervisors configurations for PoC vs. Home purposes only 2vCPU 2-4GB of RAM
– Cloud hypervisors e.g Azure, AWS for PoC vs. Home purposes only 2vCPU 3.5GB or RAM
3. Licensing Your NetScaler
3.1 You’ll need to license the appliance so obtain trial of e.g VPX 1000 and or 3000 from http://store.citrix.com/store/citrix/en_US/pd/productID.278306700/ThemeID.33753000 or search for Citrix Eval Store at Google.com.
3.2 The above link should redirect your to the NetScaler ADC part of the Eval Store
3.4 Select model type of “VPX” then select variation e.g “1000 vs. 3000 Platinum” and for duration select “30, 60 or 90 Days“.
3.5 Complete the onscreen steps and please note that you will require a valid Citrix.com account or you need to create an account in order to complete the trial request to obtain the eval license.
3.6 Once you’ve received your eval license via email navigate to at https://www.citrix.com/account/toolbox/manage-licenses/allocate.html and select find and allocate your licenses or look for the licensing button (link) and select it.
3.7 If your eval license it not visible e.g created by a Citrix rep or one of our partners –https://www.citrix.com/buy/partnerlocator/ select “Don’t see your product?” top right-hand side (small text!). A pop-up appears now enter in the eval lic provided in the format of “NNNN-XXXXX-XXXXX-XXXXX-XXXXX” and select to continue.
3.8 You will need to enter in the Host Id of your NetScaler it can be found once logged in using the NS Admin Web UI “NetScaler -> System -> System Information” then look under the heading “Hardware Information” and you find “Host Id” copy and paste it into the required field and then download the license file.
3.9 In the NS Admin Web UI click the cog icon top right then select licensing and upload the license and select to reboot the NS to apply the license.
3.10 Your NetScaler is now licensed now simple enable the required features that you need vs. require by right clicking a feature e.g NetScaler Gateway select “enable” e.t.c
4. If your in a Public Cloud setup your (Network) Security Groups to allow you external traffic to your NetScaler and i’d suggest that your disable SSH on port 22 from the world and only enable https 443 and use a Windows server + PuTTY within your Azure RG vs. EC2 VPC to interact with your NetScaler. Note: I am keeping it simple here re DMZ/Edge vs. TRU vs. Mgmt networks. Traditional rules apply for Private Cloud setups or WWW vs. DMZ vs. TRU vs. Mgmt networks.
Federated Authentication Service (FAS)
1. Download FAS Software is part of the XAD 7.9+ ISO – https://www.citrix.co.uk/downloads/xenapp-and-xendesktop/ and select 7.15 LTSR
2.
System Requirements – http://docs.citrix.com/en-us/xenapp-and-xendesktop/7-13/secure/federated-authentication-service.html
3. Deploy GPO Policies – http://docs.citrix.com/en-us/xenapp-and-xendesktop/7-13/secure/federated-authentication-service.html#par_anchortitle_6ba9/
– List + Enable XAD Broker/Controller
– Enable in-session certificate support
4. Certificate Authority – http://docs.citrix.com/en-us/xenapp-and-xendesktop/7-13/secure/federated-authentication-service.html#par_anchortitle_27dd. You may require or choose an Internal Microsoft Windows CA 2012 R2 or 2016 (Test with in this PoC)
Active Directory Certificate Services – https://technet.microsoft.com/en-us/library/hh831740.aspx
– Configuring Windows for Certificate Logon – http://support.citrix.com/article/CTX206156
– Setup Certificate Authority – http://docs.citrix.com/en-us/xenapp-and-xendesktop/7-13/secure/federated-authentication-service.html#par_anchortitle_8dfa
5. VERY IMPORTSANT When Configuring User Rules for FAS list all the required StoreFront Servers, VDA’s and User(s) either by individual object or group e.g. AD Security group PoC SAML Users – http://docs.citrix.com/en-us/xenapp-and-xendesktop/7-13/secure/federated-authentication-service.html#par_anchortitle_6ba3
6. Enable FAS for the default or custom Store on StoreFront – http://docs.citrix.com/en-us/xenapp-and-xendesktop/7-13/secure/federated-authentication-service.html#par_anchortitle_32e2
7. A full AD Admin account for all components will help and save time during the PoC
Deploying @gmail login to NetScaler using OAuth 2.0 / SAML
Coming….
Recommended Reading
– Credit to Citrix *CTP Dave Brett – http://bretty.me.uk/citrix-xendesktop-7-9-google-accounts-and-fas-for-xendesktop/ and I’d strongly recommend your read his blog post! His approach vs. requirements differs slightly from that of my own requirements. He saved me a lot of time and in testing + reading through eDocs so @dbretty thank you!
– Configure StoreFront with OKTA (CTX232042) – https://support.citrix.com/article/CTX232042
– Integrating NetScaler with Microsoft Azure Active Directory
– Credit to Citrix CTP Aaron Parker – Integrating Citrix NetScaler with Azure AD and Conditional Access
#CitrixPartnerLove
However in the *interim if your a Citrix Partner and you want to learn more and how to deploy this today! You can access the following on-demand entitled “SAML to Virtual Smartcard Sign-in for Virtual Apps & Desktops” at – http://enablement.citrix.com/library/items/1261 BUT you will require a valid Citrix partner login.
