Category Archives: NetScaler Unified Gateway

Accelerate migrations to the Gateway Service

In recent article “Accelerate migrations to the CVAD Service” – http://axendatacentre.com/blog/2021/09/30/accelerate-migrations-to-the-cvad-service/ I explored and shared how to accelerate and migrate an on-premises Citrix Virtual Apps & Desktops (CVAD) environment to the CVAD Service from a field perspective working with customers in the City of Greater London – England. Often another prominent and common question rears its head how do I migrate to your Gateway Service, how does the Gateway Service differ from the a traditional Gateway physical or virtual appliance deployment strategy?

There are handful of migration strategy’s to moving to the Gateway Service from an on-premises Gateway V/A environment:

Start A-Fresh
If you have a IT team that is battling with the economics of time, restricted financial budget(s) for projects, doesn’t have the required Citrix ADC networking skill sets due to M&A activities or people movements e.t.c then reset and restart by standardising and unlocking the IT and Employee affordance of the Citrix Gateway Service which is a turn-key service in the Citrix Cloud Platform and enabled by default for any “New” Citrix Cloud RL’s out of the box.

Evaluate & Pivot
There are a handful of very important technology and business reasons why you would want to pause before exciting this strategy, before adopting the Gateway Service for the CVAD Service.

  1. Your existing Citrix ADC utilises the Unified Gateway capabilities e.g it supports SSO with modern authentication e.g Google OAuth, OKTA or ADD SAML to Web, SaaS, Intranet web apps, Clientless apps through a universal portal and delivered through the Citrix ADC. This strategy is likely the most complex to evaluate before you pivot to the Gateway Service and typically requires a workshop to understand how the ADC is been used, what if it wasn’t there and what other ADC functions and features are been utilised e.g EPA scanning – http://axendatacentre.com/blog/2016/11/14/setup-pre-authentication-endpoint-analysis-epa-policy-with-an-azure-netscaler-unified-gateway-11-x-n/ or your performing advanced load-balancing of internal web vs. apps servers to employees e.g Finance systems.
  2. Another is reasonable or sensible reason to pause and evaluate is if you are running a fleet of Citrix ADC V/A’s managed by Citrix Application Delivery Management (ADM) V/A on-premises BUT which is regularly feed and watered then migrating this ADM configuration to the ADM Service in the Citrix Cloud platform aides in reducing the IT administrative and technical debit of managing an on-premises control plane for Citrix ADC Networking while retaining the status quo of remaining as is but enabling smart and not harder administration.
  3. The final potential reason to pause could be that you deploy and run you’re own Regional e.g Northern Europe vs. GEO e.g EMEA vs. Global Point of Presence (POP) in which you deploy and manage your own Private DIY style Gateway POP fabric globally using different clouds providers for economical costs, employee experience to reduce latency or Hybrid Mulit-Cloud resiliency for Disaster Recovery (DR) and Business Continuity. In these scenarios understand could you shift the purely the Gateway (ICA Proxy) only functionality for secure remote access for CVAD workloads to the Gateway Service and leave the existing ADC + ADM deployment to load-balance, accelerate and protect web, app servers and SQL databases.

Automate & Migrate
Current existing Citrix ADC virtual appliances (V/A) are only utilising the Gateway functionality for ICA Proxy enabling secure remote access to apps and data anytime, anywhere on any device. This strategy considerably reduces CAPEX and OPEX expenditures over a contract term reducing costs licensing the V/A; Premium Hypervisor (Optional); VM Instance costs – (v)CPU, RAM and HDD (IaaS vs. Other Cloud); Complexity of IT logical costs e.g Identity and Access Management (IAM), IP traffic routing e.t.c. This strategy significantly reduces the IT administrative and technical debit through a smile and single “Toogle” per Citrix Cloud Resource Location (RL) – https://docs.citrix.com/en-us/citrix-gateway-service/support-for-citrix-virtual-apps-and-desktops.html#enable-the-citrix-gateway-service, by default now the Gateway Service is enabled for all “New” Citrix Cloud RL’s out of the box.

The views expressed here are my own and do not necessarily reflect the views of Citrix.
Building an IT Employee Experience Scorecard

Consider this an evergreen post as of 22/09/2020

Introduction
I smile consistently these days hearing how organisations are keeping the UK economic moving forward, pivoting day 1 of the UK COVID-19 lockdown to full-time frictionless secure remote flexible working styles with minimal IT effort + friction powered by Citrix technologies.

I hear many unconsidered benefits from my customers, examples include keeping businesses operating helping their customers and supporting them during the height of the lock down to leap frogging competitors gaining significant market share through to winning new business because operationally they where available and ready with a Citrix powered securely centralised hybrid multi-cloud delivery strategy, when backed with a robust and annually tested Business Continuity Plan (BCP) set them up for instance successful shifting from day one of the UK COVID-19 lockdown to full-time work from home without any major hiccups.

For organisations that weren’t fully Citrix and had a hybrid strategy achieved full work from home swiftly swell using one or more of the following strategies:

1. Many existing hybrid Citrix customers scaled up licensing and re-framed physical workstations sat in the office through Citrix Workspace app to employees now sat at home using a browser on a personal device at home. To the employee everything is where it should be within there virtual desktop, for many this has now fundamentally changed perceptions of why they need to sat in an office for 5 working days in a post COVID-19 non-lockdown world.
2. Scaling up CVAD usage by optimising existing workloads or unlocking dark capacity turned off and deallocated ready within the data centre wherever they choose that to be.
3. The most popular one was to extend into one or multiple public clouds (AWS, Azure) to supporting elastic Citrix Virtual Apps & Desktops (CVAD) workloads whilst remaining in control of public cloud cost economics utilising Citrix AutoScale – https://docs.citrix.com/en-us/citrix-virtual-apps-desktops-service/manage-deployment/autoscale.html which is part of the CVAD Service.

Finally organisations shifted to focusing on strengthening security within 1-2 weeks, implementing contextual device security powered by Citrix Smart Control and Smart Access technologies beyond IT non-managed devices, as not every employee could take a device home, they didn’t have a device they could use or they just didn’t have the physical space for it at home as you just don’t know your employees WFH requirements, needs and including @home personal circumstances behind closed doors.

In these many organisations hearing all these great stories I noticed a common theme reoccurring in lock down months 1-2. I have a percentage of employees and its all abeit random across the entire organisation encountering good vs. fair vs. poor experiences. Due to the random nature pin pointing the issue was a huge challenge as by the time IT investigated the problem it was largely self-resolved if by magic? My response have you heard about and or deployed and are running Citrix Application Delivery Management (ADM)? A resounding NO 95% of the time. The below diagram 1 visualises the traffic flow of where I am vs. where my delivered Citrix Virtual Desktop is run out of, it likewise can visualise to IT the overhaul traffic, load demand, security & infrastructure health status ref diagram 2.

Diagram 1

Not visualising the employees “Workspace” traffic flow, is where the value of Citrix and ANY Workspace solution is LOST in IT Service delivery. Citrix Application Delivery Management (ADM) is a key enabler in helping remediate employee experience issues, whilst providing a crucial IT Employee Experience Scorecard.” Lyndon-Jon Martin June 2020

The Business IT Value of Citrix ADM
A modern flexible platform with two unique halves much like our human brains with left vs. right hemispheres connected by a nervous system, however in this case ADM has analytical vs. management hemispheres providing fleet management with different roles vs. function; employee, security & infrastructure insights supported by a hybrid multi-cloud architectural strategy enabling less IT Ops friction and complexity on a daily basis. ADM’s centralised management + sense architecture provide simple and or advanced operational experience scorecards for auditors (PCI/DSS/ISO27001 with RBAC for read-only access), security + network teams, IT and Citrix System Administrators alike from a single framed lens who’s nervous system is connected to a hybrid multi-cloud fabric providing unconsidered insights and visibility into capacity, strengthened security posture through monitoring change control and config drifts incl automated fleet management which can be executed across multiple instances in ANY cloud simultaneously or on your own terms. ADM gives IT back the right level of “Control” enabling the less friction shifting workloads with true licensing flexibility + agility to the most commercially attractive vs. the most innovate cloud platform which suites IT and their business demands.

Diagram 2

Having had the privilege of working with world class engineers in the past helping a single customer to process a £1 million pounds per minute through a payment gateway beyond typical web, app traffic of a front door of there website. I learnt that you always require something that you as the MSP or your customer can “Control” in an ANY Cloud + Services architecture for Business Continuity Planning (BCP) and sound IT Operational excellence so you can make better decisions at pace from more accurate data insights visualised. Placing your “Eggs” aka IT Business platform into a single supplier framework even the most trusted IaaS provider and enforcing that your preferred IaaS region is properly fault tolerant and highly-available is equally expensive in cost and complexity much like on-premises, do not be fooled. The IT Complexity Index increases significantly when consuming for example IaaS native site recovery services to enable near to real-time failover in another region when your primary region experience’s an (planned) outage or degraded performance, these services help to keep-a-live those existing “Sticky” connections which will eventually complete a transaction of some kind e.g credit card donation.

I’m all for public cloud in fact two operating styles “Native” vs. “Managed” Public Clouds strategies. I’ve ran my personal lab in AWS EC2 since 2016, easily amortised £1000 over these past 4 years with plenty of cashflow free. Really? How? Having a strong background + experience in the MSP world on the edge of the City of London and working with “Managed” Public Clouds platform I began to respect + understand how all IaaS providers operate inclusive of the full lifecycle management of workloads + the data centre platform itself which is to not leave everything on like you do at home or in a traditional managed colocation data centre. In a native vs. managed IaaS world you’ll turn off and deallocate capacity if you don’t require it and scale it up as you equally require it with little to no friction. I’ve digressed enough back to the IT Employees Experience Scorecard.

A number of my customers have overcome that randomness or pockets of employees complaining about a poor experience post deploying Citrix ADM as the issue can now be identified and remediated pretty efficiently. The solution is simple, deploy and run Citrix ADM for up to a week continuing as is, no changes and then run a report similar to the above and in parallel visualise all those support cases from your service desk platform and marry up employee names and you’ll quickly notice a pattern forming between employees with poor experiences vs. support cases + the number of them.

I suggested to organisations survey those employees and ask them a few simple questions the best ones “Who is your home broadband provider?” and the second “How many devices are connected in the house to the internet and number of people?”. The first question revealed what I expected its the employees consumer ISP and the suggested remediation could well be provide them a “stipend” exclusively for mobile data onto personal contracts or ship them a 4G mobile hub/dongle to use instead and the problem vanishes over night almost every time and video conferencing platforms perform better as a net result equating to happier employees with a better experience.

The second question is about understanding what is happening within the home and as a result tweak or deploy a new HDX policy which again almost every time the employee experience was significantly improved. An example is switching out “Thinwire” – https://docs.citrix.com/en-us/citrix-virtual-apps-desktops/1912-ltsr/graphics/thinwire.html for “EDT” – https://docs.citrix.com/en-us/citrix-virtual-apps-desktops/1912-ltsr/technical-overview/hdx/adaptive-transport.html or visa versa. You can Optimise the “EDT” HDX protocol bandwidth over high latency connections – https://docs.citrix.com/en-us/citrix-virtual-apps-desktops/1912-ltsr/technical-overview/hdx/bandwidth-connections.html as its roots are entrenched from the “Framehawk” protocol which was originally engineered from the ground up to deliver a better experience with macro rising increases of spectral interference and multipath propagation, you can learn more about that by reading this article – https://docs.citrix.com/en-us/citrix-virtual-apps-desktops/1912-ltsr/graphics/framehawk.html. An important note you should be actively using the “EDT” protocol with or beyond 1912 LTSR if you want something like “Framehawk“.

Getting Started with Citrix Application Delivery Management (ADM)
It can be consumed as a Citrix Cloud Service – https://docs.citrix.com/en-us/citrix-application-delivery-management-service.html or you can deploy a customer owned and operated platform – https://docs.citrix.com/en-us/citrix-application-delivery-management-software/13.html.

The views expressed here are my own and do not necessarily reflect the views of Citrix.

How vs. where I worked from in 2018

I’m often asked why Citrix? The answer can be a simple vs. complex one, therefore I choose to demonstrate why Citrix through proactive evangelism by recording myself using my Citrix Workspace actively through-out the year, which initially began in 2016 and lead to the original How vs. where I worked from in 2017 video available at – https://twitter.com/lyndonjonmartin/status/949316537021812736.

The views expressed here are my own and do not necessarily reflect the views of Citrix.
Citrix Innovation Award Finalists for #CitrixSynergy 2018

Its that time of the year where you Citrix customers, partners can vote for your favourite Citrix Innovation Award Finalist.

This year see’s a great mixture of customers in different markets all leveraging Citrix technologies as the enabler for transformation within there organisations to embrace a new way of working or #ThisIsHowTheFutureWorks powered by Citrix Networking, Workspace and Security & Platform Analytics from https://www.cloud.com/.

I would encourage you to watch all three videos describing there journey before casting your vote as there is some really great innovation happening within these Citrix customers and if you want to get started visit https://www.citrix.com or https://www.cloud.com/ today.

Beazley from the UK – Insurance

Quote “A new mindset to work wherever I am, because I have the tools that Citrix provides and Beazley…” – @dalesteggles

Health Choice Network, US – Healthcare

WAGO, Germany – Engineering

All the very best to this years Finalists.

The views expressed here are my own and do not necessarily reflect the views of Citrix.

Session Watermarking for App & Desktop Security by Citrix XenApp & XenDesktop 7.17 or #CitrixCloud

The following content is a brief and unofficial prerequisites guide to setup, configure and deploy Session Watermark policy feature with the XenApp & XenDesktop Service (April 2018) or XenApp & XenDesktop 7.17 on-premises prior to deploying in a PoC, Pilot or Production environment by the author of this entry. The views, opinions and concepts expressed are those by the author of this entry only and do not necessarily conform to industry descriptions or leading best practises. The views expressed here are my own and do not necessarily reflect the views of Citrix.
Shortened Names
SECURITY – sec
NETSCALER – ns
NETSCALER GATEWAY SERVICE – nsg service
WINDOWS – win
XENAPP – xa
XENDESKTOP – xd
XENAPP/XENDESKTOP – xad

Introduction to “Session Watermark”
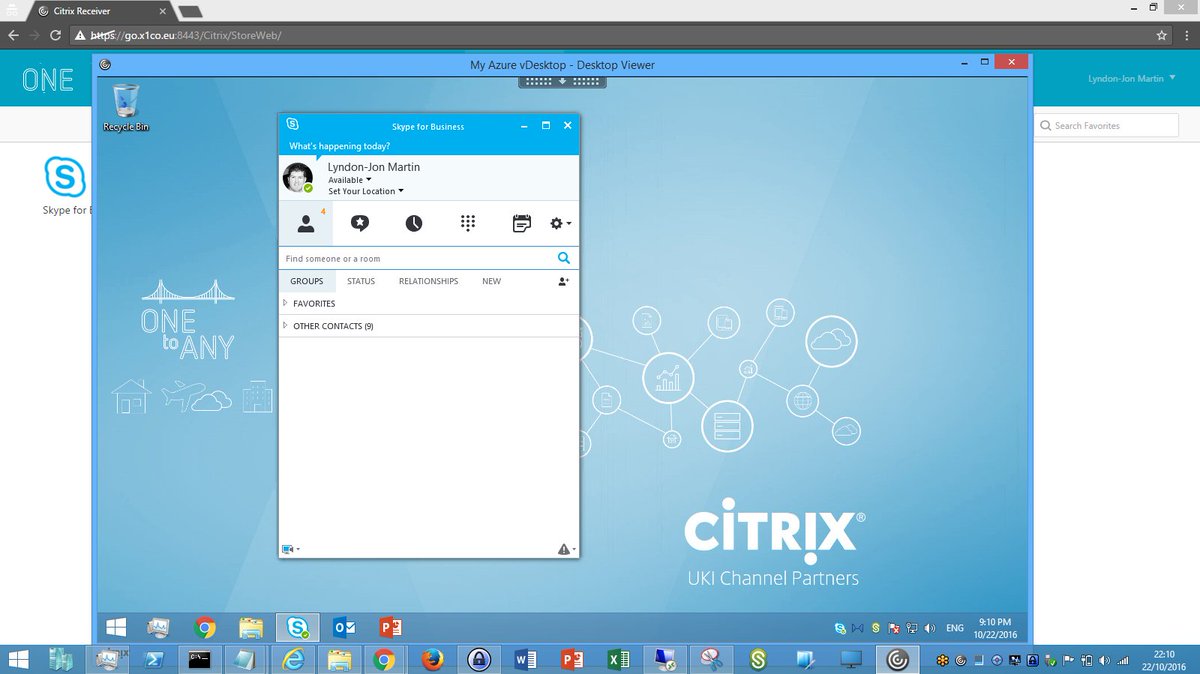
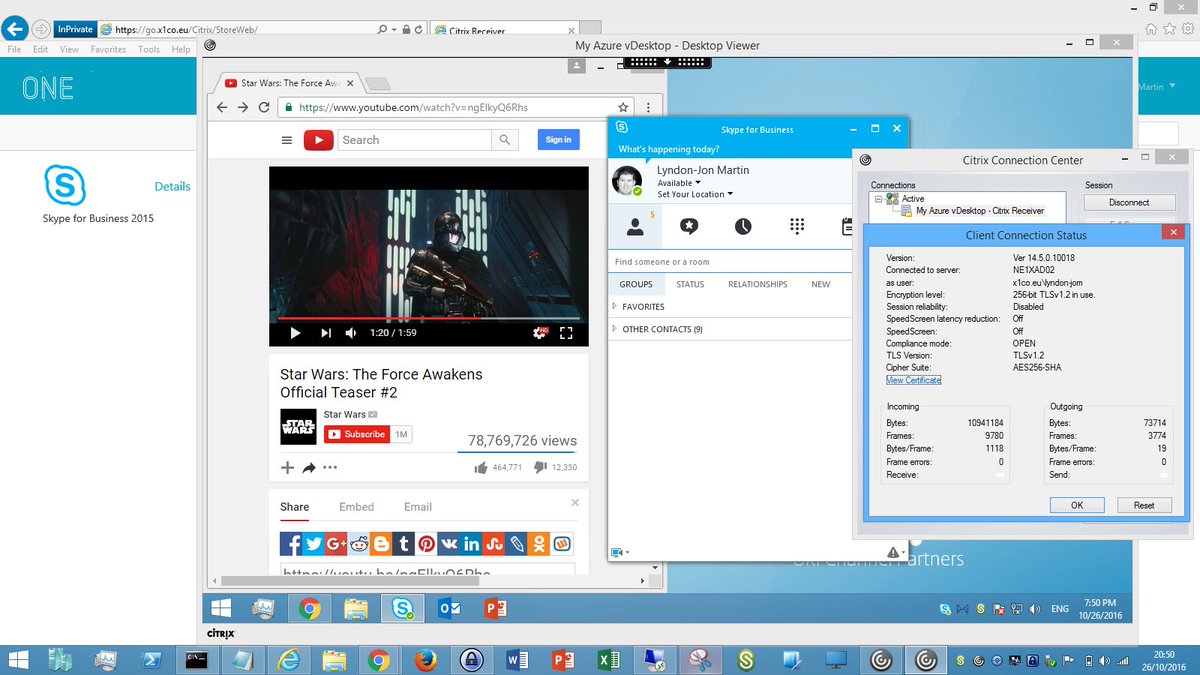
The latest release of the XenApp & XenDesktop Service powered by Citrix Cloud or if you are performing a private cloud (on-premises) upgrade or net new installation of XenApp & XenDesktop 7.17 has some NEW features (another post brewing) and one that I have been waiting on for quiet sometime now has not finally arrived (WAHOO!) and its VERY VERY simple to configure and aids in improving your security posture (I believe) for delivery of apps & desktops powered by Citrix against e.g IP theft. In the below tweet can you see it?

The above is from my initial tests using a Windows Server 2016 VM hosted in Azure Northern Europe region running the 7.17 VDA configured to my Citrite #CitrixCloud XenApp & XenDesktop Service so I did not need to upgrade anything to get this new SHINY cool feature yes I said it SHINY. All I was required to do was deploy a new Windows Server 2016 VM from the Azure marketplace, domain join it, install the VDA and connect it to my Cloud Connector and I was ready in less than 25 minutes from initially deploying the VM from the marketplace.

Finally on a personal note for me Citrix SysAdmins enabling the “Session Watermark” feature obviously initally tested in a safe environment e.g UAT with a few users from a couple of departments and then rolling it out into production (as when/how your ready) will be making IT the modern “App & Desktop Security Heroes“. IT can apply and configure these new policies to be the most right vs. relevant for your organisations security needs while not hindering the end-users Rich HD eXperience.

Session Watermark Policies
You have 8 watermarking policies to apply with the 9th one enabling this security capability or feature set with the following list of quirks, suggested policy configuration and more available at – https://docs.citrix.com/en-us/xenapp-and-xendesktop/current-release/policies/reference/ica-policy-settings/session-watermark-policy-setting.html.

Before we get started it is worth mentioning that this feature does add an overhead to the compute on the backend (VDA side) and therefore it is suggested to enable up to two water marking features or items. In my overview of this feature I will wont cover off the cost of implementing this security policy as there are multiple variables to consider e.g HDX Graphics Mode and associated policies to provide the right vs. relevant end-user experience vs. how many watermark items do I apply? I have begun testing so bare with me and I’ll publish my findings either on my personal blog here or on https://www.mycugc.org under the “Expert Insights” area.

Enable session watermark
By default this feature is DISABLED as the default behaviour which I believe is the right approach considering its Citrix’s initial release of this #security feature (in my personal view) and secondly online documentation at eDocs suggested recommendations it to enable NOT more than two watermark text items. Finally * indicates that this policy is DISABLED by default when Session Watermark is enabled.

Include client IP address
* This is the IP addr of the device connecting to the virtual app & desktop.

Include connection time
* Utilises the following format yyyy/mm/dd hh:mm to display the users initial connection time to there virtual app or desktop.

Include logon user name
ENABLED by default when you enable Session Watermark as a policy and uses the following format USERNAME@DOMAINNAME is most optimise for 20 characters or less otherwise truncation might occur of the users logon username.

Include VDA host name
ENABLED by default when you enable Session Watermark as a policy and provides the VDA hostname e.g ne1vad01

Include VDA IP address
* Provides the internal IP addr that corresponding the VDA’s hostname e.g ne1vad01 = 10.1.0.7

Session watermark style
ENABLED by default using “Multiple e.g displays five watermark labels” when you enable Session Watermark as a policy or you can configure “Single e.g displays a single watermark label in the centre of the session“. TIP switching to SINGLE and sticking to two watermark text items for me in my initial tests is a good starting policy however time will tell as I continue to test out this new feature and its capabilities with different HDX Graphics Modes and associated tweaks.

Watermark custom text
* A unicode maximum of 25 characters is supported if you exceed this limit it will be truncated.

Watermark transparency
ENABLED by default set to “17 out of 100” when you enable Session Watermark as a policy, personally I think setting it to just 1 is fine in my initial tests as you want it to be not so in your face to the end-users to be bluntly honest.

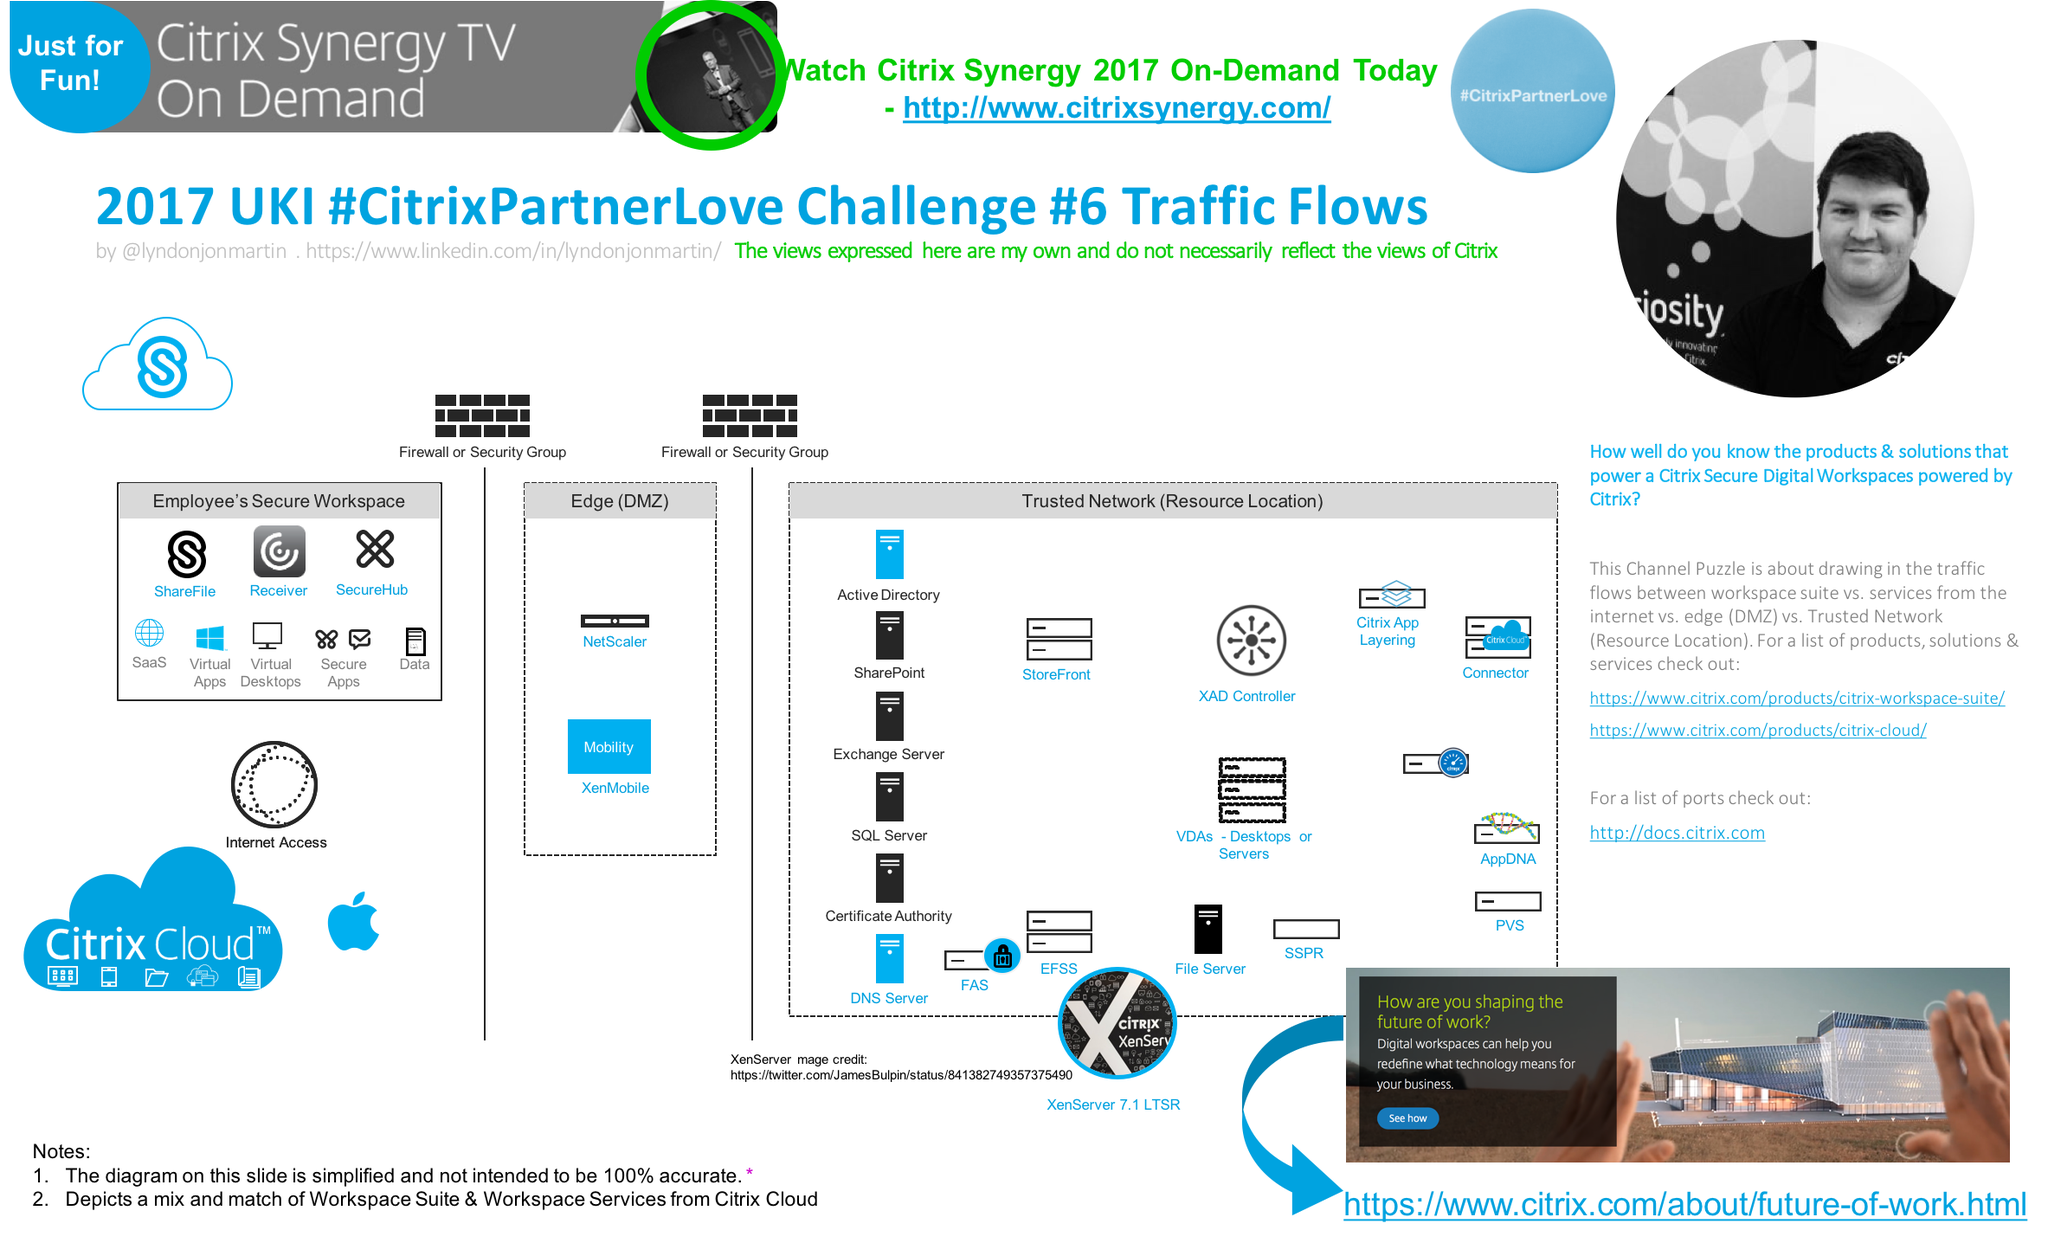
2017 UKI #CitrixPartnerLove Challenge #6 Traffic Flows

The views expressed here are my own and do not necessarily reflect the views of Citrix.
You can download the image at https://lnkd.in/dN74-97 to print.

My New Secure Workspace Ready in less than 15 min the #CitrixLife

The views expressed here are my own and do not necessarily reflect the views of Citrix.

Overview
Today I received my new Mac, yes I’ve decided to move from a PC to a Mac for various reasons (those whom know me are probably going really!?) but I still have a Windows 10 tablet PC which I use regually at home, but most importantly my Windows 10 Citrix issued virtual desktop powered by XenDesktop (Citrix on Citrix) follows me anywhere with Citrix Receiver or the HTML5 Citrix Receiver!

I didn’t even turn on my old PC I just started working within less than 15 min from my new MacBook connected to my Win10 VD via Receiver and i’ll just sort out what I need locally like Reflector, NAMP e.t.c over the weekend as its a busy week post our local partner event Citrix Partner Accelerator.

What Did I Do?
1. Unboxed my new Macbook
2. Plugged in the power and pushed the power button its been a while since I’ve heard that CHIME 🙂
3. Completed Apples on-boarding process including setting up iCloud including connecting to the Citrix employee Wi-Fi from our London, Paddington offices check it out at – https://twitter.com/CitrixUK/status/834742107055259650
4. Next I opened Safari and navigated to http://receiver.citrix.com and it auto detected for me that I am connecting from a Mac and presented me with a download link to Receiver for Mac 12.4.
5. Once downloaded I installed it simple!
6. Opened Citrix Receiver and i entered in my addr which then prompted me for my Citrix employee username, passwd and 2FA Token
7. BOOM Receiver synced all my virtual apps & desktops that I had previously selected on other device(s) within a few moments of signing in
8. I clicked on my Windows 10 Virtual Desktop powered by XenDesktop and my new mobile #SecureWorkspace is ready to go within less than 15 minutes!

What’s New in XenApp & XenDesktop 7.13

The following content is a brief and unofficial prerequisites guide to setup, configure and test delivering virtual apps and desktops powered by XenApp & XenDesktop 7.13 prior to deploying in a PoC, Pilot or Production environment by the author of this entry. The views, opinions and concepts expressed are those by the author of this entry only and do not necessarily conform to industry descriptions or best practises. The views expressed here are my own and do not necessarily reflect the views of Citrix.

Shortened Names
SECURITY ASSERTION MARKUP LANGUAGE – saml
LOCAL HOST CACHE – lhc
XENAPP – xa
XENDESKTOP – xd
XENAPP/XENDESKTOP – xad
WINDOWS – win
VIRTUAL DELIVERY AGENT – vda
HIGH DEFINITION EXPERIENCE – hdx
VIRTUAL DESKTOP – vd
CUSTOMER EXPERIENCE IMPROVEMENT PROGRAM – ceip
VIRTUAL APPS – va
DATA TRANSPORT LAYER – edt
FIREWALL – f/w
ACCESS CONTROL LISTS – acl
ADVANCED MICRO DEVICE – amd

What’s New
A full and complete list of what’s new is avaiable at – http://docs.citrix.com/en-us/xenapp-and-xendesktop/7-13/whats-new.html. I’ll start with one of my Citrix passions which is any and everything surrounding HDX technologies.

1. HDX Adaptive Transport is disabled by default in XAD 7.13* also referred to as EDT is a new HDX graphics mode that utilises both the UDP and TCP protocols with a fallback to TCP where UDP isn’t available. The HDX engineering team have engineered this new Citrix protocol called Enlightened Data Transport (EDT) which utilises the existing Citrix ports 1494 (ICA/HDX) and 2598 (Session Reliability) for both TCP and now new UDP so f/w ACL changes are near enough straight forward. To test this new graphics mode internally:

– Configure the ACL between your test end-point and through your internal network (over a VPN) VM running the 7.13 VDA to allow UDP and TCP for 1494, 2598
– Your test VM instance could be running in Azure (connected on-prem via a VPN) or on XenServer 7.1 and remember must be running the latest desktop or server VDA
– Your test end-point must be running the following min Citrix Receiver versions for Windows 4.7, Mac 12.4 and for iOS 7.2
– *In Studio create a machine catalogue, delivery group or use an existing one with your VDA upgraded from e.g 7.12 to 7.13 and then create a new HDX policy e.g HDX-TestofEDT and select the following HDX policy entitled “” and choose “Preferred“.

2. AMD Multiuser GPU (MxGPU e.g GPU Virtualization works with vSphere only) on the AMD FirePro S-series server cards for HDX 3D Pro workloads only e.g Desktop OSes ref – http://docs.citrix.com/en-us/xenapp-and-xendesktop/7-13/hdx/gpu-acceleration-desktop.html+ with support for up to 6 monitors, custom blanking & resolution, high frame rate and only GPU Pass-through is supported on the following hypervisors XenServer and Hyper-V. For further details please ref to the AMD website at – http://www.amd.com/en-us/solutions/professional/virtualization.

3. Intel Iris Pro (5-6th Gen Intel Xeon Processor E3) graphics processors supports H.264 h/w encoding for virtual apps & desktops, HDX 3D Pro support for up to 3x monitors (Ref to install options+), custom blanking & resolution, high frame rate. For further details and compatible Intel processors ref to – http://www.intel.com/content/www/us/en/servers/data-center-graphics.html

4. Other HDX enhancements include:

– Bidirectional content redirection – http://docs.citrix.com/en-us/xenapp-and-xendesktop/7-13/policies/reference/ica-policy-settings/bidirectional-content-redirection.html
– Wacom tablets improvements & connection methods – http://docs.citrix.com/en-us/xenapp-and-xendesktop/7-13/hdx/usb.html and also see http://docs.citrix.com/en-us/xenapp-and-xendesktop/7-13/policies/reference/ica-policy-settings/usb-devices-policy-settings.html
– File copying performance enhancements for client drive mapping

5. StoreFront 3.9 support for the following below and for a closer look check out the following CTX blog article – https://www.citrix.com/blogs/2017/02/24/whats-new-in-storefront-3-9/

– HDX Adaptive Display
– CEIP automatic enrollment by default. To disable please ref to http://docs.citrix.com/en-us/storefront/3-9/install-standard.html#par_anchortitle_8ea6
– Importing of NUG configurations (ZIP file or via PowerShell) into StoreFront to setup through the XAD Wizard using the latest NetScaler UG 11.1.51.21+ ref – http://docs.citrix.com/en-us/storefront/3-9/integrate-with-netscaler-and-netscaler-gateway/import-netscaler-gateway.html to reduce and avoid misconfigurations.
– Not new but if you’re looking to security harden your StoreFront standalone or cluster ref to – http://docs.citrix.com/en-us/storefront/3-9/secure.html
– SAML auth through against your preferred Store with NetScaler Unified Gateway configured as your IdP – http://docs.citrix.com/en-us/storefront/3-9/configure-authentication-and-delegation/configure-authentication-service.html#par_anchortitle_d712

5. The Connection Quality Indicator is not part of the XAD 7.13 release but an invaluable Citrix tool for Citrix SysAdmins check out its capabilities at – https://www.citrix.com/blogs/2017/02/22/citrix-connection-is-slow-not-really/ and you can download it from – https://support.citrix.com/article/CTX220774 and it also inclues group policies for better SysAdmin controls to enable or disable the tool which is supported from XAD 7.6 LTSR and upwards ref the CTX220774 article. The below image is taken from a Window 10 virtual desktop powered by XenDesktop 7.x.

6. Linux Seamless published applications from a Linux supported OS using the 7.13 VDA – http://docs.citrix.com/en-us/linux-virtual-delivery-agent/7-13/whats-new.html and also please read the publishing apps for Linux at – http://docs.citrix.com/en-us/linux-virtual-delivery-agent/1-4/suse/configuring/publish-apps.html for advanced tips and guidance on seamless mode vs. window manger configuration.
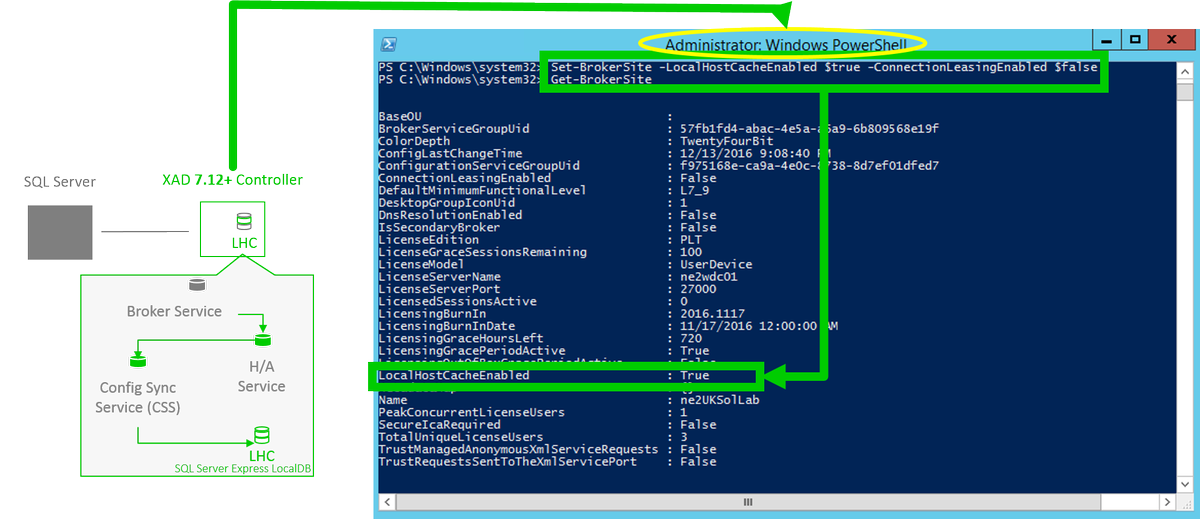
7. LHC in 7.13 introduces a new support feature for brokering operations for Citrix Cloud when the internet connection between the Citrix Cloud Connector and the Citrix Cloud control plane at – https://citrix.cloud.com/ is in a failed state or unavailable due to an ISP outage. You can also force an outage following the documentation available at – http://docs.citrix.com/en-us/xenapp-and-xendesktop/7-13/manage-deployment/local-host-cache.html++ by creating and manually modifying the following registry entry “HKLM\Software\Citrix\DesktopServer\LHC with entry of OutageModeForced” set to the value in the documentation++ to force an outage for testing and or evaluation purposes prior to implmenting Local Host Cache. I’ve embedded below a simple architectural recap of LHC introdcued in XAD 7.12 and you can read in more depth detail about Local Host Cache from a previous blog post available at – http://axendatacentre.com/blog/2016/12/13/whats-new-in-xenapp-xendesktop-7-12/.

Finally LHC still provides support for brokering operations for traditional XAD Controller Site Database on-prem ref ++. I’d also recommend that you watch this TechTalks To Go covering LHC in XAD 7.12 release.

8. Provisioning Services 7.13 now supports Linux streaming and a brand new caching technique only available and supported on XenServer 7.1 called PVS-Accelerator. Check the following YouTube video from Citrix entitled “Introducing PVS-Accelerator, only available with XenServer!” via https://twitter.com/juancitrix/status/835202277317148672.

9. HDX Thinwire enhancements in 7.13 have resulted in up to 60% bandwidth savings. Take a look at the following CTX blog post at – https://www.citrix.com/blogs/2017/01/11/hdx-next-cuts-bandwidth-by-up-to-60-yes-sixty-percent/ which has some great high level LoginVSI 4.1.6 graphics comparing Thinwire in 7.12 vs. 7.13 on Windows Server 2012 R2 and 2016.
10. AppDNA what’s new ref – http://docs.citrix.com/en-us/dna/7-13/whats-new.html now includes support for Windows 10 Anniversary Update (AU) and now defaultor analysis and reporting, Secure Web reports and finally improved importing to process to analysis OSes and apps. There are a few more to be sure to check out the whats news!

Deploying XenApp 7.13 for Evaluation & Testing Purposes
The fastest way to deploy and test the latest new features from Citrix XA 7.13 release with little to no effort is to deploy the “Citrix XenApp 7.13 Trial” from Microsoft Azure available and accessiable at – https://azuremarketplace.microsoft.com/en-us/marketplace/apps/citrix.citrix-xa?tab=Overview.

Removed from XenApp and XenDesktop 7.13
Please be sure to read and review the complete removed features and future removal features within XAD 7.x platform topics on Azure Classic, AppDisks, Desktop OS support and supported HDX Graphics Modes e.t.c –
https://docs.citrix.com/en-us/xenapp-and-xendesktop/7-13/whats-new/removed-features.html.

Viso Stencils from Citrix’s Ask the Architect – https://twitter.com/djfeller for XenApp and XenDesktop 7.13.


Image credit: https://twitter.com/djfeller/status/836557405173477376

https://virtualfeller.com/2017/02/28/visioxenappxendesktop713/

Top 10 Suggested Unified Experience Tips for Citrix Users 2016

The views expressed here are my own and do not necessarily reflect the views of Citrix.

Shortened Names
XENDESKTOP – xd
VIRTUAL DELIVERY AGENT – vda
HIGH DEFINITION EXPERIENCE – hdx
EXPERIENCE 1st – x1
XENAPP – xa
VIRTUAL DESKTOP – vd
THINWIRE COMPATIBLE MODE – tcm also known as ecm or thinwire+
SELF-SERVICE PASSWORD RESET – sspr
VIRTUAL GPU – vgpu
PROOF OF CONCEPT – poc

Suggested Top 10 for 2016
This is numbered 1 through 10 but in reality is in no particular order!

1. E-mail discovery for Citrix Receiver using DNS SRV records – http://docs.citrix.com/en-us/receiver/windows/4-3/receiver-windows-install-wrapper/receiver-windows-cfg-command-line-42.html internally and externally on the Gateway – http://docs.citrix.com/en-us/netscaler-gateway/10-1/ng-xa-xd-integration-edocs-landing/ng-clg-integration-wrapper-con/ng-clg-session-policies-overview-con/ng-clg-storefront-policies-con/ng-clg-storefront-email-discovery-tsk.html.
2. Implement SplitDNS or more technically correct “split-horizon DNS” – https://en.m.wikipedia.org/wiki/Split-horizon_DNS my favourite personally over email based discovery :-)!
3. Brand your NetScalers (Unified) Gateway – http://docs.citrix.com/en-us/netscaler-gateway/11-1/vpn-user-config/custom-portal.html and App Store (StoreFront) – http://docs.citrix.com/en-us/storefront/3-7/manage-citrix-receiver-for-web-site/unified-receiver-experience.html to match and keep it clear, clean and simple!

4. Implement HDX Adaptive Display v2 available in 7.11+ – http://docs.citrix.com/en-us/xenapp-and-xendesktop/7-11/policies/reference/ica-policy-settings/graphics-policy-settings.html as your default Graphics Mode and if you can’t then Thinwire Compatible Mode – http://docs.citrix.com/en-us/xenapp-and-xendesktop/7-11/hdx/thinwire.html.

5. If using Skype for Business 2015 or 2016 implement the HDX RealTime Optimisation Pack 2.x.n http://docs.citrix.com/en-us/hdx-optimization/2-1/hdx-realtime-optimization-pack-overview.html to offload the video/audio to the local end-points (Windows, Mac and Linux) saving on backend compute and density loss for XenApp.*

6. Implement domain pass-through for internal users – http://docs.citrix.com/en-us/storefront/3-7/plan/user-authentication.html.
7. Deploy the (latest) HTML5 Receiver for remote access – http://docs.citrix.com/en-us/receiver/html5/2-2/user-experience.html.

8. When using Citrix Receiver for Windows (with HDX engine 14.4), the GPU can be used for H.264 decoding wherever it is available at the client – http://docs.citrix.com/en-us/receiver/windows/4-5/improve.html.
9. Deploy Self-Service Password Reset (SSPR) – http://docs.citrix.com/en-us/self-service-password-reset/1-0.html.

10. The most difficult to justify probably re the cost(s) but assigning a low end vGPU GRID profile or utilising the Intel Iris Pro Graphics with XenServer 7 to provide enough/suitable GPU capacity to all virtual apps & desktops (oldISH and modern) provides a much better experience so setup a PoC to see and try if for yourself and finally NVidia now supports H.264 offloading onto there GRID Cards in 7.11 🙂 – http://docs.citrix.com/en-us/xenapp-and-xendesktop/7-11/whats-new.html#par_anchortitle_59c9.

Front XenApp 7.11+ in Azure with NetScaler (Unified) Gateway 11.x.n

The following content is a brief and unofficial overview of how-to front your virtual apps & desktops powered by XenApp 7.11 with NetScaler 11.x.n using Microsoft Azure (ARM). The views, opinions and concepts expressed are those by the author of this entry only and do not necessarily conform to industry descriptions, best practises. The views expressed here are my own and do not necessarily reflect the views of Citrix.

Shortened Names
XENAPP – xa
XENSERVER – xs
XENDESKTOP – xd
XENAPP/XENDESKTOP – xad
VIRTUAL DELIVERY AGENT – vda
HIGH DEFINITION EXPERIENCE – hdx
INDEPENDENT COMPUTING ARCHITECTURE – ica
NETSCALER – ns
NETSCALER UNIFIED GATEWAY – nsug
AZURE RESOURCE MANAGER – arm
IDENTITY ACCESS & MANAGEMENT – iam
MULTI-FACTOR AUTHENTICATION – mfa
SECURITY ASSERTION MARKUP LANGUAGE – saml

Why this Blog Article?
I’ve had a lot of cloud 1st strategy conversations with IT Pro’s, Citrix SysAdmins & organisations alike recently so I thought everyone whom is searching for how-to front XenApp with an Azure NetScaler could benefit from this blog post :-). This blog post covers a how-to even with NetScaler in single IP mode to achieving https://FQDN (Image 2) for the gateway vs. https://FQDN:8443 (Image 1) when deploying NetScaler in Azure (ARM).

Deploying NetScaler 11.x.n using Azure Resource Manager (ARM)
1. Login to https://portal.azure.com
2. I presume that you have setup a your network, IAM if not refer to https://azure.microsoft.com/en-gb/get-started/ for getting started how-to from Microsoft.
3. Click on + New in the top left of the ARM web ui and type in NetScaler and select NetScaler VPX Bring Your Own License or for a quick review check out – https://azure.microsoft.com/en-gb/marketplace/partners/citrix/netscalervpx110-6531/.
4. Click Create
5. Enter in a name for your NS virtual appliance e.g ne1nug01 and select the VM disk type
5. Enter in a username and choose auth to be either SSH public key or Password I choose password to access the NS Admin WebUI for simplicity of all readers of this blog.
6. Select your chosen of default Subscription if you have more than one and then select your existing Resource Group where you XenApp 7.11+ environment and XenApp 7.11+ VDA Workers and your mgmt. VM running AD/DNS server resides. Remember I am keeping this simple as it’s intended for PoC’s only!
7. Continue to select your chosen Azure instance for NetScaler I choose DS2_V2 Standard which consists of 2 Cores, 7GB of RAM.
8. Select your storage account, virtual network & subnet e.t.c and high availability set then click Select to continue.
9. Review your purchase of NetScaler and then click Ok to purchase and Azure will begin building your NetScaler VPX in your Azure chosen subscription which will take no more typically than 10 minutes.

Setting up & Licensing your NetScaler on Azure
Firstly be aware that when deploying a NetScaler instance on Azure for virtual apps & desktops you’ll be setting up NetScaler to run in single IP mode (YES!) which means that you’re connecting to internal TRU resources on the NetScalers IP addr (NSIP) but you connect using different ports e.g ICA Proxy on 8443 so lets begin with the setup.

1. Login into your NetScaler using the NS Admin Web UI do not provide a SubnetIP Addr (SNIP) just select Do It Later and proceed with the initial setup as per normal.
2. Now that you have setup your NetScaler you need to license it so remain logged into and open a new tab in your browser of choice and Google “Citrix Eval Store” or save this link – http://store.citrix.com/store/citrix/en_US/cat/ThemeID.33753000/categoryID.63401700
3. Select under Networking -> NetScaler ADC
4. Next select the following model “VPX” select variation e.g “Platinum 1000” select duration e.g “90 Days”.
5. Complete the onscreen process note that you will require a .Citrix.com account or you need to create an account.
6. Once you receive an e-mail with your key/code head over to at https://www.citrix.com/account/toolbox/manage-licenses/allocate.html or goto and select find and allocate your licenses or look for the licensing button (link) and select it.
7. If your key/code it not visible select “Don’t see your product?” in text in/around the top right-hand side. A pop-up appears now enter in the code provided on e-mail from the Citrix Eval Store e.g “CTX34-XXXXX-XXXXX-XXXXX-XXXXX” and continue.
8. You will need to enter in the Host Id of your NetScaler it can be found once logged in using the NS Admin Web UI “NetScaler -> System -> System Information” then look under the heading “Hardware Information” and you find “Host Id” copy and paste it into the required field and then download the license file.
9. In the NS Admin Web UI click the cog icon top right then select licensing and upload the license and select to reboot the NS to apply the license.
10. Log back in and enable the features that you require e.g right click on the “NetScaler Gateway” and select “enable” e.t.c

Setup Type Choice 8443 Default without an Azure L/B for XenApp using the XenApp/XenDesktop Wizard
Now that you have setup NetScaler within your Azure subscription in your chosen region you’re ready to begin setting up NetScaler to front virtual apps & desktops (Server OS 2012 R2 or 2016) powered by XenApp 7.11+.

Sample Text Based Diagram

User Azure NetScaler StoreFront XenApp
https://FQDN:8443/ Accepts requests from Azure to NSIP on https://8443 (Single IP Mode) Accepts requests on the Gateway & Call-back FQDN on https://FQDN:8443 Accepts & launches user’s virtual app(s) & desktop(s) as requested

1. Login to your NetScaler VPX click “Settings -> Licensing” now check that License type is Platinum and Model ID 1000
2. Select the XenApp/XenDesktop wizard and review the prerequisites carefully prior to continuing BUT in summary you’ll need an SSL Cert, LDAP service account + details, XenApp 7.11+ environment with StoreFront.
3. Enter in the static IP addr assigned by Azure or OTHER METHOD of your NetScaler VPX YES that’s right!
4. IMPORTANT STEP: Change the default port of 443 to 8443 on the Gateway IP addr
5. Set Up the rest of the XAD wizard as normal
6. IMPORTANT STEP: Setup StoreFront to allow remote access however the configured default gateway and Call-back FQDN addresses MUST include 8443 e.g https://go.x1co.eu:8443 instead of just https://go.x1co.eu
7. Setup external DNS entries e.g go.x1co.eu to point to your NetScalers static IP addr found in the Azure ARM Web UI and once you have verified it is functioning correctly using a shell (IPCONFIG /FLUSH after settin-up the DNS entries waiting 10-15 min depednant upon your ISP) the open up an internet browser and type in e.g https://go.x1co.eu:8443 and dont forget the :8443 at the end of the FQDN.
8. Attempt to login either using sAMAccountName e.g username or userPrincipalname e.g username@x1co.eu and then you should be able to successfully login and launch your virtual apps & desktop as per the below image.

Image 1


Setup Type 443 for XenApp using an Azure Load-Balancer & the NetScaler XenApp/XenDesktop Wizard

Sample Text Based Diagram

User Azure Azure Load-Balancer NetScaler StoreFront XenApp
https://FQDN/ https received request and forwarded to NetScaler on https://FQDN:8443

Accepts requests from Azure L/B on https://FQDN fwd to NSIP on https://8443 (Single IP Mode) Accepts requests on the Gateway from HTTPS://FQDN but the Call-back FQDN is on https://FQDN:8443 Accepts & launches user’s virtual app(s) & desktop(s) as requested
https://FQDN ↔ AzureL/B ↔ NetScaler:8443 NetScaler https://FQDN:8443 ↔https://FQDN StoreFront StoreFront Call-back https://FQDN:8443
StoreFront configured NetScaler Gateway https://FQDN

1. If you are choosing this option as your preferred lets hope then complete steps 1-5 and also step 7 to save you time!
2. IMPORTANT STEP: Setup StoreFront to allow remote access however the configured default gateway MUST BE e.g https://go.x1co.eu NOTICE NO :8433 YES not :8443 here. Now on the call-back FQDN addresses YOU MUST include 8443 e.g https://go.x1co.eu:8443 instead of just https://go.x1co.eu otherwise fronting NS with an Azure L/B to acheive HTTPS://FQDN for the XAD Gateway (ICA Proxy) will NOT WORK!!!!
3. Now switch to the Azure ARM Web UI. You should probably read the following useful resources – https://azure.microsoft.com/en-gb/documentation/articles/load-balancer-overview/ and for PowerShell creation check out – https://azure.microsoft.com/en-gb/documentation/articles/load-balancer-get-started-internet-arm-ps/ for any Citrix consultants out there.
4. Azure Load-balancer and click on the “+” at the top and provide a “Name” and for the type choose “Pubic” and select your Azure “Subscription” “Existing Resource Group” and its location (Same as NetScaler deployed instance) then click “Create”
5. Now it will list the available public IP addr just select the “+”
6. Enter in a name and choose your assignment choice “Dynamic” vs. “Static” and click OK.
7. Azure will then provision your Azure L/B (Wait….Maybe coffee or tea break?)
8. Once created select your Azure L/B
9. Select “Backend Pools” enter in a name then choose your availability set and then your VM’s or VM e.g NetScaler. Azure will then provision your Azure L/B with a backend pool (Wait….)
10. Select “Frontend IP Pool” click “+” enter in a name then choose your IP addr e.g NetScaler VM and then enter in a name (all names should differ makes identification easier so a good naming convention helps 🙂 now) and choose your assignment choice “Dynamic” vs. “Static” and click OK (Updating….)
11. IMPORTANT STEP: Select “Inbound NAT Rules” select the resource from your Frontend IP Pool list from the previous point (10). Select the service “HTTPS” and port to be 443 then select the target “NetScaler VM” and then vErY iMpOrtAnt select under “Port Mapping -> Custom” and in the “Target Port enter in 8443” and click save. (Wait…)
12: Now navigate to https://FQDN and attempt to login either using either sAMAccountName e.g username or userPrincipalname e.g username@x1co.eu and thereafter you should be able to successfully launch your virtual apps & desktop published by XenApp 7.11+. The below image represents the end goal when fronting an Azure NetScaler in Single IP Mode with an Azure Load-Balancer as per the below image.

NetScaler VPX in Azure Deployment Guide
http://docs.citrix.com/content/dam/docs/en-us/workspace-cloud/downloads/NetScaler-VPX-in-AZURE-Deployment-Guide.pdf

Advanced Setup & Configuration
The following how-to’s are from a 2016 Citrix Technology Advocates (CTA) – https://www.citrix.com/blogs/2016/05/23/expanding-recognition-for-community-contributors-citrix-technology-advocates/ Dave Bretty – http://bretty.me.uk/ which covers off how-to setup and configure FAS, NetScaler SAML/ADFS Proxy, Azure MFA and much more, so follow the links in order listed below.

1. http://bretty.me.uk/putting-it-all-together-citrix-xendesktop-adfs-azure-mfa-netscaler-unified-gateway-and-citrix-fas-part-1/
2. http://bretty.me.uk/putting-it-all-together-citrix-xendesktop-adfs-azure-mfa-netscaler-unified-gateway-and-citrix-fas-part-2/
3. http://bretty.me.uk/putting-it-all-together-citrix-xendesktop-adfs-azure-mfa-netscaler-unified-gateway-and-citrix-fas-part-3/
4. http://bretty.me.uk/putting-it-all-together-citrix-xendesktop-adfs-azure-mfa-netscaler-unified-gateway-and-citrix-fas-part-4/
5. http://bretty.me.uk/putting-it-all-together-citrix-xendesktop-adfs-azure-mfa-netscaler-unified-gateway-and-citrix-fas-part-5/
6. http://bretty.me.uk/putting-it-all-together-citrix-xendesktop-adfs-azure-mfa-netscaler-unified-gateway-and-citrix-fas-part-6/