Tag Archives: ICA Proxy

Deploying & Understanding the NetScaler Gateway Service from Citrix Cloud

The following content is a brief and unofficial prerequisites guide to better understand NetScaler Gateway Service from Citrix Cloud test delivering virtual apps and desktops powered by XenApp & XenDesktop Service prior to deploying in a PoC, Pilot or Production environment by the author of this entry. The views, opinions and concepts expressed are those by the author of this entry only and do not necessarily conform to industry descriptions or best practises. The views expressed here are my own and do not necessarily reflect the views of Citrix.

Shortened Names
NETSCALER GATEWAY SERVICE – nsg service or ngs
CITRIX CLOUD CONNECTOR – connector
NETSCALER – ns
HIGH-AVAILABILITY – h/a
XENAPP – xa
XENDESKTOP – xd
XENAPP/XENDESKTOP – xad
VIRTUAL DELIVERY AGENT – vda
HIGH DEFINITION EXPERIENCE – hdx
CITRIX CLOUD – cc
INFRASTRUCTURE AS A SERVICE – iaas
VIRTUAL APPLIANCE – vpx
USER EXPERIENCE – ux
ICA PROXY – hdx proxy

Introduction & Overview
The NetScaler Gateway Service is a simple, clean. effortless and but most importantly a powerful way to demonstrate the power of Citrix Cloud by providing secure remote access to your HDX virtual apps and desktops from your resources location over the internet (https) securely. While this service is very very powerful & simple to implement and use, you should under the keep in-mind that NS VPX/MPX/SDX is fully featured vs. the NSG Service which is focused on delivery of HDX virtual apps & desktops! So in summary when implementing service undering what is right vs. relevant for the customer needs and requirements is very important. Finally you can read more about the service and its benefits at https://www.citrix.com/products/citrix-cloud/services.html.

+Enabling the NetScaler Gateway Service
1. Login to https://citrix.cloud.com
2. Select to Manage your XAD Service which will take you to https://xenapp.cloud.com/.
3. Select from the drop down menu “Service Delivery” which is beneath the top menu item displayed “Service Creation
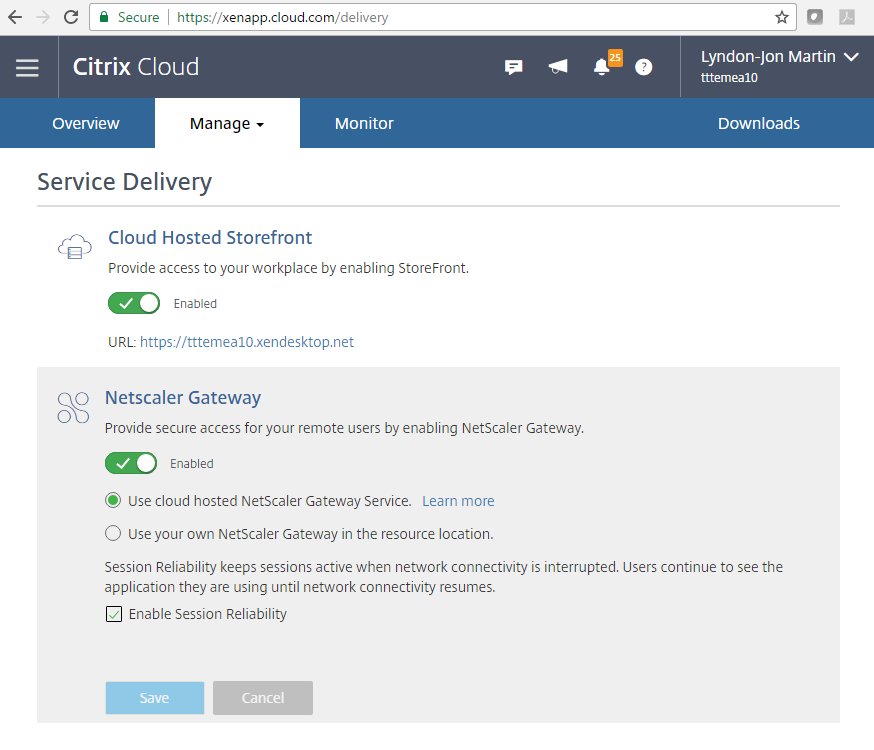
4. Now Select to toggle “ON” and choose to use the NSG service (preferred for blog article only) or your own NetScaler (Unified) Gateway at your resource location and if you enable to the NSG Service you can choose to check the session reliability (2598) checkbox.
The UX
Users connect to https://.xendesktop.net and then login using there AD UPN domain credentials e.g lyndon-jon@x1co.eu and the user’s credentials are encrypted through-out the login process. User’s can equally choose between using a full Citrix Receiver (HDX Optimisation Pack 2.x.n for offloading Skype for Business 2015-2016) vs. HTML5 Receiver (HTML5 compliant internet browser) experience by selecting their username in the top right hand corner and selecting to “Change Receiver” to their preferred choice of Receiver. It also important to set the correct +HDX Policy to get the best UX that is good and balanced (backend vs. network vs. client connected device) so I’d suggest that you implement HDX Adaptive Display v2 by selecting the following policy entitled “Use video codec for compression” and select the following option “For actively changing regions” and thereafter tweak the frame rate and adjust the Thinwire color depth support as described at http://docs.citrix.com/en-us/xenapp-and-xendesktop/7-12/whats-new.html#par_anchortitle_59c9 and you can also read more about benefits and a YouTUBE demostration on HDX Adaptive Display v2 at the following blog article I wrote in 2016 at – http://axendatacentre.com/blog/2016/10/01/foractivelychangingregions/.

HDX Traffic flow of the NSG Service
Please note that traffic flow is based upon the diagram avaiable at – http://docs.citrix.com/en-us/citrix-cloud/xenapp-and-xendesktop-service/netscaler-gateway-as-a-service.html as of Jan 2017.

1. User MUST login into cloud hosted StoreFront e.g https://.xendesktop.net. There credentials are securely handled please refer to – http://docs.citrix.com/en-us/citrix-cloud/xenapp-and-xendesktop-service/technical-security-overview.html to understand the traffic follow.
2. Once the user has authenticated successfully he/she can select to launch a virtual app or desktop.
3. User connects to the NSG Service powered by Citrix Cloud
4. Traffic is securely brokered to the Connector in your resource location that is severing up the user’s selected virtual app or desktop or both from the server or desktop VDA.

Tech Overview of the NSG Service
1. The Citrix Cloud NetScaler Cloud Gateway service on your Connector allows and provides the secure remote access feature of the NSG Service from your chosen resource location. I have written a blog article about the Connector services and leading best practises which you can read at – http://axendatacentre.com/blog/2017/01/27/understanding-the-citrix-cloud-its-services-architecture-connectors/.
2. To ensure high availability you should always deploy at a min a pair of Connectors within your resource location and increase the compute capacity of your Connectors as user demand increases initially and thereafter deploy another Connector based upon usage of service.
3. *To use the NSG Service you MUST configure to use the cloud-hosted StoreFront provided by Citrix Cloud under “Service Delivery” tab at https://xenapp.cloud.com/delivery.
4. The NSG Service only supports HDX Traffic only and the service is currently only available on Eastern, Western coasts within the USA and in Europe so for those users accessing virtual apps and desktops via the NSG Service outside of these geos or not in close proximity to an entry point will experience higher latency so tweak your HDX policy(s)+ accordingly or deploy a NS VPX in your resource location.
5. ICA files are STA signed the below example is a small snippet from my own PoC and testing*. I have also intentionally scrammed some of the unreliable text to :-).

Sample ICA file
My Azure vDesktop $S19-38]
Address=;40;CWSSTA;9D09CE5552BDE4581E888CD87EEEEFC
AutologonAllowed=ON
BrowserProtocol=HTTPonTCP
CGPSecurityTicket=On
ClearPassword=5FFE184444B0A0
ClientAudio=On
ConnectionBar=1
DesiredColor=8
DesiredHRES=4294967295
DesiredVRES=4294967295
DesktopRestartAllowed=1
Domain=\78034E8888586B61

The NSG Service currently does not support and or is limited as of writing this blog article in Jan 2017 and based upon the embedded Twitter image – http://docs.citrix.com/en-us/citrix-cloud/xenapp-and-xendesktop-service/netscaler-gateway-as-a-service.html. Finally please remember that Citrix Cloud is consistently been updated and upgraded with new feature so please please refer to the online documentation and the service overview of Citrix Cloud even a day after posting the blog article as it may become out of date! You’ve been warned!

6. No support for Unified experiences (e.g Branding with your logo, colour scheme).
7. No support for Two Factor Authentication.
8. No support for authentication via outbound proxies for access outside of the resource location over the internet.

Citrix Cloud – NetScaler Gateway Service (NGS) Offering
You can find out more about the NGS subscription options which is avaiable at – https://www.citrix.com/products/citrix-cloud/subscriptions.html#tab-41499 and the service overview at – https://www.citrix.com/products/citrix-cloud/services.html#tab-23235
Front XenApp 7.11+ in Azure with NetScaler (Unified) Gateway 11.x.n

The following content is a brief and unofficial overview of how-to front your virtual apps & desktops powered by XenApp 7.11 with NetScaler 11.x.n using Microsoft Azure (ARM). The views, opinions and concepts expressed are those by the author of this entry only and do not necessarily conform to industry descriptions, best practises. The views expressed here are my own and do not necessarily reflect the views of Citrix.

Shortened Names
XENAPP – xa
XENSERVER – xs
XENDESKTOP – xd
XENAPP/XENDESKTOP – xad
VIRTUAL DELIVERY AGENT – vda
HIGH DEFINITION EXPERIENCE – hdx
INDEPENDENT COMPUTING ARCHITECTURE – ica
NETSCALER – ns
NETSCALER UNIFIED GATEWAY – nsug
AZURE RESOURCE MANAGER – arm
IDENTITY ACCESS & MANAGEMENT – iam
MULTI-FACTOR AUTHENTICATION – mfa
SECURITY ASSERTION MARKUP LANGUAGE – saml

Why this Blog Article?
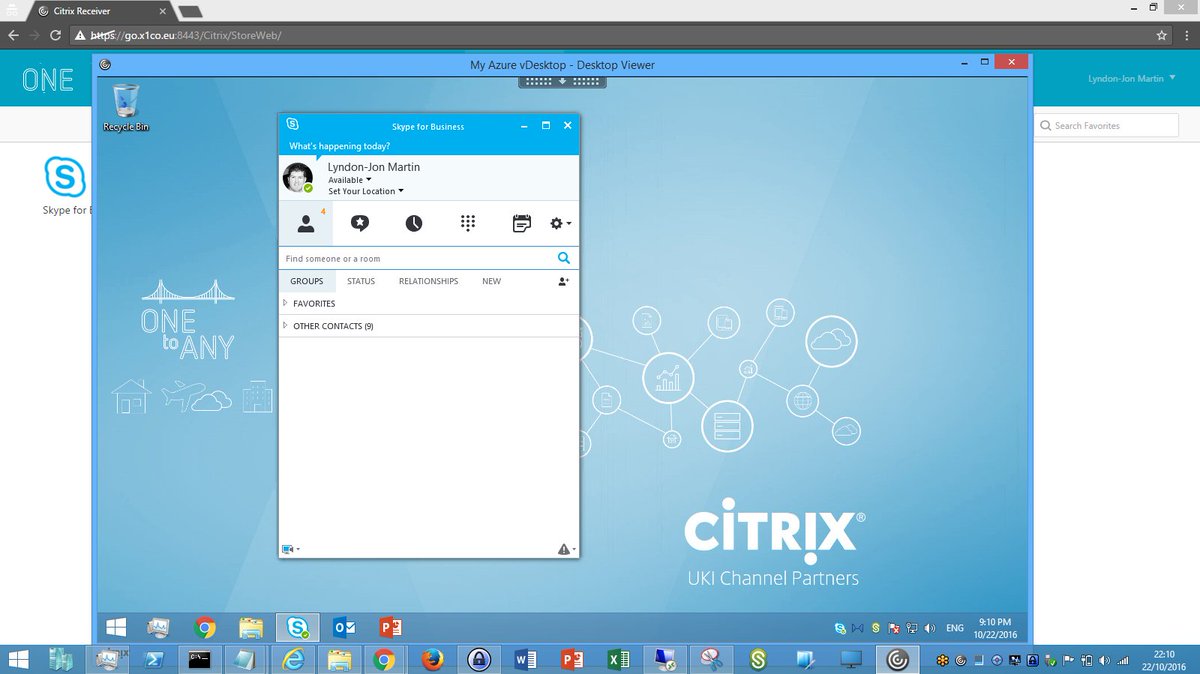
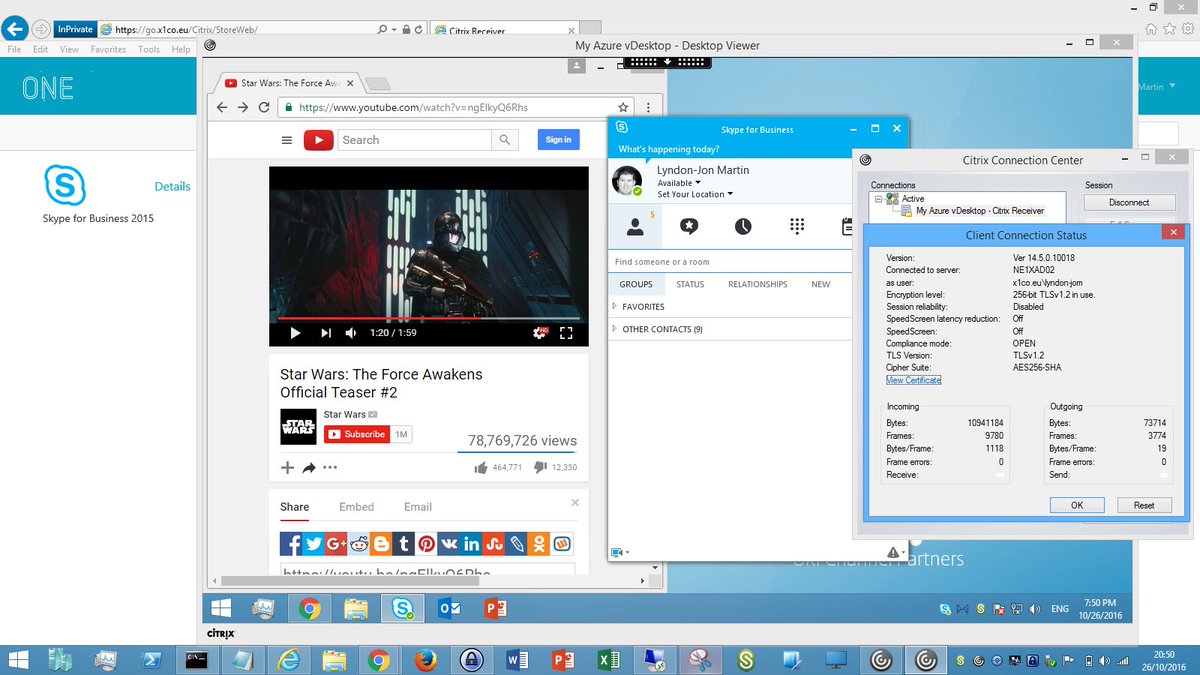
I’ve had a lot of cloud 1st strategy conversations with IT Pro’s, Citrix SysAdmins & organisations alike recently so I thought everyone whom is searching for how-to front XenApp with an Azure NetScaler could benefit from this blog post :-). This blog post covers a how-to even with NetScaler in single IP mode to achieving https://FQDN (Image 2) for the gateway vs. https://FQDN:8443 (Image 1) when deploying NetScaler in Azure (ARM).

Deploying NetScaler 11.x.n using Azure Resource Manager (ARM)
1. Login to https://portal.azure.com
2. I presume that you have setup a your network, IAM if not refer to https://azure.microsoft.com/en-gb/get-started/ for getting started how-to from Microsoft.
3. Click on + New in the top left of the ARM web ui and type in NetScaler and select NetScaler VPX Bring Your Own License or for a quick review check out – https://azure.microsoft.com/en-gb/marketplace/partners/citrix/netscalervpx110-6531/.
4. Click Create
5. Enter in a name for your NS virtual appliance e.g ne1nug01 and select the VM disk type
5. Enter in a username and choose auth to be either SSH public key or Password I choose password to access the NS Admin WebUI for simplicity of all readers of this blog.
6. Select your chosen of default Subscription if you have more than one and then select your existing Resource Group where you XenApp 7.11+ environment and XenApp 7.11+ VDA Workers and your mgmt. VM running AD/DNS server resides. Remember I am keeping this simple as it’s intended for PoC’s only!
7. Continue to select your chosen Azure instance for NetScaler I choose DS2_V2 Standard which consists of 2 Cores, 7GB of RAM.
8. Select your storage account, virtual network & subnet e.t.c and high availability set then click Select to continue.
9. Review your purchase of NetScaler and then click Ok to purchase and Azure will begin building your NetScaler VPX in your Azure chosen subscription which will take no more typically than 10 minutes.

Setting up & Licensing your NetScaler on Azure
Firstly be aware that when deploying a NetScaler instance on Azure for virtual apps & desktops you’ll be setting up NetScaler to run in single IP mode (YES!) which means that you’re connecting to internal TRU resources on the NetScalers IP addr (NSIP) but you connect using different ports e.g ICA Proxy on 8443 so lets begin with the setup.

1. Login into your NetScaler using the NS Admin Web UI do not provide a SubnetIP Addr (SNIP) just select Do It Later and proceed with the initial setup as per normal.
2. Now that you have setup your NetScaler you need to license it so remain logged into and open a new tab in your browser of choice and Google “Citrix Eval Store” or save this link – http://store.citrix.com/store/citrix/en_US/cat/ThemeID.33753000/categoryID.63401700
3. Select under Networking -> NetScaler ADC
4. Next select the following model “VPX” select variation e.g “Platinum 1000” select duration e.g “90 Days”.
5. Complete the onscreen process note that you will require a .Citrix.com account or you need to create an account.
6. Once you receive an e-mail with your key/code head over to at https://www.citrix.com/account/toolbox/manage-licenses/allocate.html or goto and select find and allocate your licenses or look for the licensing button (link) and select it.
7. If your key/code it not visible select “Don’t see your product?” in text in/around the top right-hand side. A pop-up appears now enter in the code provided on e-mail from the Citrix Eval Store e.g “CTX34-XXXXX-XXXXX-XXXXX-XXXXX” and continue.
8. You will need to enter in the Host Id of your NetScaler it can be found once logged in using the NS Admin Web UI “NetScaler -> System -> System Information” then look under the heading “Hardware Information” and you find “Host Id” copy and paste it into the required field and then download the license file.
9. In the NS Admin Web UI click the cog icon top right then select licensing and upload the license and select to reboot the NS to apply the license.
10. Log back in and enable the features that you require e.g right click on the “NetScaler Gateway” and select “enable” e.t.c

Setup Type Choice 8443 Default without an Azure L/B for XenApp using the XenApp/XenDesktop Wizard
Now that you have setup NetScaler within your Azure subscription in your chosen region you’re ready to begin setting up NetScaler to front virtual apps & desktops (Server OS 2012 R2 or 2016) powered by XenApp 7.11+.

Sample Text Based Diagram

User Azure NetScaler StoreFront XenApp
https://FQDN:8443/ Accepts requests from Azure to NSIP on https://8443 (Single IP Mode) Accepts requests on the Gateway & Call-back FQDN on https://FQDN:8443 Accepts & launches user’s virtual app(s) & desktop(s) as requested

1. Login to your NetScaler VPX click “Settings -> Licensing” now check that License type is Platinum and Model ID 1000
2. Select the XenApp/XenDesktop wizard and review the prerequisites carefully prior to continuing BUT in summary you’ll need an SSL Cert, LDAP service account + details, XenApp 7.11+ environment with StoreFront.
3. Enter in the static IP addr assigned by Azure or OTHER METHOD of your NetScaler VPX YES that’s right!
4. IMPORTANT STEP: Change the default port of 443 to 8443 on the Gateway IP addr
5. Set Up the rest of the XAD wizard as normal
6. IMPORTANT STEP: Setup StoreFront to allow remote access however the configured default gateway and Call-back FQDN addresses MUST include 8443 e.g https://go.x1co.eu:8443 instead of just https://go.x1co.eu
7. Setup external DNS entries e.g go.x1co.eu to point to your NetScalers static IP addr found in the Azure ARM Web UI and once you have verified it is functioning correctly using a shell (IPCONFIG /FLUSH after settin-up the DNS entries waiting 10-15 min depednant upon your ISP) the open up an internet browser and type in e.g https://go.x1co.eu:8443 and dont forget the :8443 at the end of the FQDN.
8. Attempt to login either using sAMAccountName e.g username or userPrincipalname e.g username@x1co.eu and then you should be able to successfully login and launch your virtual apps & desktop as per the below image.

Image 1


Setup Type 443 for XenApp using an Azure Load-Balancer & the NetScaler XenApp/XenDesktop Wizard

Sample Text Based Diagram

User Azure Azure Load-Balancer NetScaler StoreFront XenApp
https://FQDN/ https received request and forwarded to NetScaler on https://FQDN:8443

Accepts requests from Azure L/B on https://FQDN fwd to NSIP on https://8443 (Single IP Mode) Accepts requests on the Gateway from HTTPS://FQDN but the Call-back FQDN is on https://FQDN:8443 Accepts & launches user’s virtual app(s) & desktop(s) as requested
https://FQDN ↔ AzureL/B ↔ NetScaler:8443 NetScaler https://FQDN:8443 ↔https://FQDN StoreFront StoreFront Call-back https://FQDN:8443
StoreFront configured NetScaler Gateway https://FQDN

1. If you are choosing this option as your preferred lets hope then complete steps 1-5 and also step 7 to save you time!
2. IMPORTANT STEP: Setup StoreFront to allow remote access however the configured default gateway MUST BE e.g https://go.x1co.eu NOTICE NO :8433 YES not :8443 here. Now on the call-back FQDN addresses YOU MUST include 8443 e.g https://go.x1co.eu:8443 instead of just https://go.x1co.eu otherwise fronting NS with an Azure L/B to acheive HTTPS://FQDN for the XAD Gateway (ICA Proxy) will NOT WORK!!!!
3. Now switch to the Azure ARM Web UI. You should probably read the following useful resources – https://azure.microsoft.com/en-gb/documentation/articles/load-balancer-overview/ and for PowerShell creation check out – https://azure.microsoft.com/en-gb/documentation/articles/load-balancer-get-started-internet-arm-ps/ for any Citrix consultants out there.
4. Azure Load-balancer and click on the “+” at the top and provide a “Name” and for the type choose “Pubic” and select your Azure “Subscription” “Existing Resource Group” and its location (Same as NetScaler deployed instance) then click “Create”
5. Now it will list the available public IP addr just select the “+”
6. Enter in a name and choose your assignment choice “Dynamic” vs. “Static” and click OK.
7. Azure will then provision your Azure L/B (Wait….Maybe coffee or tea break?)
8. Once created select your Azure L/B
9. Select “Backend Pools” enter in a name then choose your availability set and then your VM’s or VM e.g NetScaler. Azure will then provision your Azure L/B with a backend pool (Wait….)
10. Select “Frontend IP Pool” click “+” enter in a name then choose your IP addr e.g NetScaler VM and then enter in a name (all names should differ makes identification easier so a good naming convention helps 🙂 now) and choose your assignment choice “Dynamic” vs. “Static” and click OK (Updating….)
11. IMPORTANT STEP: Select “Inbound NAT Rules” select the resource from your Frontend IP Pool list from the previous point (10). Select the service “HTTPS” and port to be 443 then select the target “NetScaler VM” and then vErY iMpOrtAnt select under “Port Mapping -> Custom” and in the “Target Port enter in 8443” and click save. (Wait…)
12: Now navigate to https://FQDN and attempt to login either using either sAMAccountName e.g username or userPrincipalname e.g username@x1co.eu and thereafter you should be able to successfully launch your virtual apps & desktop published by XenApp 7.11+. The below image represents the end goal when fronting an Azure NetScaler in Single IP Mode with an Azure Load-Balancer as per the below image.

NetScaler VPX in Azure Deployment Guide
http://docs.citrix.com/content/dam/docs/en-us/workspace-cloud/downloads/NetScaler-VPX-in-AZURE-Deployment-Guide.pdf

Advanced Setup & Configuration
The following how-to’s are from a 2016 Citrix Technology Advocates (CTA) – https://www.citrix.com/blogs/2016/05/23/expanding-recognition-for-community-contributors-citrix-technology-advocates/ Dave Bretty – http://bretty.me.uk/ which covers off how-to setup and configure FAS, NetScaler SAML/ADFS Proxy, Azure MFA and much more, so follow the links in order listed below.

1. http://bretty.me.uk/putting-it-all-together-citrix-xendesktop-adfs-azure-mfa-netscaler-unified-gateway-and-citrix-fas-part-1/
2. http://bretty.me.uk/putting-it-all-together-citrix-xendesktop-adfs-azure-mfa-netscaler-unified-gateway-and-citrix-fas-part-2/
3. http://bretty.me.uk/putting-it-all-together-citrix-xendesktop-adfs-azure-mfa-netscaler-unified-gateway-and-citrix-fas-part-3/
4. http://bretty.me.uk/putting-it-all-together-citrix-xendesktop-adfs-azure-mfa-netscaler-unified-gateway-and-citrix-fas-part-4/
5. http://bretty.me.uk/putting-it-all-together-citrix-xendesktop-adfs-azure-mfa-netscaler-unified-gateway-and-citrix-fas-part-5/
6. http://bretty.me.uk/putting-it-all-together-citrix-xendesktop-adfs-azure-mfa-netscaler-unified-gateway-and-citrix-fas-part-6/