Tag Archives: Thinwire Compatible Mode

Understanding XenApp & XenDesktop 7.12 and What’s New

The following content is a brief and unofficial prerequisites guide to setup, configure and test delivering virtual apps and desktops powered by XenApp & XenDesktop 7.12 prior to deploying in a PoC, Pilot or Production environment by the author of this entry. The views, opinions and concepts expressed are those by the author of this entry only and do not necessarily conform to industry descriptions or best practises. The views expressed here are my own and do not necessarily reflect the views of Citrix.

Shortened Names
LOCAL HOST CACHE – lhc
XENAPP – xa
XENDESKTOP – xd
XENAPP/XENDESKTOP – xad
VIRTUAL DELIVERY AGENT – vda
HIGH DEFINITION EXPERIENCE – hdx
FLEXCAST MANAGEMENT ARCHITECTURE – fma
EXPERIENCE 1st – x1
INTERNAL – int
VIRTUAL DESKTOP – vd
VIRTUAL APPS – va
DATA TRANSPORT LAYER – edt

What’s New XenApp/XenDesktop 7.12
1. Yes it’s now avaiable & back “Local Host Cache” or LHC as it was most commonly reffered to previously and its back now within XAD 7.x Flexcast Mangagment Architecture (FMA) platform and everything you need to know is avaiable at – http://docs.citrix.com/en-us/xenapp-and-xendesktop/7-12/manage-deployment/local-host-cache.html* & https://www.citrix.com/blogs/2016/12/07/local-host-cache-for-fma/ but a few note worth points to mention below followed by an overview of LHC vs. Connection Leasing by a Citrix XenApp & XenDesktop PM Craig. I have also embedded a how-to enable below along with a basic and brief architectural overview of LHC in XAD 7.12 which is powered by FMA and not IMA which is for anything XA 6.5 and below.
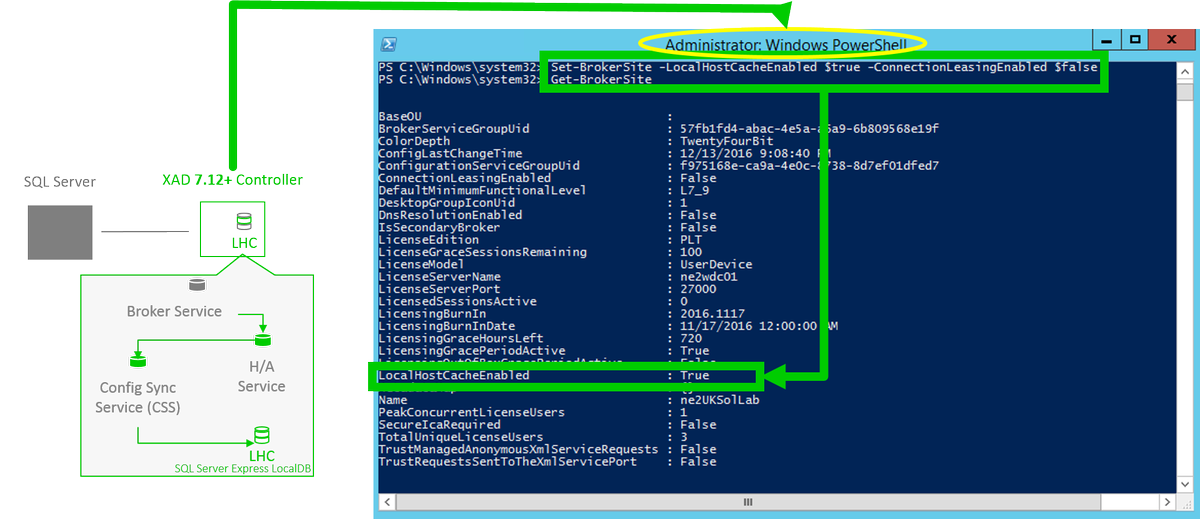
N.B LHC is disabled by default to enable it open up PowerShell in Admin mode or launching a PowerShell session using Studio and enter in the following “Set-BrokerSite -LocalHostCacheEnabled $true -ConnectionLeasingEnabled $false” once the command completes execute the following cmdlet “Get-BrokerSite” and check that the following value of “LocalHostCacheEnabled” is set to “True“. Note that CL is now also disabled and both CL and LHC should not be running simultaneously together as this is not supported.
– VDAs re-register with the elected XAD controller (broker)
– Support for up to 5K VDA’s
– LHC services “High Availability Service” performs shadow copy of the control info that the XAD Controller requires and the “Configuration Sync Service” will sync control info/data.
– Adequately size your XAD controllers correctly to account for the compute load required during an outage, please ref to the “RAM size” and “CPU core and socket configuration” sections under “Design considerations and requirements” at LHC documentation at – *.
– LHC utilises Microsoft SQL Server Express LocalDB and is auto installed when you install the XAD 7.12 controller and is installed regardless of weather LHC it enabled or not.
– Local Host Cache is enabled if connection leasing was disabled before the upgrade vs. Local Host Cache is disabled if connection leasing was enabled before the upgrade.
– To force an outage to test LHC in your home lab or organisations test/uat environment on the XAD controller open regedit as a Admin navigate to HKLM\Software\Citrix\DesktopServer\LHC” thereafter create a registry key “OutageModeForced” and set the value to 1 to force an outage mode once you have completed your tests then revert the value to 0. I would suggest prior to attempting to perform this test place a load with a few test by active users for Server VDA based workloads (XenApp) to best understand how LHC works in a failure scenario.

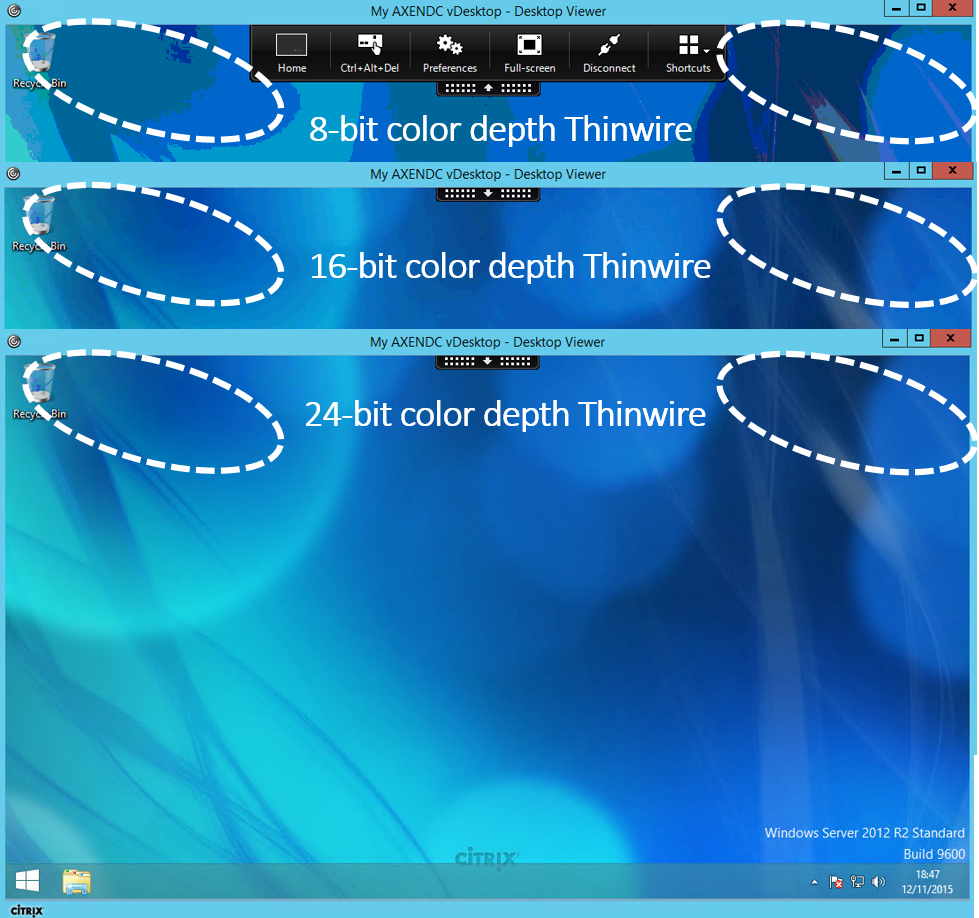
2. Thinwire Compatible Mode 8-bit color depth support (7.12 VDA only otherwise fallback to 24-bit by default) which is configured by select the following HDX policies.

– “ Use video codec for compression” and ref to http://docs.citrix.com/en-us/xenapp-and-xendesktop/7-12/policies/reference/ica-policy-settings/graphics-policy-settings.html#par_richtext_bc19 for a list of avaiable configurations please note that if configured for the entire screen then 8-bit is NOT SUPPORTED!
– “Preferred color depth for simple graphics” and select the “8-bit” value
3. HTML5 video redirection is now available for INT web sites (disabled by default) and can be enabled by configuring the “Windows Media Redirection” by referring to http://docs.citrix.com/en-us/xenapp-and-xendesktop/7-12/policies/reference/ica-policy-settings/multimedia-policy-settings.html#par_richtext_5 and you also need require to add the following “JavaScript files are located in %Program Files%/Citrix/ICA Service/HTML5 Video of the VDA installer to your website” a sample external test web page can be found at the “HDX HTML5 video redirection test page at – https://www.citrix.com/virtualization/hdx/html5-redirect.html
4. Azure Hybrid Use Benefits support e.g enable or disable support for the Azure Hybrid Use Benefits (HUB).
5. Record sessions based on client IP addr or range, TLS 1.2 encryption during data transfer and finally highlight idle periods in Player
6. NetScaler UG now supports H/A of HDX Framehawk – http://docs.citrix.com/en-us/xenapp-and-xendesktop/7-12/hdx/framehawk.html with supported NS firmware builds for Framehawk which include 11.0.62 & 11.0.64.34 (+ preffered).
7. HDX Enlightened Data Transport (for evaluation only) or “EDT” – http://docs.citrix.com/en-us/xenapp-and-xendesktop/7-12/policies/reference/ica-policy-settings.html.

Very High Level Overview*

Adaptive Display
EDT
(Evaluation Only)
TCP
UDP
High Defintion eXperience (HDX 

– Only VDA’s configured with IPv4 addressing is supported
– Requirements XAD +VDA 7.12, StoreFront 3.8
UDP setup on 1494 and 2598 on the VDA remember this is typically TCP but now must also be for UDP
– Enable policy setting “HDX Enlightened Data Transport“. Remember its DISABLED by default and you can setup 3x values “Preferred” UDP data transport is used where possible with a fallback to TCP, “Diagnostic mode” forces a UDP data transports with a fallback to TCP & “Off meaning TCP is used & does’nt affect HDX RealTime”
– If you are evaluating this then please refer to the “Tech Preview of New Adaptive Transport in 7.12” forum at – http://discussions.citrix.com/forum/1663-tech-preview-of-new-adaptive-transport-in-712/
– Note when testing directly from eDoc’s “the new data transport layer (“EDT”) is allowed by default in Citrix Receiver for Windows, however, by default, it will only attempt to use EDT if the setting in the ICA file for HDXoverUDP is Preferred or On” also please ref to the notes relating to Receiver on Mac’s

You can learn more about this evaluation by reading the following blog posts – https://www.citrix.com/blogs/2016/12/14/overcoming-latency-to-serve-a-global-user-population/* and https://www.citrix.com/blogs/2016/12/08/take-a-look-under-the-hood-of-next-generation-hdx/ by Citrix’s HDX PM Derek.

8. You can very easily setup and try XenApp 7.12 in Microsoft Azure today via Azure Marketplace by searching for “XenApp 7.12” or click the following link – https://azure.microsoft.com/en-gb/marketplace/partners/citrix/citrix-xacitrix-xa-trial/ after signing into the Azure Portal at – https://portal.azure.com/.
9. Tagging with “App Groups” now provides the ability to a tag a VM(s) so that when published virtual apps in Application Group or virtual desktops in a Delivery Group are restricted to launch from VM(s) that have been tagged.

10. Advanced Reboot Schedules

11. In StoreFront 3.8 you can create multiple IIS sites and thereafter use the following PoSH cmdlet below to create a StoreFront deployment within your own IIS sites – http://docs.citrix.com/en-us/storefront/3-8/plan.html. What does this actually mean? You can host multiple RfW sites (stores) with each having its own domain name. In order to create your custom websites in IIS for your Stores and ReceiverforWeb firstly open up PowerShell using Studio (Simple way) then close Studio. Next you MUST ensure that NO other StoreFront MMC snap-in consoles are open within your StoreFront cluster and also on the individual Windows server (minimised) that you are setting up IIS sites. StoreFront will disable the mgmt console and displays a message. TIP: To learn how-to setup IIS sites/website please visit – https://support.microsoft.com/en-gb/kb/323972

– From your open PowerShell window enter in the following which will create a custom IIS site/website for virtual apps and one for virtual desktops
– Type “Add-STFDeployment -SiteID 1 -HostBaseURL “https://www.storefront.app.com”” (Virtual apps)
– Type “Add-STFDeployment -SiteID 2 -HostBaseURL “https://www.storefront.desktop.com”” (Virtual desktops)
– Type exit and close the Powershell window prior to opening up Studio or a StoreFront MMC snap-in on any server in the StoreFront cluster

12. Although this one is not strictly new to StoreFront 3.8 and XenApp/XenDesktop 7.12 its often an overlooked feature (For CTX SysAdmins) which is the ability to securely export and then re-import your entire StoreFront configuration including using PoSH credentials for (de)encryption of the backup configuration. To learn more please check out – http://docs.citrix.com/en-us/storefront/3-8/export-import-storefront-config.html and use the feature prior to any StoreFront upgrades or migrations.

Deprecation Forecast
I would strongly recommend that you review and understand the Deprecation forecast announcements made during the XenApp/XenDesktop 7.12 release which is avaiable at – http://docs.citrix.com/en-us/xenapp-and-xendesktop/7-12/whats-new.html#par_anchortitle_5da8.
Deploying a Citrix Cloud – XenApp and XenDesktop Service PoC

The following content is a brief and unofficial overview of how-to front your virtual apps & desktops powered by Citrix Cloud XenApp & XenDesktop Service and the NetScaler Gateway Service using an Azure (IaaS) resource location. The views, opinions and concepts expressed are those by the author of this entry only and do not necessarily conform to industry descriptions, best practises. The views expressed here are my own and do not necessarily reflect the views of Citrix.

Shortened Names
XENAPP – xa
XENDESKTOP – xd
VIRTUAL DELIVERY AGENT – vda
HIGH DEFINITION EXPERIENCE – hdx
VIRTUAL DESKTOP – vd
THINWIRE COMPATIBLE MODE – tcm also known as ecm or thinwire+
SELF-SERVICE PASSWORD RESET – sspr
VIRTUAL GPU – vgpu
PROOF OF CONCEPT – poc
XENAPP AND XENDESKTOP SERVICE – xad service
CITRIX CLOUD CONNECTOR – CC Connector
ACCESS CONTROL LISTS – acl
FIREWALL – f/w

What is Citrix Cloud?
Firstly this blog post will be updated through-out Nov, Dec 2016 as I still have a few minor additions and adjustments to make but in principle this blog post should help you stand up a Citrix Cloud – XAD Service PoC successfully with your chosen resource location.

Citrix Cloud provides a control plane that includes Citrix technologies as services e.g XenApp and XenDesktop Service that allows Citrix SysAdmin’s to setup, configure and deliver virtual apps & desktops to users on any device, anytime and from any location from your chosen resource location which could be hosts runnings in a data centre running XenServer, Hyper-V, Acropolis*, vSphere vs. hyper-converged appliances (Nutanix*, Atlantis) or it could running in an IaaS or public cloud providers e.g Azure or AWS e.t.c

Your resource location of choice is connected to the Citrix Cloud control plane through something called the Citrix Cloud Connector which is installed onto a supported Windows server OSes that is domain-joined in pairs which runs a services that communicates to the control plane outbound on HTTPS/443 which also has the added benefit of NOT requiring any type of VPN (SSL, R/A or IPSec GRE Tunnel)!

Adopting Citrix Cloud introduces an evergreen or SaaS-style update(s) approach to the Citrix infrastructure components as an example within the XenApp and XenDesktop Service e.g the controller, licensing server, storefront are hosted and managed by Citrix and auto updated (evergreen) thus reducing infrastructure updates, upgrades so IT can focus on other workspace projects e.g implementing Skype for Business – http://axendatacentre.com/blog/2016/04/25/deploying-skype4b-2015-offloaded-from-a-citrix-hdx-virtual-app-or-desktop/ or daily tasks, activities thus reducing System Administration time which equates to cost savings or shifting more IT time onto providing the very best near to local like delivery and user experience as they have more time.

The Goal of this PoC
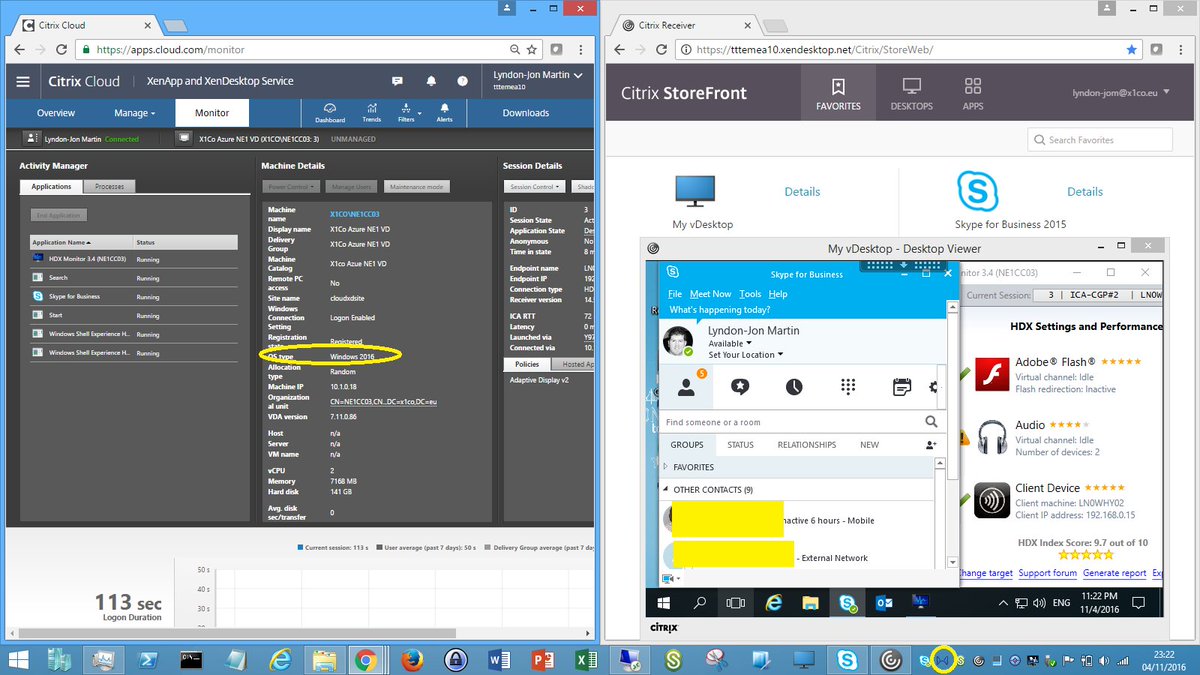
In this blog post I will describe how-to setup and deploy the “Citrix Cloud – XenApp and XenDesktop Service” using Microsoft Azure as my resource location of choice for this PoC to deliver virtual apps & desktops (Server based) including enabling remote access in its simplest form using the NetScaler Gateway Service which enables secure, remote access to virtual apps & desktops from anywhere with an internet connection using the Citrix Receiver or the HTML5 Receiver all without having to deploy a NetScaler in your resource location – https://docs.citrix.com/en-us/citrix-cloud/xenapp-and-xendesktop-service/netscaler-gateway-as-a-service.html and accesing a published Skype for Business 2015 HDX optimised virtual app powered by the HDX Optimisation Pack 2.x.n – http://docs.citrix.com/en-us/hdx-optimization/2-1.html published from a Windows Server 2012 R2 OS server to virtual desktop powered by Windows Server 2016.

Traffic Flows, Metadata & Credential Handling
The following provides insight into the traffic flows when/how users connect to there virtual apps & desktop when using the Citrix Cloud – XenApp and XenDesktop Service.

NetScaler Gateway Service
http://docs.citrix.com/en-us/citrix-cloud/xenapp-and-xendesktop-service/netscaler-gateway-as-a-service.html

XAD Service
http://docs.citrix.com/en-us/citrix-cloud/xenapp-and-xendesktop-service/technical-security-overview.html

Comparing services and pricing is available at – https://www.citrix.com/products/citrix-cloud/subscriptions.html

Pre-requisites & System Requirements
0. Trial Checklist – http://docs.citrix.com/content/dam/docs/en-us/workspace-cloud/downloads/apps-desktops-trial-checklist.pdf which via the XAD Service eDoc root at – http://docs.citrix.com/en-us/citrix-cloud/xenapp-and-xendesktop-service.html.
1. An Azure subscription with sufficient credits and compute resources for your own personal requirements for your own PoC. You’ll also need to understand the concepts of Azure so I’d suggest you begin with reviewing the online documentation available at – https://azure.microsoft.com/ or visit VMFocus blog at https://vmfocus.com/2016/11/07/70-533-implementing-microsoft-azure-infrastructure-solutions-prep-exam-experience/ and scroll to the prepartion text in bold.
2. A Citrix Cloud account with access to the XAD Service check out – https://www.citrix.com/products/citrix-cloud/ for details and information about a trial.
3. Citrix Cloud Connector downloaded from your XAD Service to your Azure resource location onto a shared folder e.g network share on your Windows domain controller or file server. For the basic’s of how-to download and install check out the installation overview at – http://docs.citrix.com/en-us/citrix-cloud/citrix-cloud-connector/installation.html.
4. Download the VDA’s from https://apps.cloud.com/downloads which is only accessiable once your have sucessfully authenticated at https://citrix.cloud.com/.
5. A Windows Server 2012 R2 VM running at a min “Active Directory”, “DNS” and the “Citrix Cloud Connector” and one more VM optional only if you want to keep costs down but preferred to match a real-work scenario would be to have a second Windows Server 2012 R2 VM running the “Citrix Cloud Connector” so that you have a pair of connectors talking to Citrix Cloud.
6. A pair of Windows Server 2012 R2 one to be used for or as a +hosted shared server virtual desktop and the other to deliver virtual apps e.g Skype for Business 2015-16 HDX Optimised Doc’s – http://docs.citrix.com/en-us/hdx-optimization/2-1/hdx-realtime-optimization-pack-overview.html, video overview at – https://www.youtube.com/watch?v=IpOSi_FkA7c.
7. A Windows Server 2016 VM to be your second +hosted shared server virtual desktop (Preferred choice for me :-)) so you can demonstrate publishing virtual apps into both +virtual desktops and demonstrate Windows Server 2016 as a DaaS VD or just a show and tell back to your organisations management to begin thinking moving to Windows Server 2016 from 2008 R2 or 2012 R2.

Deploying your Citrix Cloud Connectors
1. Prior to starting your installation please be sure to switch “Enhanced Security Configuration (ESC)” off during the installation.
2. Right-click on the CC Connector and run as Administrator.
3. Enter in your Citrix Cloud Administrator access details and you’ll receive a list of available customer accounts in your case you should only have one so select it and continue.
4. The installation will install the required software components and prior to finishing it will perform “connectivity test” this will take up to 60 seconds.
5. Make some coffee or tea if you’re British or a British South African born while the Citrix Cloud Connector communicates with the Citrix CLoud control plane successfully registers.
6. Navigate to Citrix Cloud select from the menu bar in the top left-hand corner “Identity & Access Management” on the “Domains” tab you should now see your domain with a status of “Ready ” if you see amber anywhere this is because one of your connectors is not in a ready state or you only have 1x connector in your choosen resource location.
7. Don’t proceed until your connector(s) are in a Ready state in Citrix Cloud, this is very important!

Deploy your Virtual Apps & Desktops
1. At https://citrix.cloud.com/ select under “Services List” parallel to the “XenApp and XenDesktop Service” click on “Manage” blue button. Note that you can also get to mgmt consoles by clicking the menu icon top left-hand corner and from the list select the service that you wish to administer e.g XAD Service.
2. You’ll now be redirected to https://apps.cloud.com/ and scroll to the bottom of the webpage to identify what your cloud hosted StoreFront server address is e.g https://tttemea10.xendesktop.net/Citrix/StoreWeb/, right click and say open in a new tab.
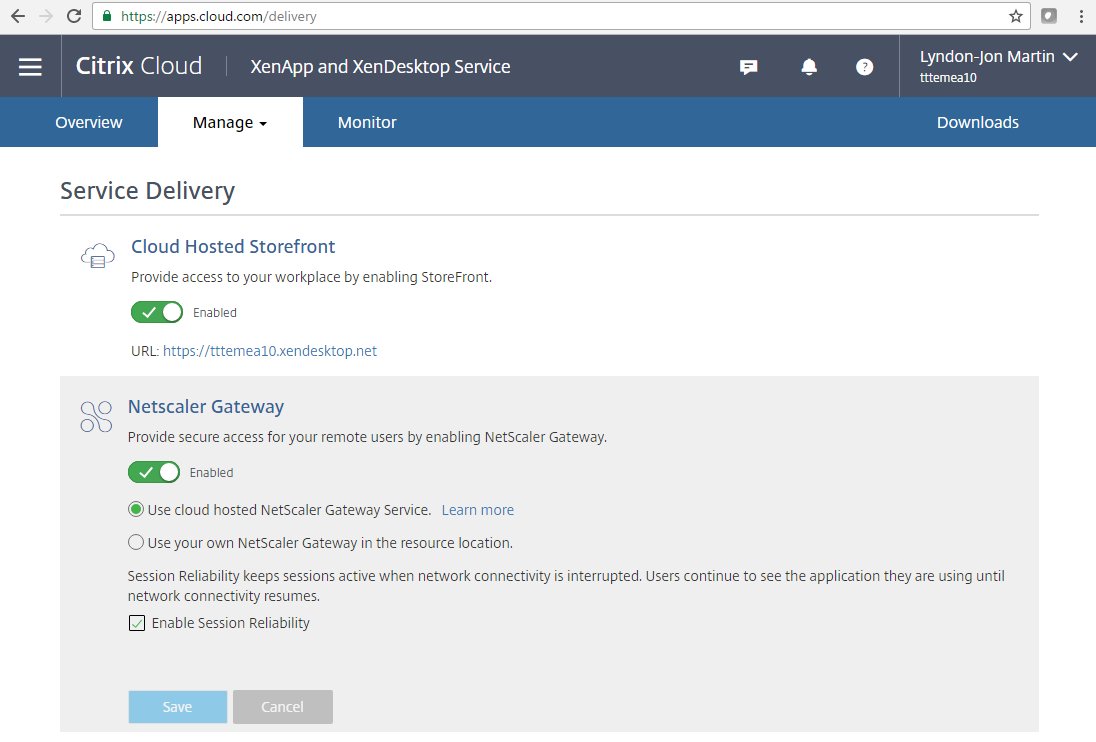
3. Now click on the downwards arrow on “Manage” and you’ll see two options e.g “Service Creation” and “Service Delivery”. Please click on Service Delivery which should take you to https://apps.cloud.com/delivery and you’ll see the below available options. Simply toggle to select your preferred delivery options for delivery of your virtual apps & desktops choosing in this case to utilise the Citrix Cloud – XAD Service cloud hosted StoreFront and or NetScaler Gateway Service. I will follow-up with another blog post in the future covering off deploying this PoC BUT using StoreFront and NetScaler (Unified) Gateway in your chosen “resource location” BUT for now I am keeping it clean and simple. Please verify that your toggle’s match what you see in the below image prior to proceeding (Also see the 3rd tip!!!). If want to use StoreFront – http://docs.citrix.com/en-us/citrix-cloud/xenapp-and-xendesktop-service/setting-up-storefront.html and NetScaler – http://docs.citrix.com/en-us/citrix-cloud/xenapp-and-xendesktop-service/getting-started.html#par_anchortitle_1403 in your resource location the read the provided links above.


TIP/HINT 1: You can choose to toggle off “Session Reliability”.
TIP/HINT 2: Where you configure the XAD Controller point this to the Citrix Cloud Connector.
TIP/HINT 3: The NetScaler Gateway Service is sold separately from the XAD Service as of 2017 Q1 ref – https://www.citrix.com/products/citrix-cloud/subscriptions.html

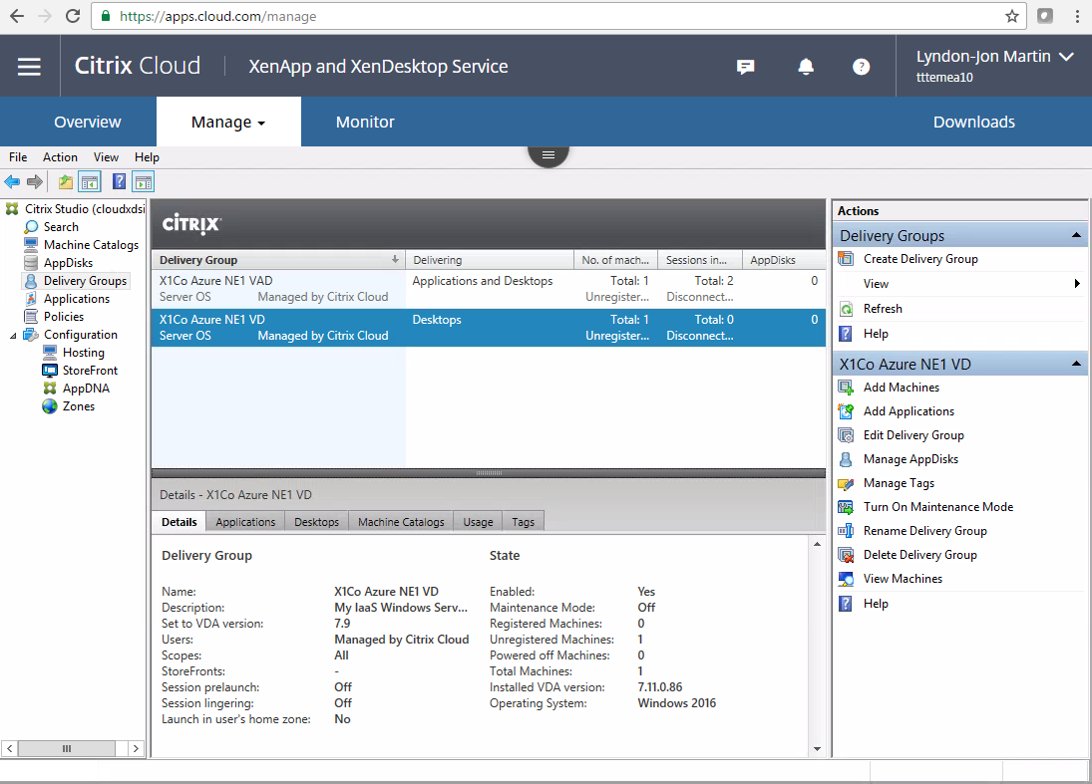
4. Now click on the downwards arrow on “Manage” and now please click on Service Creation which should take you to https://apps.cloud.com/manage you’ll notice a spinning icon in the middle of your screen for a few seconds and then your securely hardened Studio console will be avaiable to you published using the latest HTML5 Receiver which includes auto screen resizing dynamically (change the browser window size :-)), copy and paste.
5. Create your “Machine Catalog(s)” as per normal if your unsure then follow the steps as outlined at http://docs.citrix.com/en-us/xenapp-and-xendesktop/7-11/install-configure/machine-catalogs-create.html then return back to Citrix Cloud published Studio. Create three machine catalog’s if following the blog post 1x machine catalog for virtual apps powered by Win Srv 2012 R2, 2x virtual desktops one powered by Win Server 2012 R2 and one by 2016. Once you have created your machine catalog’s then check that the VM within each “Machine Catalog(s)” have a successful Registered State if the VM(s) in your each catalog(s) don’t register then review my quick troubleshooting guidance below at the end of this blog article.
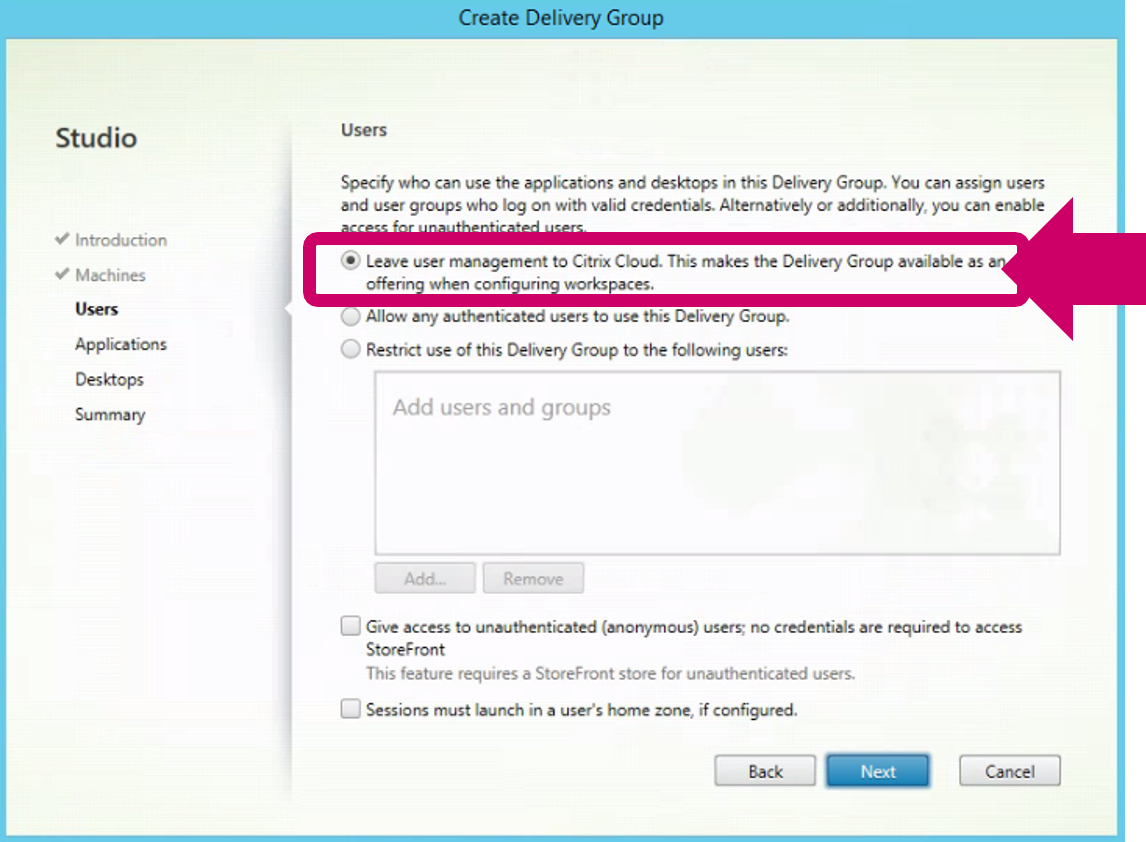
6. Next create a “Delivery Group” almost like normal once agian if your are unsure the how-to is avaiable at – http://docs.citrix.com/en-us/xenapp-and-xendesktop/7-11/install-configure/delivery-groups-create.html remeber agin if following this blog post 1x delivery group for virtual apps powered by Win Srv 2012 R2 and 2x delivery groups for virtual desktops powered by Win Server 2012 R2 and 2016 BUT there is one very important exception which is that once you select the machines and you get to the user section be very sure to select “⚹Leave user management to Citrix Cloud. This makes the Delivery Group available as an offering when configuring your Citrix Cloud Workspaces.”http://docs.citrix.com/en-us/citrix-cloud/overview/get-started/creating-and-publishing-a-workspace.html.


6. Now that you have created a Machine Catalog, Delivery Group you need to assign users to these resources so click the menu icon in the top left-hand corner and select “Workspaces“. You’ll see “My First Workspace” just ignore it for now and select the “+ Workspaces” icon it’s large you just cannot miss it! Note that workspaces are now referred service offerings which you assign to users from your Library – http://docs.citrix.com/en-us/citrix-cloud/overview/get-started/assigning-users-to-offerings-using-library.html.
7. Enter in a name for your workspace e.g PoC Workspace.
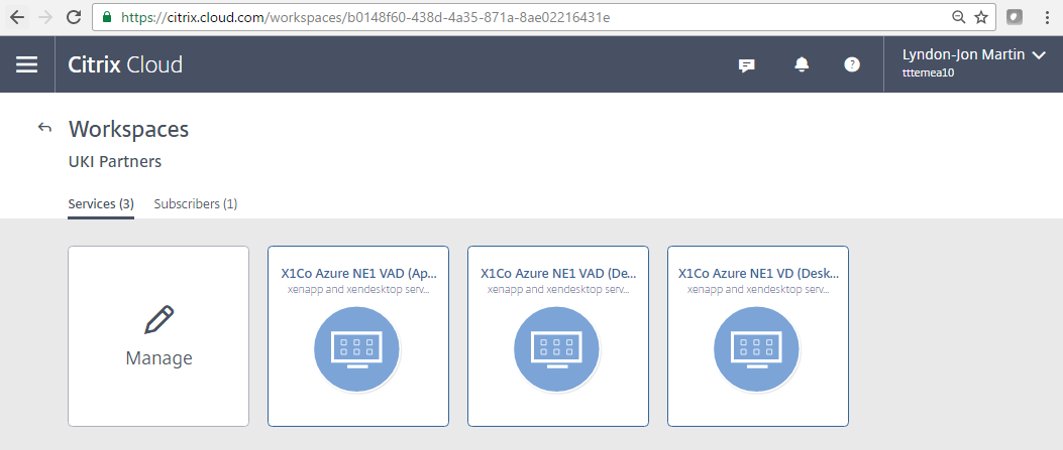
8. Select “✎ Manage” under your Workspace name and now from the available “Citrix Cloud Services” list select the “XenApp and XenDesktop Service” and you’ll see your delivery group(s) dependant if you completely followed this blog post on the right-hand side so simply select your virtual apps and virtual desktops that you wish to publish to this workspace, it’s your choice but in this PoC we’ll be selecting all avaiable delivery groups to delivery virtual apps & desktops. Once selected click on “Update Workspace” blue button above.
9. Your workspace now contains virtual apps & desktops that can be consumed by subscribers e.g users.
10. Now that you have created your first Workspace e.g PoC Workspace in Citrix Cloud using the XenApp & XenDesktop Service all that is left to do is to add users BUT in a Citrix Cloud world they are known as “subscribers“!
11. Select your e.g PoC Workspace once more and click on “Subscribers” tab and you’ll see a domain list below on your left-hand side so select your “domain” and to your right you’ll see an input field type in your subscriber’s username e.g lynd which will then query your AD via the Citrix Cloud connector securely and it will find and return your user(s) e.g lyndon-jon@x1co.eu and once it is listed select the user(s) from your query and they will be added to the list below, now repeat the process to add all other test/poc subscribers or AD test/poc security groups to your e.g PoC Workspace and then click on the “Update Workspace” blue button above to save the subscribers to this workspace.


TIP/HINT: You can also select AD Security Groups not just AD users.

Initial Test
Your users/subscribers should now be able to login to the Cloud hosted StoreFront available at e.g https://YOURCUSTOMERNAME.xendesktop.net using an HTML5 internet browser or Citrix Receiver.

HDX Policies
Please assign your policies as you prefer to users, delivery groups e.t.c. You’ll also notice that I have not applied a FPS limit to every policy only the ones that are balanced as most often these need to adjusted to be fit for purpose for standard office workers to enable user density gains on the backend and bandwidth savings while maintaining a decent and good UX. My personal preference is “HDX Adaptive Display v2“.

HDX Adaptive Display v2 HDX Adaptive Display v2 (Balanced) Thinwire Compatible Mode Thinwire Compatible Mode (Balanced) H.264
1.”Use video codec for compression” then select the option to be “For actively changing regions 1.”Use video codec for compression” then select  “For actively changing regions
2. “Preferred color depth for simple graphics” then select “16 bits per pixel” and also try 24.
1.”Use video codec for compression” then select the option to be “Do not use video codec 1.”Use video codec for compression” then select the option to be “Do not use video codec
2. “Preferred color depth for simple graphics” then select “16 bits per pixel” and also try 24.
3. “Frames Per Second” then enter in a value of “25-30“.
1.”Use video codec for compression” then select the option to be “For the entire screen
2. “Frames Per Second” then enter in a value of “30” (Optional)
My personal preferred choice My 2nd personal preferred choice

Advanced Remote Access using a NetScaler in your Resource Location with(out) StoreFront
The following has been tested using the latest NS firmware 11.1 available in the Azure marketplace as of 05/03/2017.

1. Login to NetScaler admin WebUI using the following firmware 11.1.x.n
2. Check that your appliance is correctly licensed.
3. Select the “Unified Gateway” wizard.
4. Enter in your assigned VIP (private IP addr or in Azure NSIP:8443) and enter in a vServer friendly name e.g myUG
5. Select to “Install Cert” a valid public CA signed cert either *.pfx vs. *.pem.
6. Configure LDAP either use an exciting or add a new server for LDAP auth and choose the “Server Logon Name Attribute” as userPrincipalName .
7. Select “Portal Theme” and select “RfWebUI”
8. Now under the under “Applications” select and add “XenApp/XenDesktop” and now enter in your resource location or Cloud-Hosted StoreFront “FQDN” and select “Test Connection” which should retrieve and auto configure the required settings and thereafter a green bar will appear if successful if not then manually configured based upon the following guidance below.

– Enter in “Site Path” e.g /Citrix/StoreWeb/
– Enter in your Sign Sign-on Domain e.g x1co.eu
– Enter in “Store Name” e.g Store
– Enter in “Secure Ticket Authority (STA) Server” which will be the Citrix Cloud Connector IP addr
– StoreFront server IP Addr:

Option 1 – If using the cloud-hosted StoreFront FQDN e.g https://*.xendesktop.net then please use the IP addr of the Citrix Cloud Connector in your resource location.
Option 2 – If using a StoreFront server in the resource location please use its IP addr.

9. Do not configure a “Xen Farm” please just select and “Continue” and complete steps to finish the Wizard.
10. The dashboard overview of “Unified Gateway” should indicate all up and green.

Remote PowerShell SDK for the XenApp and XenDesktop Service
Coming but have a read of – http://docs.citrix.com/en-us/citrix-cloud/xenapp-and-xendesktop-service/remote-powershell-sdk.html in the intermin.

Troubleshooting Guidance
VDA Registration Issue
1. Make sure that forward and reverse DNS is setup correctly for the VDA’s and the CC Connectors.
2. Check that the following Citrix Cloud services “Citrix Remote Broker Provider” and “Citrix Cloud Agent System, Logger & WatchDog“are successfully started on your Citrix Cloud Connector(s) VM instances.
3. Ensure that HTTPS/443 is NOT disabled outbound on any of your CC Connectors either via the Windows Firewall or your hardware or virtual f/w ACL’s.

HDX Thinwire “For actively changing regions” or HDX Adaptive Display v2

The following content is a brief and unofficial overview of the new HDX policy setting that enables HDX Adaptive Display v2. The views, opinions and concepts expressed are those by the author of this entry only and do not necessary conform to industry descriptions, best practises. The views expressed here are my own and do not necessarily reflect the views of Citrix.

Shortened Names
XENAPP – xa
XENSERVER – xs
XENDESKTOP – xd
XENAPP/XENDESKTOP – xad
VIRTUAL DELIVERY AGENT – vda
HIGH DEFINITION EXPERIENCE – hdx
INDEPENDENT COMPUTING ARCHITECTURE – ica
HDX ADAPTIVE DISPLAY V2 – hdxadv2

Introduction
The following capability is also referred to as Selective use of H.264, Selective H.264, HDX Adaptive Display v2 and Hybrid mode – https://www.citrix.com/blogs/2016/09/28/hdx-graphics-gone-hybrid/ but in this blog post it’s referred to as “HDX Adaptive Display v2” but its technical accurate name from eDoc’s is “Selective use of a video codec (H.264) to compress graphics” as reffered to here – http://docs.citrix.com/en-us/xenapp-and-xendesktop/7-11/whats-new.html#par_anchortitle_59c9.

Overview
In the release of XAD 7.11 (Seven11) a new Thinwire HDX policy was released which is part of the following policy Use video codec for compression” with the following option selected “For actively changing regions” which enables HDX Adaptive Display v2 – http://docs.citrix.com/en-us/xenapp-and-xendesktop/7-11/whats-kmnew.html#par_anchortitle_59c9 which blends the following Citrix HDX Graphics modes H.264 & Thinwire Compatible Mode together to offer the best UX but also to provide a balanced apporach by implementing the most right vs. relevant HDX graphics mode to offer the best rich & HD experience or near to local-like experience while balancing all compute, network resources between the server and or desktop VDA over the organisational network, internet to the users end-point.

The following CTX blog article – https://www.citrix.com/blogs/2016/09/28/lossless-compression-lowering-the-cost-of-pixel-perfection/ most accurately describes the what, the how and the why? So be sure read it and watch the following YouTube video demonstration entitled “Citrix Desktop Master Class – Adaptive Display v2 Demo by Lee Bushen“.

Understanding Actively Changing Regions
If you take a look at the below example of a YouTube web page (rendered in HTML in Oct 2016) e.g delivered as a virtual app published internet browser or a virtual desktop and you access the above YouTube web page HDX Adaptive Display v2 will selectively utilise H.264, Thinwire and overlay lossless text.

To further understand this in greater details please refer to this Citrix blog article first and foremost https://www.citrix.com/blogs/2016/09/28/lossless-compression-lowering-the-cost-of-pixel-perfection/ and then watch
Citrix Desktop Master Class – What’s New in XenApp/XenDesktop 7.11 – Sept 2016available at – https://www.youtube.com/watch?v=rGHdTX202_U but scrub to 1:12:00 if you just want to understand HDX Adaptive Display v2 in greater detail.

Name of application e.g an Internet Browser
Organisation logo, banner of YouTube Channel
YouTube menu
YouTubeVideo  Title
Description 
YouTube Channels
Organisation Videos Library

YouTube Video Thumbnail YouTube Video Thumbnail YouTube Video Thumbnail YouTube Video Thumbnail YouTube Video Thumbnail YouTube Video Thumbnail
Title
Owner
Title
Owner
Title
Owner
Title
Owner
Title
Owner
Title
Owner
Start menu, taskbar and notification centre

What’s new in XenApp & XenDesktop 7.9

The following content is a brief and unofficial prerequisites guide to setup, configure and test delivering virtual apps and desktops powered by XenApp & XenDesktop 7.9 prior to deploying in a PoC, Pilot or Production environment by the author of this entry. The views, opinions and concepts expressed are those by the author of this entry only and do not necessarily conform to industry descriptions or best practises.

Shortened Names
XENAPP – xa
XENDESKTOP – xd
XENAPP/XENDESKTOP – xad
VIRTUAL DELIVERY AGENT – vda
HIGH DEFINITION EXPERIENCE – hdx
INDEPENDENT COMPUTING ARCHITECTURE – ica
EXPERIENCE 1st – x1
VIRTUAL DESKTOP – vd
VIRTUAL APPS – va
THINWIRE COMPATIBLE MODE – tcm also known as ecm or thinwire+

What’s New THAT You Probably Missed!
So firstly I thought I’d start with what consultants, IT Professionals and most importantly CTX SysAdmins been an ex-one myself may miss with the latest XenApp & XenDesktop 7.9 release and then cover the what’s new e.g most commonly known as a blog article up.

1 – Windows 10 support under the XAD 7.6 Long Term Service Release (LTSRP) – https://www.citrix.com/blogs/2016/06/13/a-sneak-peek-behind-the-scenes-of-the-long-term-service-release-ltsr/ but the detail about been compliant is avaiable at the following CTX article titled “CTX205549 XenApp and XenDesktop Servicing Options (LTSR) FAQ” – http://support.citrix.com/article/CTX205549 and then search for How do I get a Windows 10 VDA that is 7.6 LTSR compliant? on the web page. The following Citrix LTSR Assistant tool note its “Tech Preview – v1.0.0.32” but has been updated as of 10 June 2016 and can be downloaded at – http://support.citrix.com/article/CTX209577 but its NOT recommended when using with a production enviroment so against your UAT enviroment to ensure that your actual Citrix XAD PROD enviroment is XAD 7.6 LTSR compliant. For more in-depth information check out – http://docs.citrix.com/en-us/xenapp-and-xendesktop/7-6-long-term-service-release/xad-whats-new.html which provides a link to the Windows 10 statement for CTX205549.
2 – Support for Windows 10 in the HDX 3D Pro VDA
3 – Federated Authentication Service or FAS leverages a MS CA to dynamically issue certs to logon users as if they where using a smart card and extends Citrix authentication capabilities is must read for any real (CTX) SysAdmin and security experts – http://docs.citrix.com/en-us/xenapp-and-xendesktop/7-9/secure/federated-authentication-service.html.
4 – New default HDX graphics behaviour within XAD 7.9 is to support the use of Thinwire Compatible Mode or more commonly referred to as Thinwire+ and then to utilise “Use video codec for compression” when preferred e.g when playing a video which makes alot of sense to me so I am very happy to see this new default behaviours kudos to the HDX engineers that would on HDX Graphics Modes! Great job again 🙂
5 – HDX 3D Pro support for Intel CPUs with Intel Iris Pro graphics 5th & 6th Generation check out the following eDoc article for the full details – http://docs.citrix.com/en-us/xenapp-and-xendesktop/7-9/hdx/gpu-acceleration-desktop.html. For a good overview and demonstration of this new GPU support for XAD 7.9 powered by XenServer 7.0 yes that is correct XenServer 7.0 watch the following YouTube clip. Also please be sure to check out the latest XenServer 7.0 documentation at – http://docs.citrix.com/en-us/xenserver/xenserver-7-0.html there is some seriously new very cool stuff which I will cover in another up and comming Blog article time permitting between work and family life.

6 – The HTML5 Receiver 2.0 introduces a enhanced floating toolbar and you can now control its behaviour by completely hiding it or an individual icon only so check out the how-to at – http://docs.citrix.com/en-us/receiver/html5/2-0/about-this-release.html and after that it descirbes the new Client side appswitcher feature which also means CTX SysAdmins dont have to install the Client side appswitcher seperately on your VDAs.
7 – The following guides are for XAD 7.6+ and onwards although not actually classed as NEW they are often missed I find:

– Implementation and Configuration Guides – http://docs.citrix.com/en-us/categories/solution_content/implementation_guides.html
– Design Guides – http://docs.citrix.com/en-us/categories/solution_content/design_guides.html
– Reference Architectures – http://docs.citrix.com/en-us/categories/solution_content/reference-architectures.html

8 – Securing your StoreFront deployment is a must read in my person view – http://docs.citrix.com/en-us/storefront/3-6/secure.html. AppDNA now also introduces a compliance module – http://docs.citrix.com/en-us/dna/7-9/whats-new.html which helps SysAdmins identity if any apps that are due to be rolled out into your virtual app eco-system may introduce secuirty vulnerabilities or more importantly risk(s).
9 – Provisioning nVidia vGPU enabled XenDesktop machines powered by GRID K1 and K2 cards – http://docs.citrix.com/en-us/provisioning/7-9/xendesktop-setup-wizard-vgpu.html.
10 – Finally you should be aware of the new installation & upgrade default behaviour changes for XAD 7.9 so be sure to read/review the full and complete list of whats new at – http://docs.citrix.com/en-us/xenapp-and-xendesktop/7-9/whats-new.html.

Remote Display Analyzer (RDA)

What is the Remote Display Analyzer?
A simple summary sourced from https://www.rdanalyzer.com/ – “Use Remote Display Analyzer to easily analyze the result of your configuration and change settings on the fly to assess the best possible end user experience for every user, on every device on every location“. It’s also recognised as Citrix “community tool in EUC” – https://www.citrix.com/blogs/2016/03/17/community-tool-remote-display-analyzer-for-xenapp-xendesktop/.

FAQ’s – https://www.rdanalyzer.com/support/faq/.
About – https://www.rdanalyzer.com/about/, Bram Wolfs – http://www.bramwolfs.com & Barry Schiffer – www.barryschiffer.com.
Download – https://www.rdanalyzer.com/

HDX Broadcast now with Thinwire Compatible Mode

The following content is a brief and unofficial prerequisites guide to setup, configure and test HDX Broadcast now with Thinwire Compatible Mode with XAD 7.3 FP3+ prior to deploying in a PoC, Pilot or Production environment by the author of this entry. The views, opinions and concepts expressed are those by the author of this entry only and do not necessary conform to industry descriptions or best practises.

Shortened Names
XENAPP – xa
XENDESKTOP – xd
XENAPP/XENDESKTOP – xad
VIRTUAL DELIVERY AGENT – vda
HIGH DEFINITION EXPERIENCE – hdx
UNIFIED COMMUNICATIONS – uc
MICROSOFT – ms
NETSCALER GATEWAY – ns(g)
INDEPENDENT COMPUTING ARCHITECTURE – ica
FEATURE PACK – fp
NETSCALER UNIFIED GATEWAY – nug
NETSCALER GATEWAY – nsg
EXPERIENCE 1st – x1
STOREFRONT SERVER – sfs
THINWIRE COMPATIBLE MODE – tcm
THINWIRE COMPATIBLE MODE – ecm

My Own View/Opinion
ThinWire Compatible Mode can be implemented to replace the Citrix SuperCodec (H.264) in my personal opinion for numerous use cases hOwEvEr based upon your organisations end-user use cases and or scenario’s by department and role you should always test which graphics mode/encoder(s) are most suitable within your environment by department or role to meet your end-user’s X1 UX expectations on a daily basis.

What is Thinwire Compatible Mode?
If your new to Citrix I’d suggest that before reading any further to get a better understanding of what Thinwire Compatible Mode (TCM) is and does i’d suggest that you read the following entitled “HDX technologies for optimizing application and desktop delivery” available at – http://www.citrix.com/content/dam/citrix/en_us/documents/products-solutions/citrix-hdx-technologies.pdf. Its the latest graphics encoder/mode available within Citrix XAD 7.6 FP3 supported on the following OSes Windows 8.x, 10 and Windows Server 2012 R2.

Use Cases for TCM
1. Lower powered endpoint devices that can support Receiver but do not support Citrix’s SuperCodec which requires an H.264 decoder
2. Delivery of virtual apps and desktops over low bandwidth networks e.g remote branch offices that have limited internet uplink capacity based upon there geographic location i.e. ISDN, 3/4G or low capacity ADSL.
3. Delivery of 3D apps over LAN networks offers a great X1 UX which a fuzzy-first approach as described at – http://docs.citrix.com/en-us/xenapp-and-xendesktop/7-6/xad-hdx-landing/thinwire-compatibility-mode.html search for “Build to lossless” on that web page. You should always thoroughly test between both TCM/H.264 graphics modes to ensure that your end-users X1 UX meets there expectations and requirements day to day.
4: Greater user density on Windows Server 2012 R2 for XenApp based workloads.

TCM Key Features
The following is just a short snippet into some of the features part of TCM below so be sure to check out and read the following CTX Blog article –
https://www.citrix.com/blogs/2015/10/09/a-big-leap-in-ica-protocol-innovation-for-citrix/ for a full list of all the details and more.

– Intelligent bitmap matching for a bitmap-only provider. As much as possible, previously sent bitmaps are reused resulting in lower bandwidth.
– Emulated 16-bit mode, further reducing bandwidth for typical workloads.
– Ultra-low server CPU usage, improving scalability.
– Designed for port to Linux (already used by the Citrix Linux VDA)
– …

Demonstration of Thinwire Compatible Mode
TBC…

Pre-requisites & System Requirements for Deploying a Basic/Intro Thinwire Compatible Mode policy (Draft + The Basic’s Only)
1: Download and install the latest component’s for XAD 7.6 FP3 within a test/poc environment and not in a PROD environment!
2: Currently the XAD 7.6 FP3 VDA’s provide support for TCM with the following Windows OSes Windows 8.x, Windows 10 and Windows Server 2012 R2 OSes.
3: Citrix Receiver You can utilise the latest or older Citrix Receiver’s including the HTML5 Receiver with Thinwire Compatible Mode encoder.
4: Create the following policy in Studio below to enable TCM within a ICA/HDX session:

– Create a new policy
– Search for the following policy entitled “Use video codec for compression” select it and set the following value – “Do not use Video codec” which will force the ICA/HDX session to utilise Thinwire Compatibility Mode.
– Assign the policy to your test “Delivery Group” with either a virtual desktop (Win 8.x, 10 or Server 2012 R2) and save the new policy.
– Login to ReceiverforWeb or Citrix Receiver and launch your virtual desktop ensure that your test user was assigned to the test delivery group which you assigned the TCM policy to/against.

Tuning Thinwire Compatible Mode
You can easily tune TCM to utilise less bandwidth with a single policy entitled “Preferred colour depth for simple graphics” but still delivery a really good eXperience 1st User eXperience for your end-users. Simply modify the TCM policy that your created earlier in this blog article and search for and add “Preferred colour depth for simple graphics” and select either “16 bits per pixel” or “24 bits per pixel” then click next and next again saving the policy. Now disconnect from your existing ICA/HDX session to your test virtual desktop and re-launch it and if you’ve opted for 16 bits per pixel in the policy above you’ll notice a difference straight away BUT the UX is still acceptable graphically for knowledge/task workers and more importantly its still as responsive and usable.

There are obviously many other policies that can be applied to make even more efficiencies so for a full list including detailed notes of what to configure please refer to and check out the following CTX article entitled “HDX Graphics Modes – Which Policies Apply to DCR/Thinwire/H.264 – An Overview for XenDesktop/XenApp 7.6 FP3” available at – http://support.citrix.com/article/CTX202687. I have embedded the basics into a simple HTML table below with how to explicitly enable ECM for testing purposes.

Policy Name Default Value Comment
Display memory limit 65536 KB http://support.citrix.com/article/CTX201696 – Support for Monitors Including 4K Resolution and Multi-Monitors
Dynamic window preview Enabled
Extra color compression Disabled Legacy Mode *
Moving image compression Enabled Legacy Mode
Preferred color depth for simple graphics 24 bits per pixel Legacy Mode **
Target frame rate 30 fps Legacy Mode
Target minimum framerate 10 fps
Visual quality Medium Legacy Mode
OPTIONAL Adjusted Policy Comments
Use video codec for compression Do not use Video codec Force ECM on explicitly by turning H.264 off (Testing)

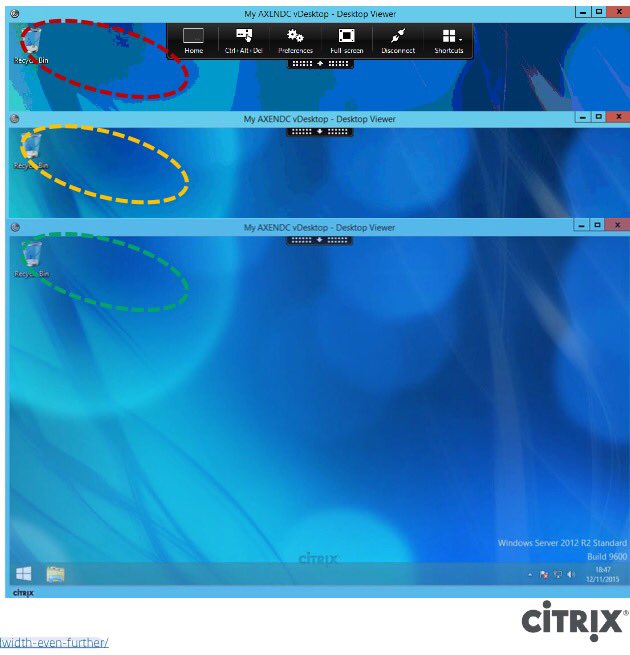
Example of Tuning between 8 (red), 16(amber) and 24(green) Bit Modes of Thinwire Compatible Mode below but please note that the image is not in a high resolution JPEG format!

Useful Resources
A Big Leap in ICA Protocol Innovation for Citrix – https://www.citrix.com/blogs/2015/10/09/a-big-leap-in-ica-protocol-innovation-for-citrix/.
Thinwire Compatibility Tuning: Lowering Your Bandwidth Even Further – https://www.citrix.com/blogs/2015/10/23/thinwire-compatibility-tuning-lowering-your-bandwidth-even-further/.
Read Blog articles by this author Muhammad Dawood –
https://www.citrix.com/blogs/author/muhammadj/.

Supported Citrix Receivers
1: You can download either Receiver by visiting your OSes app store or navigating to – http://receiver.citrix.com for help download the correct Receiver for your platform.
2: The HTML5 Receiver is also supported.
3: The Citrix Receiver feature matrix is available at – https://www.citrix.com/content/dam/citrix/en_us/documents/products-solutions/citrix-receiver-feature-matrix.pdf.

What’s new with XenApp/XenDesktop 7.6 Feature Pack (FP3)

The following content is a brief and unofficial prerequisites guide to setup, configure and test XenApp, XenDesktop FP3 prior to deploying in a PoC, Pilot or Production environment by the author of this entry. The views, opinions and concepts expressed are those by the author of this entry only and do not necessary conform to industry descriptions or best practises.

Shortened Names
XENAPP – xa
XENDESKTOP – xd
XENAPP/XENDESKTOP – xad
VIRTUAL DELIVERY AGENT – vda
HIGH DEFINITION EXPERIENCE – hdx
EXPERIENCE 1st – x1
STOREFRONT SERVER – sfs
FEATURE PACK – fp
THINWIRE PLUS – thinwire +
THINWIRE COMPATIBLE – thinwire c
USER EXPERIENCE – ux

What is new in FP3?
0: ++An absolutely MUST read entitled “HDX Graphics Modes – Which Policies Apply to DCR/Thinwire/H.264 – An Overview for XenDesktop/XenApp 7.6 FP3” which is available at – http://support.citrix.com/article/CTX202687 prior to implementing any of the new graphics mode/encoder(s) within XAD 7.6 FP3.
1: Support for Windows 10 Enterprise Edition, in the Standard VDA for Windows Desktop OSes.
2: HDX Broadcast updates include the following:

Framehawk (Admin guide – http://docs.citrix.com/content/dam/docs/en-us/xenapp-xendesktop/xenapp-xendesktop-7-6/downloads/Framehawk%20Administration%20Guide.pdf) virtual display channel is integrated into the standalone VDA package.
Thinwire Compatible Modehttp://docs.citrix.com/en-us/xenapp-and-xendesktop/7-6/xad-hdx-landing/thinwire-compatibility-mode.html also referred to as Thinwire +/Plus is the very latest encoder to deliver a fantastic and rich X1 UX for virtual apps and desktops delivered from Windows Server 2012 R2, Windows 8.1 and 10 powered by XAD 7.6 FP3. To learn more about check out – https://www.citrix.com/blogs/2015/10/09/a-big-leap-in-ica-protocol-innovation-for-citrix/. Set the “Use video codec for compression” to “Do not use” which will force the use of Thinwire Compatibility Mode by default for user ICA/HDX sessions on XAD 7.6 FP3.

HDX Framehawk Performance in XenApp and XenDesktop 7.6 FP3

3: ++Updated Studio built-in policies ref – http://docs.citrix.com/en-us/xenapp-and-xendesktop/7-6/xad-policies-article/xad-policies-templates.html which include the following:

– Very High Definition User Experience+
– High Server Scalability *+
– High Server Scalability-Legacy OS **
– Optimized for WAN *+
– Optimized for WAN-Legacy OS **
– Security and Control

+ New or adjusted to meet today’s new requirements
* Windows 8.1-10, Windows Server 2012 R2
** Windows 7, Windows Server 2008 R2

4: Support for signature devices (Wacom) and drawing tablets which can be applied by adding the following USB device policy settings ref – http://docs.citrix.com/en-us/xenapp-and-xendesktop/7-6/xad-policies-article/xad-policies-settings-wrapper/xad-policies-settings-ica/xad-policies-settings-usb.html.
5: The HDX 3D Pro VDA used to deliver HDX Rich Graphical apps now supports full-screen apps including 3D and gaming apps within single monitor for ICA sessions.
x: For a full and compete list with accurate descriptions and overviews please check out – http://docs.citrix.com/en-us/xenapp-and-xendesktop/7-6/xad-whats-new.html.

What’s new with StoreFront 3.0.1?
This release contains a number of fixed issues ref – http://docs.citrix.com/en-us/storefront/3/sf-about-30/fixed-issues.html including support for TLS 1.0-1. Please beware that SSL 3.0 is NOT supported and Citrix strongly recommends that you do not use it.