Category Archives: HTTPS

SAML Sign-in to Virtual Smartcard for Virtual Apps & Desktops

The following content is a brief and unofficial prerequisites guide to setup, configure and test accessing virtual apps and desktops authenticated via SAML IdP (Google OAuth) powered by XenApp & XenDesktop 7.14.1+ and NetScaler Unified Gateway 11.1 prior to deploying a PoC, Pilot or Production environment by the author of this entry. The views, opinions and concepts expressed are those by the author of this entry only and do not necessarily conform to industry descriptions or leading best practises. The views expressed here are my own and do not necessarily reflect the views of Citrix.

Shortened Names
FEDERATED AUTHENTICATION SERVICE – fas
SECURITY ASSERTION MARKUP LANGUAGE – saml
IDENTITY PROVIDER – idp
SERVICE PROVIDER – sp
USER AGENT – ug
NETSCALER UNIFIED GATEWAY – nug or netscaler ug
XENAPP – xa
XENDESKTOP – xd
XENAPP/XENDESKTOP – xad
STOREFRONT – sf

What is OAuth?
Wikipedia definition – https://en.wikipedia.org/wiki/OAuth and Google’s definiton – https://developers.google.com/identity/protocols/OAuth2.

What is SAML?
Wikipedia definition – https://en.wikipedia.org/wiki/Security_Assertion_Markup_Language.

Why this blog article?
For me as organisations begin shifting to a Cloud native or Cloud First (i prefer hybrid cloud) stratergy they begin too embrace PaaS e.g Citrix Cloud, Office 365 BUT a common major problem is where does the users identity live and do I need replicate it (read-only, passwd hashes e.t.c) and secondly mobilising of data repositories is another major requirement vs. problem. ShareFile can help in solving your data mobilisation problems which I will follow up in a separate blog article in the future to expand upon this, but for now back to SAML and Identity.

Utilising the Federation Authentication Service or FAS for short which is part of XenApp and XenDesktop (see feature matrix – https://www.citrix.co.uk/products/xenapp-xendesktop/feature-matrix.html) in-line with NetScaler UG enables organisations to solve numerous problems about identity (where is lives vs. its synced to data centres A through C e.t.c) enabling access to any type of app fronted by NetScaler Unified Gateway working inline with FAS.

NetScaler for me is your organisations front door (knock knock) e.g https://go.axendec.com or if you know me #10 Downing Street from on any device and it controls how the users authenticates requirements e.g AD, AAD, SAML vs. OAuth 2.0, Biometrics (e.g VeridiumID watch – https://www.veridiumid.com/video-citrix-ready-partnerspeak-veridium/ which is Citrix Ready and be sure to check out https://www.veridiumid.com/biometric-authentication-technology/biometric-connectors/), however in this scenario i’ll focus on access from devices that support a modern web browser (HTML5) to keep it simple. The below table depicts a user that has successfully loaded onto NUG with SMAL vs. OAuth 2.0 credentials and they can go left towards SaaS web apps or right towards virtual apps & desktops where FAS + StoreFront + Int Windows CA will generate a virtual smart card from the SAML token passed from NetScaler to SSO onto the required resource e.g Windows Server 2016 virtual desktop.

SaaS NetScaler Unified Gateway Virtual Apps & Desktops
User logins with SAML credentials e.g AAD, Google OAuth 2.0
← SAML or OAuth 2.0 Token →
Office365 XenApp & XenDesktop,
StoreFront, FAS & Internal Windows CA

PoC SuGgEsTeD Architecture Diagram – BASIC
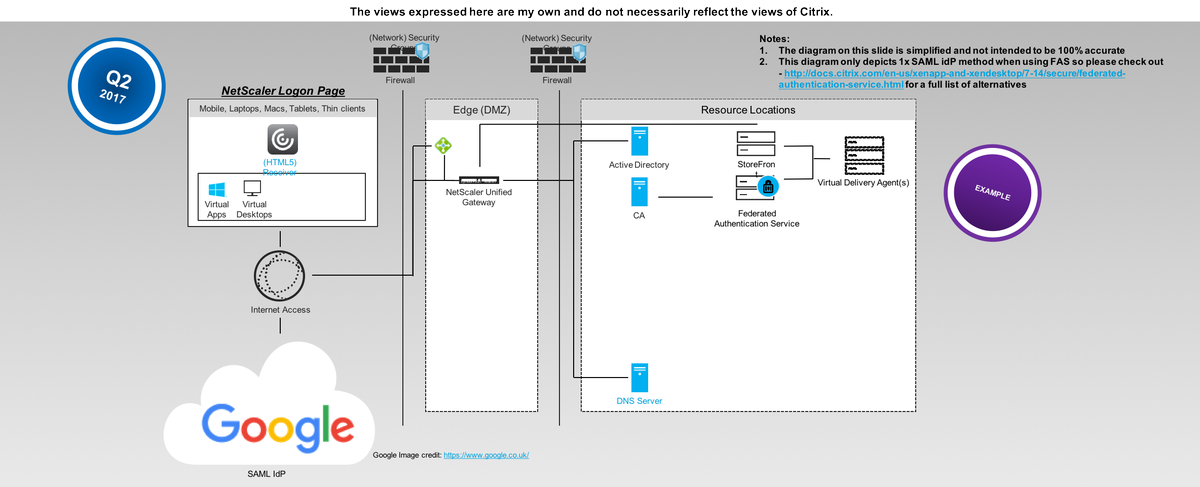
I have gone for a very simple diagram approach here to help those will little to no knowledge on SAML, OAuth 2.0, AD Shadow accts, virtual smart cards get up to speed.
User Login Flow (Not Step by Step its High Level)
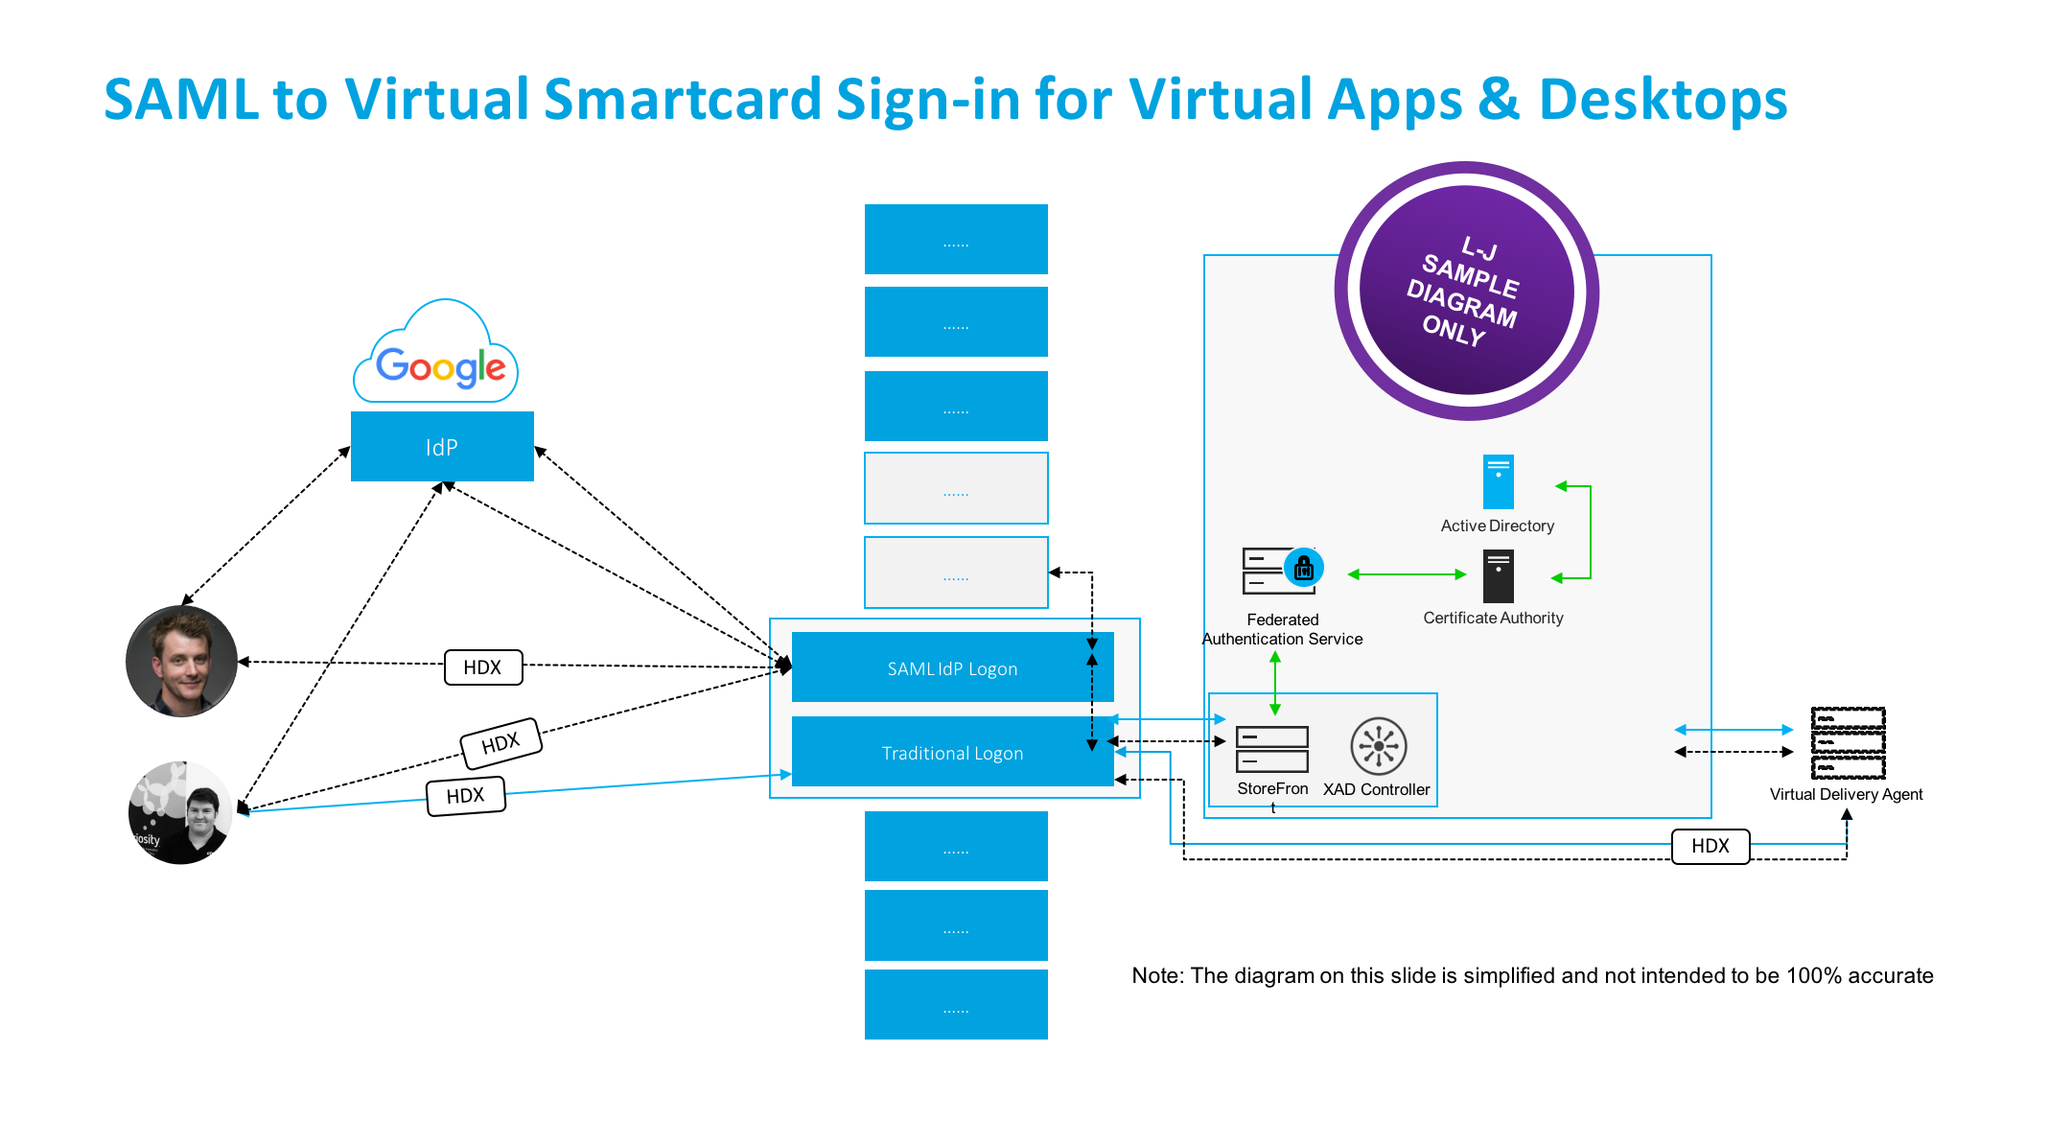
1. The user navigates to the SAML IdP logon webpage setup, configured and hosted by NetScaler UG.
2. The user is automatically redirect to the Google auth login web page to authenticate.
3. Once the user is successfully authenticated at Google they are re-directed back to the NetScaler UG and auto signed in and auto redirected (Responder Policy) to the configured Unified Gateway (my use case here) or ICA Proxy vServer.
4. The user can then select from a choice of Full vs. Clientless VPN or Virtual Apps & Desktops (Selected). Note that in the username will be user@domain while still on the NetScaler UG.
5. The user is SSO onto ReceiverforWeb hosted + powered by StoreFront and the user selects to launch an there choosen HDX virtual app and or desktop(s), you’ll now notice that the username is now first, last name.
6. StoreFront initiates and generates a ICA/HDX file for the user while communicating with FAS + internal Windows CA to generate a virtual smart card for the user that will be used to SSO the user onto there requested resource(s) e.g a Virtual Desktop.
7. The user receives the ICA/HDX file and Receiver automatically launches his/her virtual app and or desktop.

Demonstration WhoamI?

PoC SuGgEsTeD Architecture Diagram – ADVANCED
The Actual Login Flow
Coming…*

Pre-requistes & System Requirements – Google OAuth 2.0
1. Navigate to https://console.developers.google.com/projectselector/apis/credentials and sign-in with your Google credentials.
2. Select “Credentials” under API Manager then select to “Create” a Project
3. Enter in a new “Project Name” and read and review Googles EULA and notification service about updates etc.
4. Google will create your Project
5. Select “Create credentials” and from the drop down select “OAuth client ID”
6. Configure “OAuth consent screen” the bare minimum is to select “Product name shown to users” e.g MYProJectName and then select “Save” you can return later and complete …
7. Now you need to create a client ID select the application type to be “Web Application”
Enter in a friendly name:
– For “Authorized JavaScript origins” enter in “:4443”
– https://YOUR-FQDN:4443
– For “Authorized redirect URIs” enter in “:4443”
– https://YOUR-FQDN:4443/oauth/login
– Select “Create” twice
Google will now create your OAuth credentials and a popup screen will appear with your “Client ID” e.g xnxnxnxnxnxnxnxnxnxnx.apps.googleusercontent.com and “Client Secret” e.g 123456789xnxnxn
8. Now store of copy of these for later in a safe please as you’ll need it for the NetScaler configuration later.

Pre-requistes & System Requirements – Citrix
NetScaler
1. Review the deploying NetScaler guide for your chosen resource location at – http://docs.citrix.com/en-us/netscaler/12/deploying-vpx.html. If your wondering what a Resource Location click this link – http://docs.citrix.com/en-us/citrix-cloud/overview/about/what-are-resource-locations.html.
2. Download vs. deploy your NetScaler virtual appliance on your own terms e.g upload and boot on a hypervisor vs. deployed via a IaaS market place.

– Traditional hypervisors configurations for PoC vs. Home purposes only 2vCPU 2-4GB of RAM
– Cloud hypervisors e.g Azure, AWS for PoC vs. Home purposes only 2vCPU 3.5GB or RAM

3. Licensing Your NetScaler
3.1 You’ll need to license the appliance so obtain trial of e.g VPX 1000 and or 3000 from http://store.citrix.com/store/citrix/en_US/pd/productID.278306700/ThemeID.33753000 or search for Citrix Eval Store at Google.com.
3.2 The above link should redirect your to the NetScaler ADC part of the Eval Store
3.4 Select model type of “VPX” then select variation e.g “1000 vs. 3000 Platinum” and for duration select “30, 60 or 90 Days“.
3.5 Complete the onscreen steps and please note that you will require a valid Citrix.com account or you need to create an account in order to complete the trial request to obtain the eval license.
3.6 Once you’ve received your eval license via email navigate to at https://www.citrix.com/account/toolbox/manage-licenses/allocate.html and select find and allocate your licenses or look for the licensing button (link) and select it.
3.7 If your eval license it not visible e.g created by a Citrix rep or one of our partners –https://www.citrix.com/buy/partnerlocator/ select “Don’t see your product?” top right-hand side (small text!). A pop-up appears now enter in the eval lic provided in the format of “NNNN-XXXXX-XXXXX-XXXXX-XXXXX” and select to continue.
3.8 You will need to enter in the Host Id of your NetScaler it can be found once logged in using the NS Admin Web UI “NetScaler -> System -> System Information” then look under the heading “Hardware Information” and you find “Host Id” copy and paste it into the required field and then download the license file.
3.9 In the NS Admin Web UI click the cog icon top right then select licensing and upload the license and select to reboot the NS to apply the license.
3.10 Your NetScaler is now licensed now simple enable the required features that you need vs. require by right clicking a feature e.g NetScaler Gateway select “enable” e.t.c

4. If your in a Public Cloud setup your (Network) Security Groups to allow you external traffic to your NetScaler and i’d suggest that your disable SSH on port 22 from the world and only enable https 443 and use a Windows server + PuTTY within your Azure RG vs. EC2 VPC to interact with your NetScaler. Note: I am keeping it simple here re DMZ/Edge vs. TRU vs. Mgmt networks. Traditional rules apply for Private Cloud setups or WWW vs. DMZ vs. TRU vs. Mgmt networks.

Federated Authentication Service (FAS)
1. Download FAS Software is part of the XAD 7.9+ ISO – https://www.citrix.co.uk/downloads/xenapp-and-xendesktop/ and select 7.15 LTSR
2.
System Requirements – http://docs.citrix.com/en-us/xenapp-and-xendesktop/7-13/secure/federated-authentication-service.html
3. Deploy GPO Policies – http://docs.citrix.com/en-us/xenapp-and-xendesktop/7-13/secure/federated-authentication-service.html#par_anchortitle_6ba9/
– List + Enable XAD Broker/Controller
– Enable in-session certificate support
4. Certificate Authority – http://docs.citrix.com/en-us/xenapp-and-xendesktop/7-13/secure/federated-authentication-service.html#par_anchortitle_27dd. You may require or choose an Internal Microsoft Windows CA 2012 R2 or 2016 (Test with in this PoC)
Active Directory Certificate Services – https://technet.microsoft.com/en-us/library/hh831740.aspx
– Configuring Windows for Certificate Logon – http://support.citrix.com/article/CTX206156
– Setup Certificate Authority – http://docs.citrix.com/en-us/xenapp-and-xendesktop/7-13/secure/federated-authentication-service.html#par_anchortitle_8dfa
5. VERY IMPORTSANT When Configuring User Rules for FAS list all the required StoreFront Servers, VDA’s and User(s) either by individual object or group e.g. AD Security group PoC SAML Users – http://docs.citrix.com/en-us/xenapp-and-xendesktop/7-13/secure/federated-authentication-service.html#par_anchortitle_6ba3
6. Enable FAS for the default or custom Store on StoreFront – http://docs.citrix.com/en-us/xenapp-and-xendesktop/7-13/secure/federated-authentication-service.html#par_anchortitle_32e2
7. A full AD Admin account for all components will help and save time during the PoC

Deploying @gmail login to NetScaler using OAuth 2.0 / SAML
Coming….

Recommended Reading
– Credit to Citrix *CTP Dave Brett – http://bretty.me.uk/citrix-xendesktop-7-9-google-accounts-and-fas-for-xendesktop/ and I’d strongly recommend your read his blog post! His approach vs. requirements differs slightly from that of my own requirements. He saved me a lot of time and in testing + reading through eDocs so @dbretty thank you!
– Configure StoreFront with OKTA (CTX232042) – https://support.citrix.com/article/CTX232042
Integrating NetScaler with Microsoft Azure Active Directory
– Credit to Citrix CTP Aaron Parker – Integrating Citrix NetScaler with Azure AD and Conditional Access


#CitrixPartnerLove
However in the *interim if your a Citrix Partner and you want to learn more and how to deploy this today! You can access the following on-demand entitled “SAML to Virtual Smartcard Sign-in for Virtual Apps & Desktops” at – http://enablement.citrix.com/library/items/1261 BUT you will require a valid Citrix partner login.
Front XenApp 7.11+ in Azure with NetScaler (Unified) Gateway 11.x.n

The following content is a brief and unofficial overview of how-to front your virtual apps & desktops powered by XenApp 7.11 with NetScaler 11.x.n using Microsoft Azure (ARM). The views, opinions and concepts expressed are those by the author of this entry only and do not necessarily conform to industry descriptions, best practises. The views expressed here are my own and do not necessarily reflect the views of Citrix.

Shortened Names
XENAPP – xa
XENSERVER – xs
XENDESKTOP – xd
XENAPP/XENDESKTOP – xad
VIRTUAL DELIVERY AGENT – vda
HIGH DEFINITION EXPERIENCE – hdx
INDEPENDENT COMPUTING ARCHITECTURE – ica
NETSCALER – ns
NETSCALER UNIFIED GATEWAY – nsug
AZURE RESOURCE MANAGER – arm
IDENTITY ACCESS & MANAGEMENT – iam
MULTI-FACTOR AUTHENTICATION – mfa
SECURITY ASSERTION MARKUP LANGUAGE – saml

Why this Blog Article?
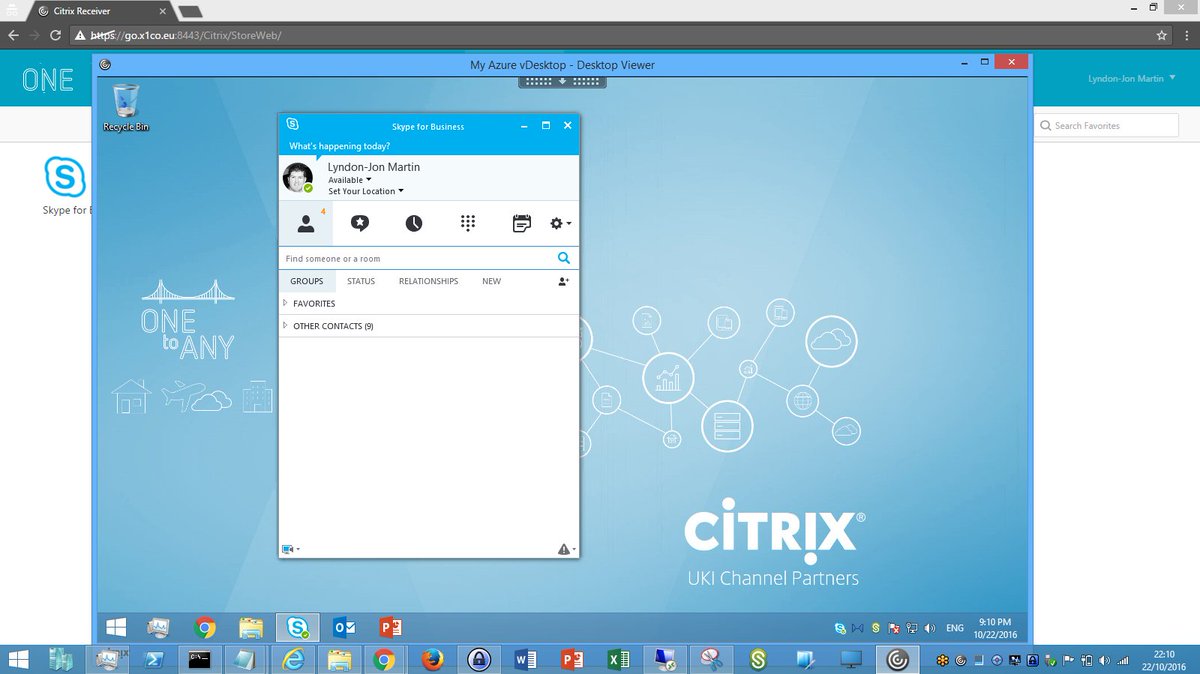
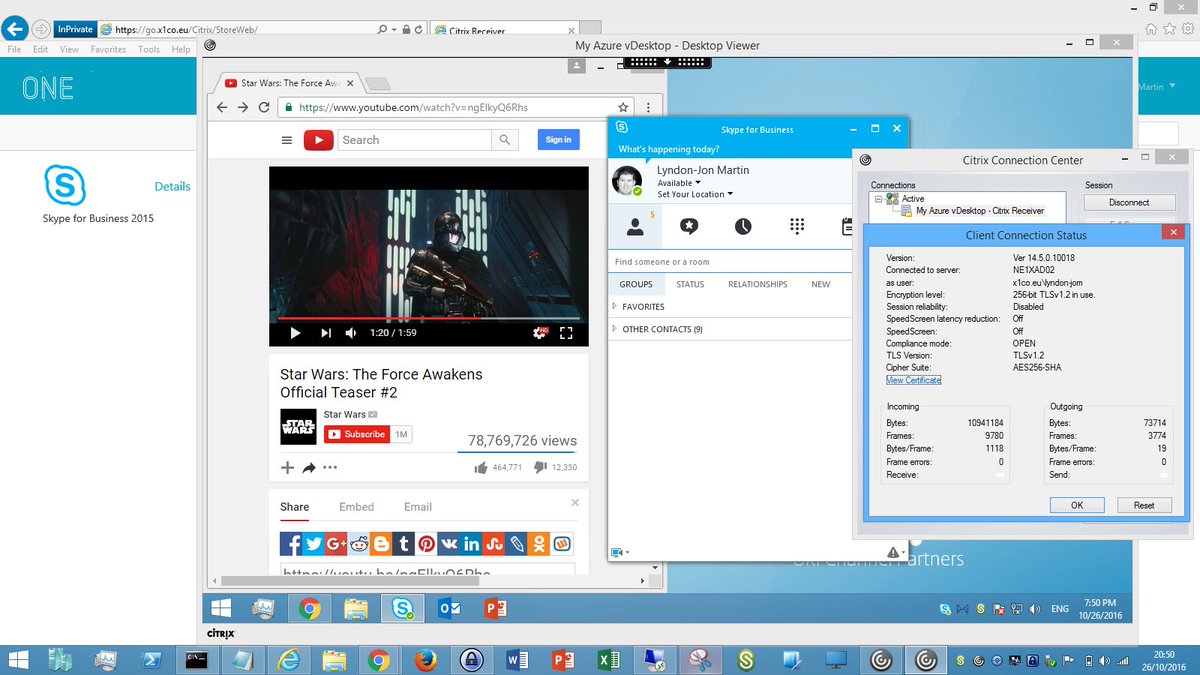
I’ve had a lot of cloud 1st strategy conversations with IT Pro’s, Citrix SysAdmins & organisations alike recently so I thought everyone whom is searching for how-to front XenApp with an Azure NetScaler could benefit from this blog post :-). This blog post covers a how-to even with NetScaler in single IP mode to achieving https://FQDN (Image 2) for the gateway vs. https://FQDN:8443 (Image 1) when deploying NetScaler in Azure (ARM).

Deploying NetScaler 11.x.n using Azure Resource Manager (ARM)
1. Login to https://portal.azure.com
2. I presume that you have setup a your network, IAM if not refer to https://azure.microsoft.com/en-gb/get-started/ for getting started how-to from Microsoft.
3. Click on + New in the top left of the ARM web ui and type in NetScaler and select NetScaler VPX Bring Your Own License or for a quick review check out – https://azure.microsoft.com/en-gb/marketplace/partners/citrix/netscalervpx110-6531/.
4. Click Create
5. Enter in a name for your NS virtual appliance e.g ne1nug01 and select the VM disk type
5. Enter in a username and choose auth to be either SSH public key or Password I choose password to access the NS Admin WebUI for simplicity of all readers of this blog.
6. Select your chosen of default Subscription if you have more than one and then select your existing Resource Group where you XenApp 7.11+ environment and XenApp 7.11+ VDA Workers and your mgmt. VM running AD/DNS server resides. Remember I am keeping this simple as it’s intended for PoC’s only!
7. Continue to select your chosen Azure instance for NetScaler I choose DS2_V2 Standard which consists of 2 Cores, 7GB of RAM.
8. Select your storage account, virtual network & subnet e.t.c and high availability set then click Select to continue.
9. Review your purchase of NetScaler and then click Ok to purchase and Azure will begin building your NetScaler VPX in your Azure chosen subscription which will take no more typically than 10 minutes.

Setting up & Licensing your NetScaler on Azure
Firstly be aware that when deploying a NetScaler instance on Azure for virtual apps & desktops you’ll be setting up NetScaler to run in single IP mode (YES!) which means that you’re connecting to internal TRU resources on the NetScalers IP addr (NSIP) but you connect using different ports e.g ICA Proxy on 8443 so lets begin with the setup.

1. Login into your NetScaler using the NS Admin Web UI do not provide a SubnetIP Addr (SNIP) just select Do It Later and proceed with the initial setup as per normal.
2. Now that you have setup your NetScaler you need to license it so remain logged into and open a new tab in your browser of choice and Google “Citrix Eval Store” or save this link – http://store.citrix.com/store/citrix/en_US/cat/ThemeID.33753000/categoryID.63401700
3. Select under Networking -> NetScaler ADC
4. Next select the following model “VPX” select variation e.g “Platinum 1000” select duration e.g “90 Days”.
5. Complete the onscreen process note that you will require a .Citrix.com account or you need to create an account.
6. Once you receive an e-mail with your key/code head over to at https://www.citrix.com/account/toolbox/manage-licenses/allocate.html or goto and select find and allocate your licenses or look for the licensing button (link) and select it.
7. If your key/code it not visible select “Don’t see your product?” in text in/around the top right-hand side. A pop-up appears now enter in the code provided on e-mail from the Citrix Eval Store e.g “CTX34-XXXXX-XXXXX-XXXXX-XXXXX” and continue.
8. You will need to enter in the Host Id of your NetScaler it can be found once logged in using the NS Admin Web UI “NetScaler -> System -> System Information” then look under the heading “Hardware Information” and you find “Host Id” copy and paste it into the required field and then download the license file.
9. In the NS Admin Web UI click the cog icon top right then select licensing and upload the license and select to reboot the NS to apply the license.
10. Log back in and enable the features that you require e.g right click on the “NetScaler Gateway” and select “enable” e.t.c

Setup Type Choice 8443 Default without an Azure L/B for XenApp using the XenApp/XenDesktop Wizard
Now that you have setup NetScaler within your Azure subscription in your chosen region you’re ready to begin setting up NetScaler to front virtual apps & desktops (Server OS 2012 R2 or 2016) powered by XenApp 7.11+.

Sample Text Based Diagram

User Azure NetScaler StoreFront XenApp
https://FQDN:8443/ Accepts requests from Azure to NSIP on https://8443 (Single IP Mode) Accepts requests on the Gateway & Call-back FQDN on https://FQDN:8443 Accepts & launches user’s virtual app(s) & desktop(s) as requested

1. Login to your NetScaler VPX click “Settings -> Licensing” now check that License type is Platinum and Model ID 1000
2. Select the XenApp/XenDesktop wizard and review the prerequisites carefully prior to continuing BUT in summary you’ll need an SSL Cert, LDAP service account + details, XenApp 7.11+ environment with StoreFront.
3. Enter in the static IP addr assigned by Azure or OTHER METHOD of your NetScaler VPX YES that’s right!
4. IMPORTANT STEP: Change the default port of 443 to 8443 on the Gateway IP addr
5. Set Up the rest of the XAD wizard as normal
6. IMPORTANT STEP: Setup StoreFront to allow remote access however the configured default gateway and Call-back FQDN addresses MUST include 8443 e.g https://go.x1co.eu:8443 instead of just https://go.x1co.eu
7. Setup external DNS entries e.g go.x1co.eu to point to your NetScalers static IP addr found in the Azure ARM Web UI and once you have verified it is functioning correctly using a shell (IPCONFIG /FLUSH after settin-up the DNS entries waiting 10-15 min depednant upon your ISP) the open up an internet browser and type in e.g https://go.x1co.eu:8443 and dont forget the :8443 at the end of the FQDN.
8. Attempt to login either using sAMAccountName e.g username or userPrincipalname e.g username@x1co.eu and then you should be able to successfully login and launch your virtual apps & desktop as per the below image.

Image 1


Setup Type 443 for XenApp using an Azure Load-Balancer & the NetScaler XenApp/XenDesktop Wizard

Sample Text Based Diagram

User Azure Azure Load-Balancer NetScaler StoreFront XenApp
https://FQDN/ https received request and forwarded to NetScaler on https://FQDN:8443

Accepts requests from Azure L/B on https://FQDN fwd to NSIP on https://8443 (Single IP Mode) Accepts requests on the Gateway from HTTPS://FQDN but the Call-back FQDN is on https://FQDN:8443 Accepts & launches user’s virtual app(s) & desktop(s) as requested
https://FQDN ↔ AzureL/B ↔ NetScaler:8443 NetScaler https://FQDN:8443 ↔https://FQDN StoreFront StoreFront Call-back https://FQDN:8443
StoreFront configured NetScaler Gateway https://FQDN

1. If you are choosing this option as your preferred lets hope then complete steps 1-5 and also step 7 to save you time!
2. IMPORTANT STEP: Setup StoreFront to allow remote access however the configured default gateway MUST BE e.g https://go.x1co.eu NOTICE NO :8433 YES not :8443 here. Now on the call-back FQDN addresses YOU MUST include 8443 e.g https://go.x1co.eu:8443 instead of just https://go.x1co.eu otherwise fronting NS with an Azure L/B to acheive HTTPS://FQDN for the XAD Gateway (ICA Proxy) will NOT WORK!!!!
3. Now switch to the Azure ARM Web UI. You should probably read the following useful resources – https://azure.microsoft.com/en-gb/documentation/articles/load-balancer-overview/ and for PowerShell creation check out – https://azure.microsoft.com/en-gb/documentation/articles/load-balancer-get-started-internet-arm-ps/ for any Citrix consultants out there.
4. Azure Load-balancer and click on the “+” at the top and provide a “Name” and for the type choose “Pubic” and select your Azure “Subscription” “Existing Resource Group” and its location (Same as NetScaler deployed instance) then click “Create”
5. Now it will list the available public IP addr just select the “+”
6. Enter in a name and choose your assignment choice “Dynamic” vs. “Static” and click OK.
7. Azure will then provision your Azure L/B (Wait….Maybe coffee or tea break?)
8. Once created select your Azure L/B
9. Select “Backend Pools” enter in a name then choose your availability set and then your VM’s or VM e.g NetScaler. Azure will then provision your Azure L/B with a backend pool (Wait….)
10. Select “Frontend IP Pool” click “+” enter in a name then choose your IP addr e.g NetScaler VM and then enter in a name (all names should differ makes identification easier so a good naming convention helps 🙂 now) and choose your assignment choice “Dynamic” vs. “Static” and click OK (Updating….)
11. IMPORTANT STEP: Select “Inbound NAT Rules” select the resource from your Frontend IP Pool list from the previous point (10). Select the service “HTTPS” and port to be 443 then select the target “NetScaler VM” and then vErY iMpOrtAnt select under “Port Mapping -> Custom” and in the “Target Port enter in 8443” and click save. (Wait…)
12: Now navigate to https://FQDN and attempt to login either using either sAMAccountName e.g username or userPrincipalname e.g username@x1co.eu and thereafter you should be able to successfully launch your virtual apps & desktop published by XenApp 7.11+. The below image represents the end goal when fronting an Azure NetScaler in Single IP Mode with an Azure Load-Balancer as per the below image.

NetScaler VPX in Azure Deployment Guide
http://docs.citrix.com/content/dam/docs/en-us/workspace-cloud/downloads/NetScaler-VPX-in-AZURE-Deployment-Guide.pdf

Advanced Setup & Configuration
The following how-to’s are from a 2016 Citrix Technology Advocates (CTA) – https://www.citrix.com/blogs/2016/05/23/expanding-recognition-for-community-contributors-citrix-technology-advocates/ Dave Bretty – http://bretty.me.uk/ which covers off how-to setup and configure FAS, NetScaler SAML/ADFS Proxy, Azure MFA and much more, so follow the links in order listed below.

1. http://bretty.me.uk/putting-it-all-together-citrix-xendesktop-adfs-azure-mfa-netscaler-unified-gateway-and-citrix-fas-part-1/
2. http://bretty.me.uk/putting-it-all-together-citrix-xendesktop-adfs-azure-mfa-netscaler-unified-gateway-and-citrix-fas-part-2/
3. http://bretty.me.uk/putting-it-all-together-citrix-xendesktop-adfs-azure-mfa-netscaler-unified-gateway-and-citrix-fas-part-3/
4. http://bretty.me.uk/putting-it-all-together-citrix-xendesktop-adfs-azure-mfa-netscaler-unified-gateway-and-citrix-fas-part-4/
5. http://bretty.me.uk/putting-it-all-together-citrix-xendesktop-adfs-azure-mfa-netscaler-unified-gateway-and-citrix-fas-part-5/
6. http://bretty.me.uk/putting-it-all-together-citrix-xendesktop-adfs-azure-mfa-netscaler-unified-gateway-and-citrix-fas-part-6/

Deploying a PoC with the Citrix Workspace Cloud (CWC) Apps & Desktop Service now Citrix Cloud XenApp and XenDesktop Service (Draft)

The following content is a brief and unofficial prerequisites guide to setup, configure and test delivering virtual apps and desktops powered by Citrix Workspace Cloud (CWC) – App’s & Desktop Service with a AWS EC2 resource location prior to deploying in a PoC, Pilot or Production environment by the author of this entry. The views, opinions and concepts expressed are those by the author of this entry only and do not necessary conform to industry descriptions or best practises. The views expressed here are my own and do not necessarily reflect the views of Citrix.

Shortened Names
AMAZON WEB SERVICES – aws
SECURITY GROUPS – sg
ELASTIC COMPUTE CLOUD – ec2
HYBRID CLOUD PROVISIONING – hcp
XENAPP – xa
XENDESKTOP – xd
XENAPP/XENDESKTOP – xad
VIRTUAL DELIVERY AGENT – vda
HIGH DEFINITION EXPERIENCE – hdx
INDEPENDENT COMPUTING ARCHITECTURE – ica
CITRIX WORKSPACE CLOUD CONNECTOR – cwc connector/agent
EXPERIENCE 1st – x1
VIRTUAL DESKTOP – vd
VIRTUAL APPS – va
INFRASTRUCTURE AS A SERVICE – iaas
CITRIX WORKSPACE CLOUD – cwc
CITRIX LIFECYCLE MANAGE

Video Citrix Workspace Cloud: How It Works

PoC Introduction & Overview (This is a Public Draft Blog Article & May Contain Some Errors)
In this particular instance I will be deploying a Citrix Workspace Cloud (CWC) PoC using the Apps & Desktop service which is Citrix online service and is essentially made up of five compoments in my personal view these are people (Users, Consultants & SysAdmins), the Control Plane which is hosted by Citrix and is high available and accessible at – https://workspace.cloud.com/, Resource Locations which could be private, public (IaaS) or hybrid clouds which host and run your actual CItrix workloads e.g servers or desktops OSes with the VDA’s installed and optionally StoreFront and or NetScaler Unified Gateway, Receiver for access to your published virtual apps & desktops and finally the CWC connector which makes everything just work safe & securely.

Please note that I will update this blog post with a how-to re deploying NS for remote access from AWS EC2.

Datasheet for Citrix Workspace Cloud
https://www.citrix.com/content/dam/citrix/en_us/documents/products-solutions/explore-workspace-cloud-take-a-test-drive-or-trial.pdf

What you need
For this PoC I may refer to AWS and XenServer concepts as my home lab is deployed in a Hybrid Cloud model e.g some of my Citrix workloads are in hosted in AWS EC2 (N.Virgina) while others are running on a XenServer 6.5 SP1+ host at my house in London. You don’t have to use AWS like I am for your PoC you could use any IaaS provider e.g Azure, Rackspace, Peer1 or even on-prem with your own host(s) running XenServer, Hyper-V and of course vSphere :-).

1 – CWC trial account entitling you to the CWC Apps & Desktop Service and Identity & Access Management e.g for adding users from your domain and to download the CWC Connector.
2 – Your resource location of choice mine is AWS from here on in through-out this blog article.
3 – 1x Windows Server 2012 R2 I’ll call this VM WDC01 running AD, DNS at a minimum and the Citrix Receiver (http://receiver.citrix.com), CWC Connector downloaded on the desktop (explained later).
4 – 1x Windows Server 2012 R2 domain joined and I’ll call this VM CXA01 with the latest XA 7.8+ Server VDA (https://www.citrix.com/downloads.html which requires a valid Citrix.com customer/partner account with access details ) downloaded.
5 – AWS security groups (on-prem f/w ACL) to allow outbound traffic on TCP 443 (HTTPS) to the Internet, allow HTTPS/ICA/HDX/RDS traffic including HDX RealTime ports for audio and video between all VM’s within your chosen network.
6 – Some suggested test application examples could be Microsoft’s Office 2016 or OpenOffice, Notepad ++, The Gimp, Autodesk Viewer. WaRnInG!!! Disclaimer – Please refer to the ISV’s EULA for terms of usage prior to downloading, installing, configuring and publishing virtual apps to test and play with!.
7 – *Create friendly DNS entries to be used later for WDC01 e.g DNS entry of cwccontroller.axendatacentre.com or your could stick with host name.domainname format it’s your choice. Note: Be sure to setup and configure not just fwd. but also reverse DNS within resolution/look-up!

Setting up your Resource Location
1 – Login as the Domain Admin on WDC01 and navigate to https://workspace.cloud.com and sign in with your trial access details provided by Citrix.
2 – Select from the list on the very TOP left-hand corner Identity & Access Management next click the plus/+ sign and follow the onscreen prompts to download the CWC Connector/agent.
3 – Before installing the CWC Connector/Agent please be sure to read the following documenation – http://docs.citrix.com/en-us/workspace-cloud/workspace-cloud/what-is-a-workspace-cloud-connector-/workspace-cloud-connector-technical-details.html. Once downloaded double click on the CWC Connector/agent and when prompted enter in your CWC trial access details and the installation will complete successfully if the access details provided are correct and if 443 HTTPS is enable outbound to the Internet from WDC01 to https://workspace.cloud.com.
4 – Take a short 1-3 min comfort break then refresh your web page for https://workspace.cloud.com and navigate back to Identity & Access Management and you should see your domain appear within the list, then you may proceed. If you don’t check your firewall ACL’s locally on the Windows server or virtual f/w at the edge of your VPC network and also check your AWS Security Groups are setup correctly to allow in/outbound access on HTTPS/443.

Note: If you turn off WDC01 you’ll receive and error at this page and manage & monitor tabs within the Apps & Desktop Service are NOT accessible until access is restored! Likewise if you only have 1x CWC Connector/agent then you may see an amber warning under domain within Identity & Access Management as you only have 1x CWC Connector/agent and it suggested even for a PoC to install 2x instead of 1x.

5 – Login as a Domain Admin on CXA01 and mount the XA 7.8+ VDA media by right clicking and left clicking on Mount then navigate to Windows Explorer and double click on D drive that has recently mounted with the XA 7.8 installation media and then proceed to select to install the Server VDA from the splash screen or if your downloaded the Server VDA *.exe (suggested & recommended) from Citrix.com then double click to install the VDA. In each case you’ll require 2x reboots as per normal like on-prem installations however now on CXA01 there is one exception at the controller step type in cwccontroller.axendatacente.com* or the hostname.domainname for WDC01 (Point to the CWC Connector/agent that you previously installed) and then continue with installation and once the installation is completed on CXA01, then verify that the VDA has registered and is communicating with WDC01 e.g cwccontroller.axendatacentre.com by reviewing CWC service or the event logs within Computer Management. Tip: Install to enabling remote connections initially to get your head around how the CWC Apps & Desktop Service actually works.
6 – You’ve now successfully completed setting up your XenApp worker for your chosen resource location in my case it’s an AWS EC2 located out of N.Virginia. If your curious about the CWC connector there is a tech overview avaiable at – http://docs.citrix.com/en-us/workspace-cloud/workspace-cloud/what-is-a-workspace-cloud-connector-/workspace-cloud-connector-technical-details.html be sure to review it.
7 – Now we need to continue with creating a machine catalog, delivery group in the hosted Studio and obviously publishing your virtual apps & desktop (server based).

Create a Machine Catalogue and Delivery Groups to publish Virtual apps & desktops
1 – Now go back to the homepage at https://workspace.cloud.com and to the right of the Apps & Desktop Service click “Manage” to launch the management interface which provides you with an Overview page (Scroll to the bottom to find out your cloud hosted StoreFront address. Tip: If you get an red bar with an error message check that your CWC Connector/agent at your resource location is up and available and showing as green for your domain at the Identity & Access Management tab!.
2 – Scroll to bottom of the overview web page to find out exactly what your cloud hosted StoreFront addr is. It should follow the following format https://{TENANT NAME}.xendesktop.net/Citrix/StoreWeb/. Right click on it to open a new tab and to remain at https://apps.cloud.com/. You should be able to login using your test AD security group. Tip: You won’t see any published virtual apps or desktops currently as you have not created a machine catalogue or delivery group.
3 – Go back to the Manage Apps & Desktops Service web page and click Manage or Monitor this will embed a custom, hardened published app version of Studio or Director using the HTML5 Receiver so please ensure that you are utilising an HTML5 compliant internet browser that supports the HTML5 Receiver.
4 – Assuming you’ve clicked on Manage firstly navigate to Hosting Connections create a connection to your chosen resource location either on-prem or cloud (Private or Public) details for setting up hosting connections are available at – http://docs.citrix.com/en-us/xenapp-and-xendesktop/7-8/manage-deployment/connections.html. Once setup wait 1-2 min before proceeding you don’t have to by the way! I do.
5 – Click Machine Catalogue and create as per normal for detailed on how-to please refer to – http://docs.citrix.com/en-us/xenapp-and-xendesktop/7-8/install-configure/machine-catalogs-create.html. Tip: I’d suggest as its your first time using the CWC Apps and Desktop service create your machine catalogue with a single VM with the VDA installed to allow remote connections as described earlier to allow you to get around how the CWC Apps and Desktops Service actually works. You don’t have to either it’s your choice.
6 – Click Delivery Groups and create as per normal aswell and please refer to – http://docs.citrix.com/en-us/xenapp-and-xendesktop/7-8/install-configure/delivery-groups-create.html for guidance delivering virtual apps (Skype for Business 2015 also implment the HDX Optimisation Pack 2.0 check out – https://www.citrix.com/blogs/2016/01/12/citrix-and-microsoft-unveil-v2-solution-for-skype-for-business/ for more information) & desktops (Windows Server 2012 R2). TIP: The name you provide your Delivery Group filters through to the Workspaces at – https://workspace.cloud.com/workspaces and becomes the default name of your published virtual & desktops services that you will assign to your subscribers (users) workspace.
7 – You’ve now successfully setup a Machine Catalog and Delivery Group using the CWC Apps & Desktop Service to published a virtual apps & desktop, however prior to accessing your virtual apps & desktops you’ll need to create a Workspace and add subscribers (users) including which published resources your subscribers (users) are able to access otherwise they wont be able to login nor access any published resources.

You should have the Server VDA and CWC Connector now installed see the below example image below.

Create a Workspace to Delivery published virtual apps & desktops
1 – A workspace consists of a collection of services from CWC e.g Secure Documents (ShareFile), Apps & Desktop Service (XenApp/XenDesktop) and so forth that SysAdmins can combine together to form e.g a Pre-Sales workspace that may consist of a virtual apps e.g Skype for Business 2015 that is also offloaded with the HDX Optimisation Pack 2.0 – https://docs.citrix.com/en-us/hdx-optimization/2-0/hdx-realtime-optimization-pack-about.html and a virtual desktop e.g a dedicated Windows 10 or 2012 R2 desktop. A workspace also consists of subscribers (users) who access the workspace which contains published resources created by Citrix SysAdmins. Please ref to http://docs.citrix.com/en-us/workspace-cloud/workspace-cloud/get-started/creating-and-publishing-a-workspace.html which explains how-to create a workspace, define subscribers and published resources.
2 – Once you have created a Workspace and assigned subscribers, resources then users can login at https://{TENANT}.xendesktop.net/Citrix/StoreWeb/ from there resource location and gain access to there virtual apps & desktops.
3 – Managing your newly created Workspace is easy following this useful online document from eDocs – http://docs.citrix.com/en-us/workspace-cloud/workspace-cloud/get-started/manage-a-workspace.html.

Example of my virtual desktop (Server based) delivered by CWC using the XenApp 7.8 VDA. I also use the same theme for my complete XenApp 7.8 deployment in AWS yes I have both deployed and configured 🙂

A first for me
This is the first time I’ve written a blog post (primarily) completed in the air traveling from somewhere between London – England, Oslo – Norway and Stockholm – Sweden.

Disclaimer
This blog article should be considered to be a draft still and therefore may contain errors and I will be updating and adjusting it time permitting and adding in how-to front this CWC Apps & Desktop service deployment in my AWS EC2 resource location with NetScaler Unified Gateway – https://www.youtube.com/watch?v=qT739UoR8d0.

Fronting XenMobile 10.x.n with NetScaler 10.5.x.n – 11.x.n

The following content is a brief and unofficial prerequisites guide to setup, configure and test a NetScaler Gateway 10.5.x.n or NetScaler Unified Gateway 11.x.n fronting a XenMobile 10.x.n XMS virtual appliance prior to deploying in a PoC, Pilot or Production environment by the author of this entry. The views expressed here are my own and do not necessarily reflect the views of Citrix.

Shortened Names
XENMOBILE – xm
XENMOBILE SERVER – xms
VIRTUAL APPLIANCE – v/a
FEDERAL INFORMATION PROCESSING STANDARDs – fips
NETSCALER GATEWAY – nsg
NETSCALER UNIFIED GATEWAY – nug
VIRTUAL IP ADDRESS – vip
MOBILE APPLICATION MANAGEMENT – mam
MOBILE DEVICE MANAGEMENT -mdm
CERTIFICATE AUTHORITY – ca

Deployment Preparation Overview (DRAFT & MAY CONTAIN ERROR(S))
0. The section also contain the pre-requite, system requirements for each virtual appliance (V/A) for NetScaler and the XenMobile Server (XMS).
1. Review the XenMobile comparability matrix at – http://docs.citrix.com/en-us/xenmobile/10-1/xmob-system-requirements/xmob-10-understand-compatibilitymatrix-con.html to choose the correct NS build vs. XMS build.
2. Download the V/A’s for each at signing in with your Citrix partner access details.
3. You need an SSL certificate a wildcard is recommend for simplicity and this should be using at min a 2048-bit key for your CSR that you submit to your CA. If you are experiencing the following issue enrolment issue Profile Installation Failed “The server certificate for ‘https://’ is invalid“ the please review http://axendatacentre.com/blog/2015/03/29/xenmobile-10-0-poc-considerations/ to help resolve this issue.
4. Generate an APNS certificate following this process at http://docs.citrix.com/en-us/xenmobile/9/xmob-dm-config-requesting-apns-con.html and sign your APNS certificate with Citrix at – https://xenmobiletools.citrix.com/.
5. You need to be aware that the port communication between the different components has changed and also the placement of the XMS V/A in XenMobile 10. A network diagram can be viewed at – http://docs.citrix.com/en-us/xenmobile/10-1/xmob-arch-overview-con.html I would recommended that you please refer to the figure 4. MDM and MAM modes and also figure 5. Cluster deployments.
6. XenMobile 10 today as of writing this blog post requires the following FQDN and IP ADDR reservations to be made available when fronting a XMS V/A with NS appliance either virtual or physical 10.5.x.n and 11.x.n. Please note that for simplicity I will refer to a NetScaler Virtual Appliance V/A from here on in.

a – 1x Public routable FQDN for MDM e.g enroll.axendatacentre.com
b – 1x Public routable static IP addr that resolves to the MDM FQDN
c – 1x Public routable FQDN for MAM e.g apps.axendatacentre.com as Secure/Worx’s apps utilise a mVPN via WorxHome now SecureHub
d – 1x Public routable static IP addr that resolves to the public FQDN MAM
e – 1x DMZ private static IP addr for Gateway for your mVPN traffic
f – 1x DMZ private static IP addr for Load-balancing the MAM traffic
g – 1x DMZ private static IP addr for MDM traffic e.g enrolling and on-going device mgmt.
h – 1x DMZ private static IP addr for the actual XMS V/A

Sample PoC Diagram
* refers to the “.axendatacentre.com” ending the FQDN.

MDM (b) Firewall MDM (a/g) NetScaler Installation FQDN (h) XMS
enroll.*
81.xxx.nnn.100
enroll.*
192.168.2.30
enroll.enroll.axendatacentre.com
MAM (d) MAM (c/e/f)
apps.*
81.xxx.nnn.101
apps.*
192.168.2.31
192.168.2.33

7. NetScaler today as of writing this blog article requires the following IP ADDR reservations for NetScaler to allow you to front Citrix e.g “XenMobile”, ShareFile e.t.c and none-Citrix workloads e.g web services, exchange servers, application servers and much more.

– 1x DMZ private static NetScaler IP addr
– 1x DMZ private static NetScaler Mgmt IP addr for mgmt. of your NS virtual or physical appliance
– 1x DMZ private static Subnet IP addr for the NetScaler to access resources within your TRU network

8. Once you have successfully deployed your XMS use the built-in 30 day licenses for the initial configuration then allocate some eval licenses against the XMS hostname. You can allocate XM 10 licenses by choosing the “MDM/Enterprise 99 User” from – http://store.citrix.com/store/citrix/en_US/pd/productID.306222300/ThemeID.33753000. Once you have licensed the XMS V/A then proceed to successfully deploy the NS V/A and login into the NS V/A mgmt. interface which will be the NS’s mgmt IP addr find the HostID or utilise the following CTX article entitled “How to Allocate NetScaler VPX Licenses” – http://support.citrix.com/article/CTX133147 which will be required to license your NS V/A. Once you have the HostID visiting the Citrix Evaluation Store at – http://store.citrix.com/store/citrix/en_US/cat/ThemeID.33753000/categoryID.63401700 and allocate as an eXaMpLe a 3000 VPX at platinum for 90 days at – http://store.citrix.com/store/citrix/en_US/pd/productID.278306700/ThemeID.33753000 and also allocate a “Universal 99 Concurrent User Connection” from – http://store.citrix.com/store/citrix/en_US/pd/productID.282559700/ThemeID.33753000 once again for 90 days.
9. Reboot both the NS, XMS V/A and validate that they are back up and running and functioning as expected using the CLI and or the Admin WebUI’s of each V/A.

Let’s Deploy XMS fronted by a NS (DRAFT & MAY CONTAIN ERROR(S))
1. Login into NS Admin WebUI and navigate to the licensing tab and validate that you have all green ticks and ensure that you have 99-104 Universal licenses if not please read step 8 above before proceeding.
2. In the bottom left-hand corner click on “XenMobile” and select “XenMobile 10” from the dropdown list on the XenMobile initial wizard welcome page.
3. Under the NetScaler for XenMobile section to the left-hand side select the following “Access through NetScaler Gateway” (MAM e.g Worx’s Apps) and “Load Balance XenMobile Servers” (MDM) and then click on Continue.
4. Enter in the IP addr e and leave the port as 443 and provide a Virtual Server Name then click Continue.
5. Select and existing wildcard card certificate or upload a new wildcard certificate then click Continue.
6. Select and existing LDAP binding or create a new LDAP binding and then click Continue. Example of a Base DN for the domain axendc.co.za with domain users residing with the default Users folder within AD would e.f “Cn=Users,dc=axenc,dc=co,dc=za“.
7. Under Load-Balancing FQDN for MAM enter in a for the FQDN and for the IP addr beneath is enter in IP addr f and then click Continue. Please leave the defaults as is for now BUT please be aware that we will are not be performing any SSL Offloading, split tunnelling.
8. Select the same SSL cert as per step 5 above unless its NOT a wild card certificate in-which case then please upload the SSL cert for the MDM FQDN before proceeding. Click Continue.
9. Click “Add Server” under the XenMobile Servers section and enter in IP addr h and the click Continue. Note: Port for communication is 8443!
10. Click “Load Balance Device Manager/XenMobile Servers“.
11. Enter in the IP addr g and alter or leave the default name of the Virtual Server and click Continue. Note: Communication is HTTPS or SSL_Bridge as we choose not to perform HTTP or SSL Offloading in step 7 above.
12. You’ll notice that your XenMobile Servers IP addr’s are already automatically inserted under the XenMobile Servers section click Continue. Note: The Ports for communication are 443, 8443!
13. Click Done!
14. You have now successfully deployed a single XMS V/A fronted by a NS V/A. Once the wizard has completed you can click Edit under the “NetScaler Gateway” section on the top right-hand side under the Test Connectivity button to back into the wizard and modify the split tunnelling options to meet your organisations needs and or requirements.

XenApp 7.6 XenDesktop 7.6 including Feature Pack (FP) 1

The following content is a brief and unofficial prerequisites guide to setup, configure and test XenApp 7.6, XernDesktop 7.6 prior to deploying in a PoC, Pilot or Production environment by the author of this entry. The views, opinions and concepts expressed are those by the author of this entry only and do not necessary conform to industry descriptions or best practises.

Shortened Names
XENAPP – xa
XENDESKTOP – xd
VIRTUAL DELIVERY AGENT – vda
LIGHT WEIGHT DIRECTORY PROTOCOL – ldap
ACTIVE DIRECTORY – ad
CERTIFICATE SIGNING REQUEST – csr
CONNECTION LEASING – cl
FULLY QUALIFIED DOMAIN NAME – fqdn
RECEIVER FOR WEB – rfw
CERTIFICATE AUTHORITY – ca
STOREFRONT SERVICES – sfs
PUBLIC KEY INFRASTRUCTURE – pki
NETSCALER GATEWAY – nsg
SECURE TICKET AUTHORITY – sta
DOMAIN NAME SERVER – dns
DYNAMIC HOST CONFIGURATION PROTOCOL – dhcp
FEATURE PACK – fp

What’s New now with Feature Pack 1 (FP1)
0: If you are new to XenDesktop 7.x, XenApp & XenDesktop 7.5, 7.6 then I would suggest that you begin by reading and reviewing the Technical Overview of XAD 7.6 – http://support.citrix.com/proddocs/topic/xenapp-xendesktop-76/xad-architecture-article.html and follow on by understanding the System Requirements for XAD 7.6 at – http://support.citrix.com/proddocs/topic/xenapp-xendesktop-76/xad-system-requirements-76.html.
1: XenApp – http://www.citrix.com/products/xenapp/whats-new.html.

2: XenDesktop – http://www.citrix.com/products/xendesktop/whats-new.html. 3: How to setup and configure session pre-launch and lingers for XAD 7.6 – http://support.citrix.com/proddocs/topic/xenapp-xendesktop-76/xad-dg-manage-sessions.html#xad-dg-manage-sessions__prelaunch-linger including a video from Citrix TV is embedded below. 4: Connection Leasing (Previously or rather similar to Local Host Cache (LHC) under XenApp 6.x and downwards) provides the ability to allow end-users within your organisation the ability to continue to access Citrix published desktops, applications even if your MS SQL highly available database is offline using the new feature in XAD 7.6. Please note that you should always still have a H/A SQL database environment in-place and connection leasing does require the 7.6 VDA. For more information please read and review – http://support.citrix.com/proddocs/topic/xenapp-xendesktop-76/xad-connection-leasing.html#xad-connection-leasing. 5: How-to perform a XenApp 6.5 migration – http://support.citrix.com/proddocs/topic/xenapp-xendesktop-76/xad-xamigrate.html#xad-xamigrate and the general eDocs node that covers off migrations from previous versions of XenApp 6.x and XenDesktop 4.x, 5.x are covered at – http://support.citrix.com/proddocs/topic/xenapp-xendesktop-76/xad-upgrade-existing-environment.html. 6: Overview & Understanding High Definition eXperience (HDX) under XAD 7.6 including Flash and USB/Drive redirection, GPU Sharing and Network traffic priorities – http://support.citrix.com/proddocs/topic/xenapp-xendesktop-76/xad-hdx-landing.html. 7: For a complete and full list of what’s new in XenApp 7.6 and XenDesktop 7.6 take a look at – http://support.citrix.com/proddocs/topic/xenapp-xendesktop-76/xad-whats-new.html. 8: What’s new in the XAD 7.6 FP1? Check out http://support.citrix.com/proddocs/topic/xenapp-xendesktop-76/xad-whats-new-7-6fp1.html for a list of the full details. I’ve provided summary below of what it includes: – Session Recording which/was formerly Smart Auditor. – Updated Citrix Licensing. – Updated Director which includes enable/disable session recording for the detail check out http://support.citrix.com/article/CTX142260. – HDX Real-Time Optimization Pack 1.7 for Microsoft Lync 2013 the details here at – http://support.citrix.com/proddocs/topic/hdx-realtime-optimization-pack-17/lync-realtime-optimization-pack-17.html. Detailed How-to Upgrade to Citrix Receiver 4.2.x.n 1: Learn what is required in order to perform an upgrade of your existing Citrix Receiver 3.4 implementation to to 4.2.100 by download this handy and useful PDF best practises guide at – http://docs.citrix.com/content/dam/en-us/receiver/windows/4-2/downloads/Receiver_for_Windows_4.2_Upgrade_Best_Practice_Guide.pdf. 2: It is also worth mentioning that the current new Citrix Receiver for Windows 4.2.x.n now supports TLS 1.1, 1.2, Start menu integration & shortcut management, USB 3.0 and so much more please check out – http://support.citrix.com/proddocs/topic/receiver-windows-42/receiver-windows-42-about.html#receiver-windows-42-about for more information so upgrading does and will provide numerous useful benefits for CTX SysAdmins and there end-users. Upgrading & Migration
1: XenApp 7.5 Migration Guide – http://www.citrix.com/content/dam/citrix/en_us/documents/products-solutions/xenapp-75-migration-guide.pdf.
2: Upgrading & Migration Microsite for XenApp 6.x to XenApp 7.5 – http://www.citrix.com/products/xenapp/tech-info/upgrade.html.
3: Introduction to XenApp 7.6 Upgrade Planning recorded GoToWebcast from 07/102014 available at – https://citrix.webcasts.com/viewer/event.jsp?ei=1040823. If you would any overview please read the orginal events web page at – http://www.citrix.com/events/introduction-to-xenapp-76-upgrade-planning.html. Citrix Education
1: CXA-104 Citrix XenApp 7.6: Overview – – http://training.citrix.com/mod/ctxcatalog/course.php?id=925. 2: CXA-105 Getting Started with Citrix XenApp and XenDesktop 7.6 – http://training.citrix.com/mod/ctxcatalog/course.php?id=973 3: CXA-208 Moving to XenApp 7.6 – http://training.citrix.com/mod/ctxcatalog/course.php?id=1096. 4: CXD-105 Citrix XenApp and XenDesktop Help Desk Support – http://training.citrix.com/mod/ctxcatalog/course.php?id=1011. GUI Installation & Overview for XenApp 7.6, XenDesktop 7.6
1: XenApp 7.6 Reviewers Guide provides a simple installation overview which can be downloaded at https://www.citrix.com/content/dam/citrix/en_us/documents/oth/xenapp-reviewers-guide.pdf and the XenDesktop 7.6 equivalent can be found at – https://www.citrix.com/content/dam/citrix/en_us/documents/products-solutions/xendesktop-reviewers-guide.pdf. Unattended Installation of XAD 7.6 Infrastructure Components & The VDA
1: The installation executable is located at x64\XenDesktop Setup\XenDesktopServerSetup.exe within the installation media path. The below is an example and simply replace x with mounted ISO, CD/DVD drive letter or the UNC path to the XAD7.5-6 installation media. If you do not include the /xenapp switch it will automatically install XenDesktop.

x:\x64\XenDesktop Setup\XenDesktopServerSetup.exe /xenapp /components controller,desktopstudio /configure_firewall

2: Sample installation code to insert into a batch script from Citrix eDocs that will install the VDA on Desktop OS as a master image and it will include Citrix Receiver.


x:\x64\XenDesktop Setup\XenDesktopVdaSetup.exe /quiet /components
vda,plugins /controllers “Contr-Main.mydomain.local” /enable_hdx_ports /optimize
/masterimage /baseimage /enable_remote_assistance

If you are looking for how-to install the VDA for groups of machines in AD the please checkout this eDocs node the batch script that will allow you to install/configure or even remove the VDA – http://support.citrix.com/proddocs/topic/xenapp-xendesktop-76/xad-install-vda-adscript.html.
3: For more detailed information check out – http://support.citrix.com/proddocs/topic/xenapp-xendesktop-76/xad-install-command.html.

High-Definition user eXperience (HDX) 1: So what is HDX? That’s a very good question an introduction whitepaper to your questions can be found at – http://www.citrix.com/content/dam/citrix/en_us/documents/products-solutions/citrix-hdx-technologies.pdf. 2: Now that you’ve read through the whitepaper you will want to begin configuring and testing some of the HDX policies in Studio to test out HDX capabilities. Start with reading through the HDX eDocs node at – http://support.citrix.com/proddocs/topic/xenapp-xendesktop-76/xad-hdx-landing.html. If your more interested in HDX 3D Pro which leverages GPU cards installed on workstations, servers within the data centre then I would suggest to start by reviewing – http://support.citrix.com/proddocs/topic/xenapp-xendesktop-76/xad-hdx3dpro-intro.html. For a visual aid surrounding of how GPU technologies with work XenApp & XenDesktop take a look at how GPU pass-through works at – http://www.nvidia.com/object/xenapp.html for with XenApp and for a vGPU works for XenDesktop check out – http://www.nvidia.com/object/virtual-gpus.html. 3: High Definition User Experience template policy in Studio explained and feedback requested – http://blogs.citrix.com/2014/11/13/citrix-studio-templates-help-needed-out-of-the-box-configuration-for-xendesktop-and-xenapp/. Citrix Unveils New Version of Market Leading Third-Generation Unified Platform for Application and Desktop Virtualization
http://www.citrix.com/news/announcements/aug-2014/citrix-unveils-new-version-of-market-leading-third-generation-un.html Citrix Offers Technology Preview of Linux Virtual Apps and Desktops Delivered from XenApp and XenDesktop

http://www.citrix.com/news/announcements/aug-2014/citrix-offers-technology-preview-of-linux-virtual-apps-and-deskt.html Deploying Unified Communications (UC) Lync 2010/2013 1: Lync Feature Matrix is available at – http://support.citrix.com/article/CTX200279 which is very useful for understanding what is and what isn’t supported and whether you need to deploy either the HDX Optimisation Pack of the Microsoft VDI Plug-in. 2: Delivery options for deploying Microsoft Lync for XenApp 7.6 or XenDesktop 7.6 explained in detail at – http://blogs.citrix.com/2014/10/23/delivering-lync-from-xenapp-and-xendesktop/. I’ve summarised your options below: – Generic HDX Realtime * Pure ICA/HDX between two end-points and the infrastructure. – HDX RealTime Optimization Pack for Lync® * Optimised softphone with offloading of the media engine by Citrix Note: 1.6 is for Lync 2010 and 1.7 is for Lync 2013 check out 1.7 – http://support.citrix.com/proddocs/topic/hdx-realtime-optimization-pack-17/hdx-realtime-optimization-pack-about-17.html which is compatible with Lync Server 2013, Lync Server 2010, and Lync Online (Office 365). – Microsoft® Lync® VDI Plug-in * Optimised softphone with offloading of the media engine by Microsoft check out the CTX article for a how-to at – http://support.citrix.com/article/CTX138408. – Local App Access utilises a * XAD policy applied to users to utilise the locally installed Lync app over published Lync app from XenApp. If you want to under more about how-to enable this XAD feature please review – http://support.citrix.com/proddocs/topic/xenapp-xendesktop-76/xad-laa-intro.html. * Please refer to eDocs or CTX200279 3: UC with XenApp and XenDesktop Solutions Brief – https://www.citrix.com/content/dam/citrix/en_us/documents/products-solutions/unified-communications-with-xendesktop-solutions-overview.pdf.

Heartbleed Security Vulnerability

Some useful links surrounding the recent discovery of the OpenSSL security vulnerability named Heartbleed but its technical official reference is “CVE-2014-0160” related to Citrix.com.

1: The official website – http://heartbleed.com and vulnerability tech overview is available at – https://cve.mitre.org/cgi-bin/cvename.cgi?name=CVE-2014-0160.
2: Citrix CTX article providing an update regarding any products which potentially require a patch, upgrade – http://support.citrix.com/article/CTX140605.
3: Useful blog article detailing the security advisory for XenMobile deployments – http://blogs.citrix.com/2014/04/15/citrix-xenmobile-security-advisory-for-heartbleed/.