Tag Archives: XenApp

Citrix Workspace app is released Hello World

The views expressed here are my own and do not necessarily reflect the views of Citrix.

Introduction
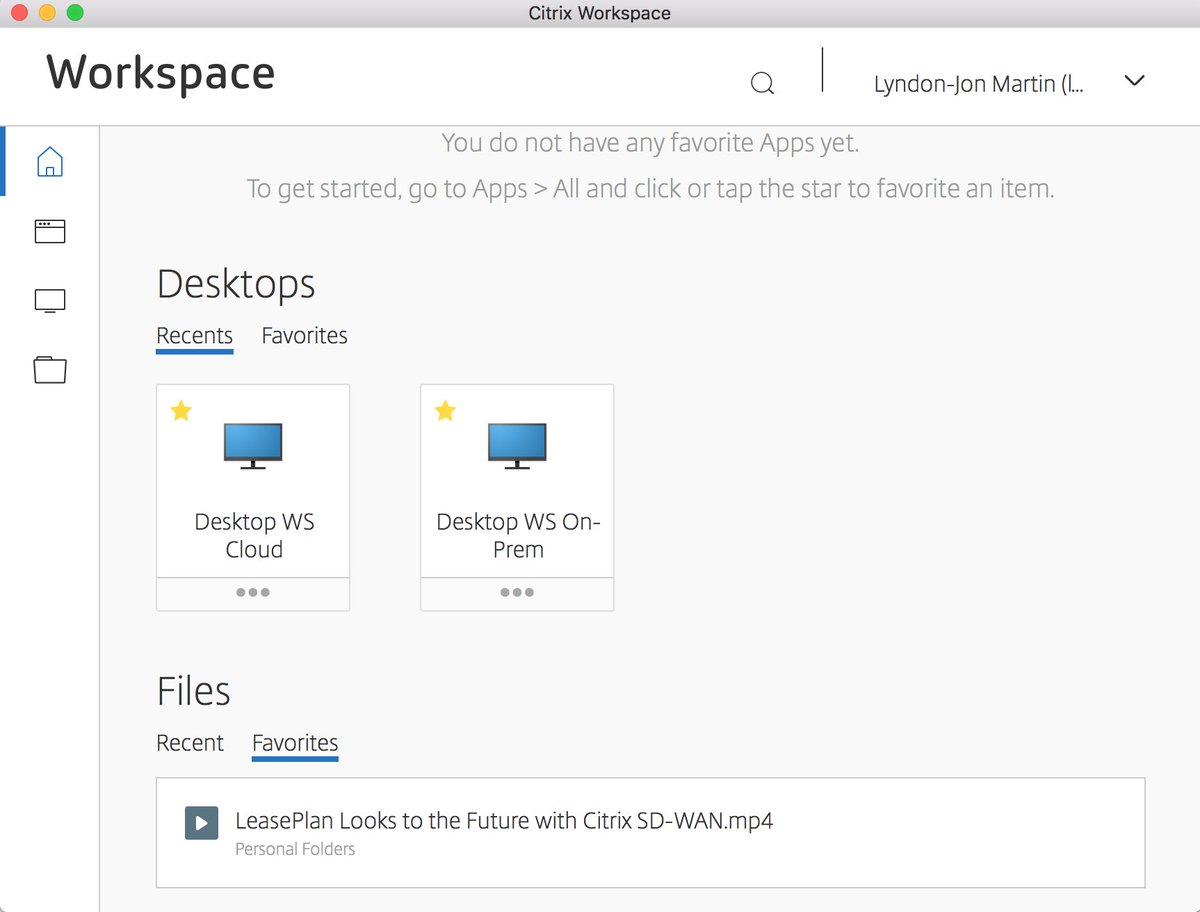
What is Citrix Workspace app? It brings together all your LOB tools which in todays modern world consists of (virtual/micro/installed/mobile) apps, SaaS, desktops & content. I’ve embedded a sample of what this actually looks like below.

Overview
The new Citrix Workspace app way more than purely an upgrade of Citrix Receiver e.g grey to blue icon and a skin change, this NEW Citrix client app release is simply extraordinary, working for Citrix I can be considered bias however once you actually begin to consume the Citrix Workspace app you’ll understand exactly what I mean. Citrix Workspace app is for me all about an experience, and that experience is extraordinarily AWESOME! As I begin consuming my LOB (Line of Business) tools wherever I am + want and in a setting/context that suites me (home, Paddington vs. partner offices, trains, taxi e.t.c) the chosen LOB tool delivered context can change dependant upon criteria (I won’t be covering this today) or how IT (say YES!) has chosen to deliver the LOB tool through Citrix Access Control Service – https://docs.citrix.com/en-us/citrix-cloud/access-control/get-started.html.

I now have all my content available all in the same AWESOME app thank you Citrix Content & Collaboration aka ShareFile. I can upload, download and even favourite particular content e.g “L-J’s H1/2 Citrix Partner Tech Super Deck” which is then available directly from the home view/tab. In the below example I am uploading the LeasePlan Citrix SD-WAN case study – https://www.citrix.co.uk/customers/leaseplan-en.html and the actual video is available at – https://www.youtube.com/watch?v=4Hq-yryxfS0 take a look and remember to listen to the outcomes Citrix SD-WAN provides LeasePlan.
How do I get started today?
Firstly I will do a more detail blog post on getting it all up and running with use cases time dependant of course.

1.Start by navigating to https://docs.citrix.com/en-us/citrix-workspace-app.html and then goto Citrix.com and login with your access details, next navigate to https://www.citrix.com/downloads/workspace-app/ and download Citrix Workspace app for your chosen end-point. If you are running a TP of Citrix Workspace app code base please UNINSTALL it prior to installing the GA production code base as a few community individuals I know had issues upgrading from TP code base. I would like to state for the record I upgraded from PRODUCTION Citrix Receiver to the Citrix Workspace app for Mac 1808 on my Mac without ANY issues see below tweet.

2. Please carefully read the System Requirements for your chosen platform here is the link for Mac – https://docs.citrix.com/en-us/citrix-workspace-app-for-mac/system-requirements.html and Windows https://docs.citrix.com/en-us/citrix-workspace-app-for-windows/system-requirements.html.

3. Review the installation guidance for Mac – https://docs.citrix.com/en-us/citrix-workspace-app-for-mac/install-configure.html and Windows – https://docs.citrix.com/en-us/citrix-workspace-app-for-windows/install.html.

4. Please carefully read the configuration of Workspace app for Mac – https://docs.citrix.com/en-us/citrix-workspace-app-for-mac/configure.html
and Windows – https://docs.citrix.com/en-us/citrix-workspace-app-for-windows/install.html e.t.c. for other platform and if you are looking for multi-monitor support or Mac – https://docs.citrix.com/en-us/citrix-workspace-app-for-mac/improve-user-experience.html#using-multiple-monitors for Windows – https://docs.citrix.com/en-us/citrix-workspace-app-for-windows/improve.html#multi-monitor-support, and securing communications between Workspace app and your StoreFront for Mac – https://docs.citrix.com/en-us/citrix-workspace-app-for-mac/secure-communications.html and Windows – https://docs.citrix.com/en-us/citrix-workspace-app-for-windows/secure-communication.html (Pay attention to deprecated cipher suites node) and finally if your are you a Smart Card user pay attention to the recitations at the bottom of both docs for Mac – https://docs.citrix.com/en-us/citrix-workspace-app-for-mac/requirements-for-smartcard-authentication.html and for Windows – https://docs.citrix.com/en-us/citrix-workspace-app-for-windows/authentication/config-smart-card.html and for WIF 5.4 (yes I know really however some of you still may need it while your upgrading to XAD 7.x platform) https://docs.citrix.com/en-us/citrix-workspace-app-for-windows/secure-communication/config-smart-card–for-web-interface.html.

5. Sign-up vs. Login to Citrix Cloud today and trial vs. acquire a Citrix Cloud service e.g ShareFile Service or the XAD Service and if you want to aggregate on-premises LOB apps into the new Citrix Workspace experience then setup “Site Aggregation” today. To learn how please read this CTXS blog post and watch the embedded YouTUBE video which provides a how-to overview at – https://www.citrix.com/blogs/2018/08/03/site-aggregation-for-citrix-workspace-is-now-ga/.

Thats all folks for now on the technical overview its brief I know so I will follow-up in future with more detailed overview + how-to e.t.c either here or on the https://www.mycugc.org website in the experts area.

Upgrading to Citrix Workspace from Citrix Receiver for smart devices

In Closing
I work for Citrix, I have been a Citrix + IaaS advocate for well over a decade (now SD-WAN swell) so I am mostly likely bias you’ll think however Citrix Workspace app is truly AWESOME and way more than what you see at a glance, I encourage you all to begin consuming it today to see for yourself just what I am talking about and why I personally say its “AWESOME“.

What’s New with HDX (3D Pro) Technologies in XenApp & XenDesktop 7.16

The following content is a brief and unofficial prerequisites guide to setup, configure and test accessing secure by design virtual apps and desktops powered by XenApp & XenDesktop 7.15 prior to deploying a PoC, Pilot or Production environment by the author of this entry. The views, opinions and concepts expressed are those by the author of this entry only and do not necessarily conform to industry descriptions or leading best practises. The views expressed here are my own and do not necessarily reflect the views of Citrix.

Shortened Names
SESSION REABILITY – sr
HIGH DEFINITION EXPERIENCE – hdx
XENAPP/XENDESKTOP – xad
SESSION REABILITY – sr
CURRENT RELEASE – cr
LONG TERM SERVICE RELEASE – ltsr

Introduction what is HDX?
High Definition eXperience (HDX) is a set of technologies that provides a near to HD local like experience of a remoted virtual app, desktop or both to users anywhere in the world on any device even without installing anything on that device all you need is a modern widely used (supported) HTML5 compliant internet browser e.g Chrome, Safari (try it on your iOS devices :-)), Firefox, Internet Explorer you get the picture.

HDX is simple yet so powerful and has three founding principles which are intelligent redirection, adaptive compression, and data de-duplication like wise it has three principles it performs when you connect to there virtual resources which is Inspect the VM (Server vs. Desktop) what does it have e.g vGPU, Inspect the network what its like and can I use UDP for adaptive transport or should I fallback to TCP to remote the display + multimedia and finally it inspects the end-point what is there and can I use it? An example is the HDX Optimisation Pack available to offload audio/video for my Skype for Business sessions or shall I utilise generic HDX fallbacks?

I’m not going in great detail in this introduction so if your new to HDX or even an HDX Xen Master I’d still encourage you read the white paper published by Citrix on HDX Technologies at –
https://www.citrix.com/content/dam/citrix/en_us/documents/white-paper/citrix-hdx-technologies.pdf. Also be sure to check out the HDX resources page on Citrix.com at – https://www.citrix.co.uk/products/xenapp-xendesktop/hdx-technologies.html.

Finally you can find all the latest about XAD 7.16 and not just whats new with HDX in this release at – https://docs.citrix.com/en-us/xenapp-and-xendesktop/current-release/whats-new.html and you’ll notice that it’s not a 7.16 URL but refers to current release or CR.

HDX RealTime
Skype for Business to Teams “We are committed…” read all about it in Dereks blog post on Citrix.com – https://www.citrix.com/blogs/2017/11/08/the-big-news-about-microsoft-teams. The big announcement is that HDX RealTime Optimisation Pack now has an LTSR release version 2.4 which is available and you can learn more product lifecycle information at – https://docs.citrix.com/en-us/hdx-optimization/2-4-ltsr.html. Its also worth noting that this LTSR does NOT support any version of Microsofts Teams only Skype for Business 2015, 2016 you can learn more by reviewing the System Requirements for the client vs. server side at – https://docs.citrix.com/en-us/hdx-optimization/2-4-ltsr/system-requirements.html.

– HDX RealTime Media Engine for the Citrix Ready workspace hub (formerly known as HDX Ready Pi) is only supported for ViewSonic – https://citrixready.citrix.com/viewsonic/viewsonic-sc-t25.html or NComputing – https://citrixready.citrix.com/ncomputing/ncomputing-rx-hdx-thin-client.html Pi’s only. You can also get management of these devices from Stratodesk check out – https://www.stratodesk.com/products/raspberry-pi-thin-client.
– Behavioural changes in the way audio is handled in fallback mode when CPU is busy is to disable Echo Cancellation via the RTME as the generic HDX RealTime will handle this capability until returning to expected behaviour and lower CPU load.
– Enhancements to the microphone to provide better insights into whom is speaking.

The full list of what’s new in this LTSR is available at – https://docs.citrix.com/en-us/hdx-optimization/2-4-ltsr/whats-new.html.

HDX Broadcast
– The release of XAD 7.16 introduces a great new VDA installation behaviour change 🙂 whereby it will automatic set the HDX mode to be standard (Server OS) vs. HDX 3DPro mode (Desktop OS if it meets the requirements for HDX 3DPro e.g the Desktop OS includes a vGPU or GPU) which I believe is setup in the right direction and simplifying overall CTX Admin overhead e.g another syntax option to remember vs. I forget to configure the correct parameter.
– Now by default the new HDX Graphics mode is enabled is adaptive transport or EDT and is set to Preferred. Don’t worry if your a Citrix Admin as you’ve maybe already realised I didn’t enable UDP for this to work! Remember is an adaptive remote display protocol so it will fallback to TCP by default using the default Citrix HDX ports. Its also worth mentioning that when (Preferred) is set then SR is enabled for both UDP vs. TCP connections and client connections (Receiver check supported versions e.g Win min 4.10; Mac 12.8) are attempted in parallel during the initial connection, for SR reconnections and finally auto client reconnects aswell.
– Browser Content Redirection – https://docs.citrix.com/en-us/xenapp-and-xendesktop/current-release/multimedia/browser-content-redirection.html redirects the contents to the local device running an embedded browser within the HDX session which allows for offloading of content, network traffic, graphics from the VDA running in the resource location to the users end-point enhancing the UX significantly.
– Not strictly something new but HTML5 Redirection – https://docs.citrix.com/en-us/xenapp-and-xendesktop/current-release/policies/reference/ica-policy-settings/multimedia-policy-settings.html which is still currently only available for internal usage as you’ll read from the eDocs article but this is 100% something an Citrix Admin & Architects should begin testing today as HTML5 begins in my personal view to supersede Flash based websites as we move forward towards 2020.
– Auto DI Scaling for Multi-Monitor
– H.265 encoding support running on the latest end-points which supported a GPU that supports H.265 decoding and if its not available it will by default fall-back to H.264 decoding. The net result of moving to H.265 from H.264 which is a Platinum only feature results in significant bandwidth savings and much better UX. I have seen the net results with a few of our engineering customers that develop vehicles with teams spread out across the world and the results as awesome!
– Strictly speaking this is not agnostic or exclusive to the HDX technology stack but the Windows Continuum is quiet important for a great user experience and its powered by primarily at a the hypervisor level and its currently only supported on Citrix XenServer. Visit – https://docs.citrix.com/en-us/xenapp-and-xendesktop/current-release/technical-overview/hdx.html for how-to configure it today if your running XenServer.

– High definition webcam streaming for Windows Server with resolutions up to 1920×1080 – https://docs.citrix.com/en-us/xenapp-and-xendesktop/current-release/technical-overview/hdx.html#hd-webcam
– “Session Watermark” with custom text which you learn to setup and configure using the following CTX article – https://support.citrix.com/article/CTX230054 and was originally part of the XenApp Secure Browser and its deployment guide is available at – https://docs.citrix.com/content/dam/docs/en-us/workspace-cloud/downloads/Secure%20Browser%20-%20Deployment%20Guide.pdf.

In Closing
I be covering off some HDX topics in more detail in up and coming blog posts either here or in “Expert Insights” at myCUGC website at – https://www.mycugc.org/. Finally if you want to take part in my challenge for 2018 you can learn more about it at – https://www.mycugc.org/blog/a-2018-challenge-for-the-mycugc-community.

SAML Sign-in to Virtual Smartcard for Virtual Apps & Desktops

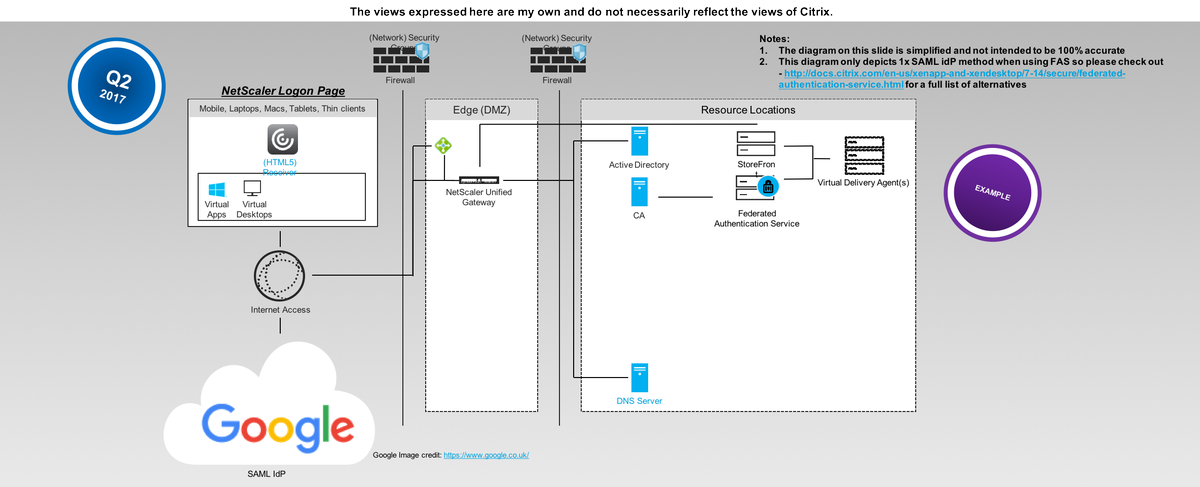
The following content is a brief and unofficial prerequisites guide to setup, configure and test accessing virtual apps and desktops authenticated via SAML IdP (Google OAuth) powered by XenApp & XenDesktop 7.14.1+ and NetScaler Unified Gateway 11.1 prior to deploying a PoC, Pilot or Production environment by the author of this entry. The views, opinions and concepts expressed are those by the author of this entry only and do not necessarily conform to industry descriptions or leading best practises. The views expressed here are my own and do not necessarily reflect the views of Citrix.

Shortened Names
FEDERATED AUTHENTICATION SERVICE – fas
SECURITY ASSERTION MARKUP LANGUAGE – saml
IDENTITY PROVIDER – idp
SERVICE PROVIDER – sp
USER AGENT – ug
NETSCALER UNIFIED GATEWAY – nug or netscaler ug
XENAPP – xa
XENDESKTOP – xd
XENAPP/XENDESKTOP – xad
STOREFRONT – sf

What is OAuth?
Wikipedia definition – https://en.wikipedia.org/wiki/OAuth and Google’s definiton – https://developers.google.com/identity/protocols/OAuth2.

What is SAML?
Wikipedia definition – https://en.wikipedia.org/wiki/Security_Assertion_Markup_Language.

Why this blog article?
For me as organisations begin shifting to a Cloud native or Cloud First (i prefer hybrid cloud) stratergy they begin too embrace PaaS e.g Citrix Cloud, Office 365 BUT a common major problem is where does the users identity live and do I need replicate it (read-only, passwd hashes e.t.c) and secondly mobilising of data repositories is another major requirement vs. problem. ShareFile can help in solving your data mobilisation problems which I will follow up in a separate blog article in the future to expand upon this, but for now back to SAML and Identity.

Utilising the Federation Authentication Service or FAS for short which is part of XenApp and XenDesktop (see feature matrix – https://www.citrix.co.uk/products/xenapp-xendesktop/feature-matrix.html) in-line with NetScaler UG enables organisations to solve numerous problems about identity (where is lives vs. its synced to data centres A through C e.t.c) enabling access to any type of app fronted by NetScaler Unified Gateway working inline with FAS.

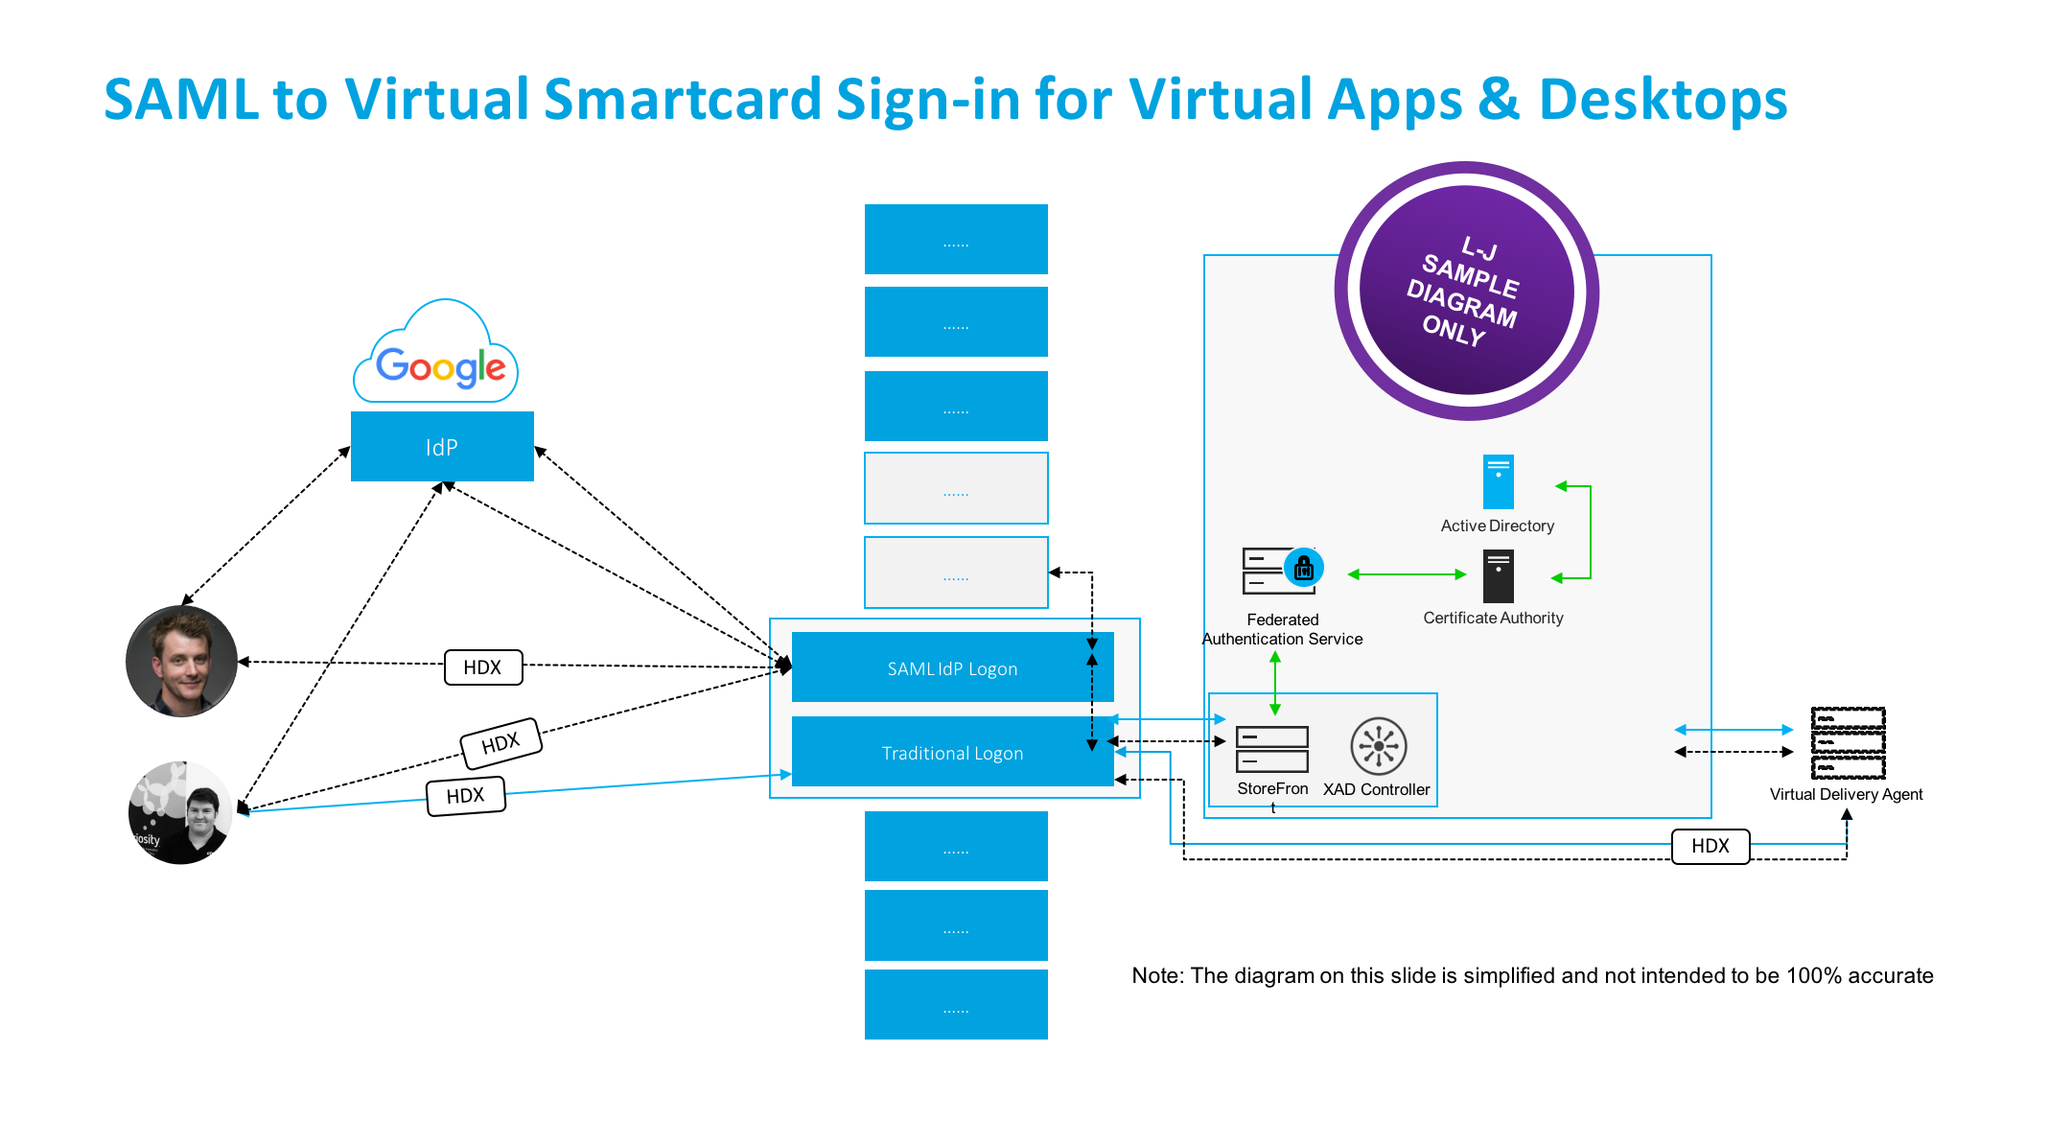
NetScaler for me is your organisations front door (knock knock) e.g https://go.axendec.com or if you know me #10 Downing Street from on any device and it controls how the users authenticates requirements e.g AD, AAD, SAML vs. OAuth 2.0, Biometrics (e.g VeridiumID watch – https://www.veridiumid.com/video-citrix-ready-partnerspeak-veridium/ which is Citrix Ready and be sure to check out https://www.veridiumid.com/biometric-authentication-technology/biometric-connectors/), however in this scenario i’ll focus on access from devices that support a modern web browser (HTML5) to keep it simple. The below table depicts a user that has successfully loaded onto NUG with SMAL vs. OAuth 2.0 credentials and they can go left towards SaaS web apps or right towards virtual apps & desktops where FAS + StoreFront + Int Windows CA will generate a virtual smart card from the SAML token passed from NetScaler to SSO onto the required resource e.g Windows Server 2016 virtual desktop.

SaaS NetScaler Unified Gateway Virtual Apps & Desktops
User logins with SAML credentials e.g AAD, Google OAuth 2.0
← SAML or OAuth 2.0 Token →
Office365 XenApp & XenDesktop,
StoreFront, FAS & Internal Windows CA

PoC SuGgEsTeD Architecture Diagram – BASIC
I have gone for a very simple diagram approach here to help those will little to no knowledge on SAML, OAuth 2.0, AD Shadow accts, virtual smart cards get up to speed.

User Login Flow (Not Step by Step its High Level)
1. The user navigates to the SAML IdP logon webpage setup, configured and hosted by NetScaler UG.
2. The user is automatically redirect to the Google auth login web page to authenticate.
3. Once the user is successfully authenticated at Google they are re-directed back to the NetScaler UG and auto signed in and auto redirected (Responder Policy) to the configured Unified Gateway (my use case here) or ICA Proxy vServer.
4. The user can then select from a choice of Full vs. Clientless VPN or Virtual Apps & Desktops (Selected). Note that in the username will be user@domain while still on the NetScaler UG.
5. The user is SSO onto ReceiverforWeb hosted + powered by StoreFront and the user selects to launch an there choosen HDX virtual app and or desktop(s), you’ll now notice that the username is now first, last name.
6. StoreFront initiates and generates a ICA/HDX file for the user while communicating with FAS + internal Windows CA to generate a virtual smart card for the user that will be used to SSO the user onto there requested resource(s) e.g a Virtual Desktop.
7. The user receives the ICA/HDX file and Receiver automatically launches his/her virtual app and or desktop.

Demonstration WhoamI?

PoC SuGgEsTeD Architecture Diagram – ADVANCED

The Actual Login Flow
Coming…*

Pre-requistes & System Requirements – Google OAuth 2.0
1. Navigate to https://console.developers.google.com/projectselector/apis/credentials and sign-in with your Google credentials.
2. Select “Credentials” under API Manager then select to “Create” a Project
3. Enter in a new “Project Name” and read and review Googles EULA and notification service about updates etc.
4. Google will create your Project
5. Select “Create credentials” and from the drop down select “OAuth client ID”
6. Configure “OAuth consent screen” the bare minimum is to select “Product name shown to users” e.g MYProJectName and then select “Save” you can return later and complete …
7. Now you need to create a client ID select the application type to be “Web Application”
Enter in a friendly name:
– For “Authorized JavaScript origins” enter in “:4443”
– https://YOUR-FQDN:4443
– For “Authorized redirect URIs” enter in “:4443”
– https://YOUR-FQDN:4443/oauth/login
– Select “Create” twice
Google will now create your OAuth credentials and a popup screen will appear with your “Client ID” e.g xnxnxnxnxnxnxnxnxnxnx.apps.googleusercontent.com and “Client Secret” e.g 123456789xnxnxn
8. Now store of copy of these for later in a safe please as you’ll need it for the NetScaler configuration later.

Pre-requistes & System Requirements – Citrix
NetScaler
1. Review the deploying NetScaler guide for your chosen resource location at – http://docs.citrix.com/en-us/netscaler/12/deploying-vpx.html. If your wondering what a Resource Location click this link – http://docs.citrix.com/en-us/citrix-cloud/overview/about/what-are-resource-locations.html.
2. Download vs. deploy your NetScaler virtual appliance on your own terms e.g upload and boot on a hypervisor vs. deployed via a IaaS market place.

– Traditional hypervisors configurations for PoC vs. Home purposes only 2vCPU 2-4GB of RAM
– Cloud hypervisors e.g Azure, AWS for PoC vs. Home purposes only 2vCPU 3.5GB or RAM

3. Licensing Your NetScaler
3.1 You’ll need to license the appliance so obtain trial of e.g VPX 1000 and or 3000 from http://store.citrix.com/store/citrix/en_US/pd/productID.278306700/ThemeID.33753000 or search for Citrix Eval Store at Google.com.
3.2 The above link should redirect your to the NetScaler ADC part of the Eval Store
3.4 Select model type of “VPX” then select variation e.g “1000 vs. 3000 Platinum” and for duration select “30, 60 or 90 Days“.
3.5 Complete the onscreen steps and please note that you will require a valid Citrix.com account or you need to create an account in order to complete the trial request to obtain the eval license.
3.6 Once you’ve received your eval license via email navigate to at https://www.citrix.com/account/toolbox/manage-licenses/allocate.html and select find and allocate your licenses or look for the licensing button (link) and select it.
3.7 If your eval license it not visible e.g created by a Citrix rep or one of our partners –https://www.citrix.com/buy/partnerlocator/ select “Don’t see your product?” top right-hand side (small text!). A pop-up appears now enter in the eval lic provided in the format of “NNNN-XXXXX-XXXXX-XXXXX-XXXXX” and select to continue.
3.8 You will need to enter in the Host Id of your NetScaler it can be found once logged in using the NS Admin Web UI “NetScaler -> System -> System Information” then look under the heading “Hardware Information” and you find “Host Id” copy and paste it into the required field and then download the license file.
3.9 In the NS Admin Web UI click the cog icon top right then select licensing and upload the license and select to reboot the NS to apply the license.
3.10 Your NetScaler is now licensed now simple enable the required features that you need vs. require by right clicking a feature e.g NetScaler Gateway select “enable” e.t.c

4. If your in a Public Cloud setup your (Network) Security Groups to allow you external traffic to your NetScaler and i’d suggest that your disable SSH on port 22 from the world and only enable https 443 and use a Windows server + PuTTY within your Azure RG vs. EC2 VPC to interact with your NetScaler. Note: I am keeping it simple here re DMZ/Edge vs. TRU vs. Mgmt networks. Traditional rules apply for Private Cloud setups or WWW vs. DMZ vs. TRU vs. Mgmt networks.

Federated Authentication Service (FAS)
1. Download FAS Software is part of the XAD 7.9+ ISO – https://www.citrix.co.uk/downloads/xenapp-and-xendesktop/ and select 7.15 LTSR
2.
System Requirements – http://docs.citrix.com/en-us/xenapp-and-xendesktop/7-13/secure/federated-authentication-service.html
3. Deploy GPO Policies – http://docs.citrix.com/en-us/xenapp-and-xendesktop/7-13/secure/federated-authentication-service.html#par_anchortitle_6ba9/
– List + Enable XAD Broker/Controller
– Enable in-session certificate support
4. Certificate Authority – http://docs.citrix.com/en-us/xenapp-and-xendesktop/7-13/secure/federated-authentication-service.html#par_anchortitle_27dd. You may require or choose an Internal Microsoft Windows CA 2012 R2 or 2016 (Test with in this PoC)
Active Directory Certificate Services – https://technet.microsoft.com/en-us/library/hh831740.aspx
– Configuring Windows for Certificate Logon – http://support.citrix.com/article/CTX206156
– Setup Certificate Authority – http://docs.citrix.com/en-us/xenapp-and-xendesktop/7-13/secure/federated-authentication-service.html#par_anchortitle_8dfa
5. VERY IMPORTSANT When Configuring User Rules for FAS list all the required StoreFront Servers, VDA’s and User(s) either by individual object or group e.g. AD Security group PoC SAML Users – http://docs.citrix.com/en-us/xenapp-and-xendesktop/7-13/secure/federated-authentication-service.html#par_anchortitle_6ba3
6. Enable FAS for the default or custom Store on StoreFront – http://docs.citrix.com/en-us/xenapp-and-xendesktop/7-13/secure/federated-authentication-service.html#par_anchortitle_32e2
7. A full AD Admin account for all components will help and save time during the PoC

Deploying @gmail login to NetScaler using OAuth 2.0 / SAML
Coming….

Recommended Reading
– Credit to Citrix *CTP Dave Brett – http://bretty.me.uk/citrix-xendesktop-7-9-google-accounts-and-fas-for-xendesktop/ and I’d strongly recommend your read his blog post! His approach vs. requirements differs slightly from that of my own requirements. He saved me a lot of time and in testing + reading through eDocs so @dbretty thank you!
– Configure StoreFront with OKTA (CTX232042) – https://support.citrix.com/article/CTX232042
Integrating NetScaler with Microsoft Azure Active Directory
– Credit to Citrix CTP Aaron Parker – Integrating Citrix NetScaler with Azure AD and Conditional Access


#CitrixPartnerLove
However in the *interim if your a Citrix Partner and you want to learn more and how to deploy this today! You can access the following on-demand entitled “SAML to Virtual Smartcard Sign-in for Virtual Apps & Desktops” at – http://enablement.citrix.com/library/items/1261 BUT you will require a valid Citrix partner login.

Deploying a Citrix Cloud – XenApp and XenDesktop Service PoC

The following content is a brief and unofficial overview of how-to front your virtual apps & desktops powered by Citrix Cloud XenApp & XenDesktop Service and the NetScaler Gateway Service using an Azure (IaaS) resource location. The views, opinions and concepts expressed are those by the author of this entry only and do not necessarily conform to industry descriptions, best practises. The views expressed here are my own and do not necessarily reflect the views of Citrix.

Shortened Names
XENAPP – xa
XENDESKTOP – xd
VIRTUAL DELIVERY AGENT – vda
HIGH DEFINITION EXPERIENCE – hdx
VIRTUAL DESKTOP – vd
THINWIRE COMPATIBLE MODE – tcm also known as ecm or thinwire+
SELF-SERVICE PASSWORD RESET – sspr
VIRTUAL GPU – vgpu
PROOF OF CONCEPT – poc
XENAPP AND XENDESKTOP SERVICE – xad service
CITRIX CLOUD CONNECTOR – CC Connector
ACCESS CONTROL LISTS – acl
FIREWALL – f/w

What is Citrix Cloud?
Firstly this blog post will be updated through-out Nov, Dec 2016 as I still have a few minor additions and adjustments to make but in principle this blog post should help you stand up a Citrix Cloud – XAD Service PoC successfully with your chosen resource location.

Citrix Cloud provides a control plane that includes Citrix technologies as services e.g XenApp and XenDesktop Service that allows Citrix SysAdmin’s to setup, configure and deliver virtual apps & desktops to users on any device, anytime and from any location from your chosen resource location which could be hosts runnings in a data centre running XenServer, Hyper-V, Acropolis*, vSphere vs. hyper-converged appliances (Nutanix*, Atlantis) or it could running in an IaaS or public cloud providers e.g Azure or AWS e.t.c

Your resource location of choice is connected to the Citrix Cloud control plane through something called the Citrix Cloud Connector which is installed onto a supported Windows server OSes that is domain-joined in pairs which runs a services that communicates to the control plane outbound on HTTPS/443 which also has the added benefit of NOT requiring any type of VPN (SSL, R/A or IPSec GRE Tunnel)!

Adopting Citrix Cloud introduces an evergreen or SaaS-style update(s) approach to the Citrix infrastructure components as an example within the XenApp and XenDesktop Service e.g the controller, licensing server, storefront are hosted and managed by Citrix and auto updated (evergreen) thus reducing infrastructure updates, upgrades so IT can focus on other workspace projects e.g implementing Skype for Business – http://axendatacentre.com/blog/2016/04/25/deploying-skype4b-2015-offloaded-from-a-citrix-hdx-virtual-app-or-desktop/ or daily tasks, activities thus reducing System Administration time which equates to cost savings or shifting more IT time onto providing the very best near to local like delivery and user experience as they have more time.

The Goal of this PoC
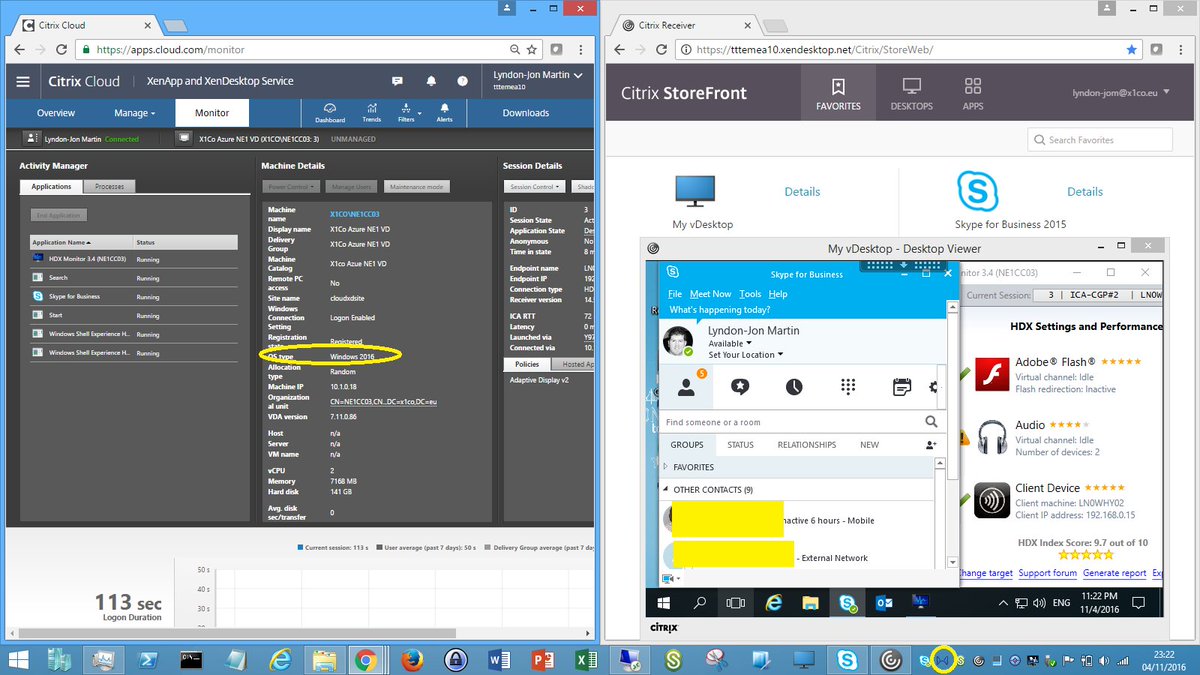
In this blog post I will describe how-to setup and deploy the “Citrix Cloud – XenApp and XenDesktop Service” using Microsoft Azure as my resource location of choice for this PoC to deliver virtual apps & desktops (Server based) including enabling remote access in its simplest form using the NetScaler Gateway Service which enables secure, remote access to virtual apps & desktops from anywhere with an internet connection using the Citrix Receiver or the HTML5 Receiver all without having to deploy a NetScaler in your resource location – https://docs.citrix.com/en-us/citrix-cloud/xenapp-and-xendesktop-service/netscaler-gateway-as-a-service.html and accesing a published Skype for Business 2015 HDX optimised virtual app powered by the HDX Optimisation Pack 2.x.n – http://docs.citrix.com/en-us/hdx-optimization/2-1.html published from a Windows Server 2012 R2 OS server to virtual desktop powered by Windows Server 2016.

Traffic Flows, Metadata & Credential Handling
The following provides insight into the traffic flows when/how users connect to there virtual apps & desktop when using the Citrix Cloud – XenApp and XenDesktop Service.

NetScaler Gateway Service
http://docs.citrix.com/en-us/citrix-cloud/xenapp-and-xendesktop-service/netscaler-gateway-as-a-service.html

XAD Service
http://docs.citrix.com/en-us/citrix-cloud/xenapp-and-xendesktop-service/technical-security-overview.html

Comparing services and pricing is available at – https://www.citrix.com/products/citrix-cloud/subscriptions.html

Pre-requisites & System Requirements
0. Trial Checklist – http://docs.citrix.com/content/dam/docs/en-us/workspace-cloud/downloads/apps-desktops-trial-checklist.pdf which via the XAD Service eDoc root at – http://docs.citrix.com/en-us/citrix-cloud/xenapp-and-xendesktop-service.html.
1. An Azure subscription with sufficient credits and compute resources for your own personal requirements for your own PoC. You’ll also need to understand the concepts of Azure so I’d suggest you begin with reviewing the online documentation available at – https://azure.microsoft.com/ or visit VMFocus blog at https://vmfocus.com/2016/11/07/70-533-implementing-microsoft-azure-infrastructure-solutions-prep-exam-experience/ and scroll to the prepartion text in bold.
2. A Citrix Cloud account with access to the XAD Service check out – https://www.citrix.com/products/citrix-cloud/ for details and information about a trial.
3. Citrix Cloud Connector downloaded from your XAD Service to your Azure resource location onto a shared folder e.g network share on your Windows domain controller or file server. For the basic’s of how-to download and install check out the installation overview at – http://docs.citrix.com/en-us/citrix-cloud/citrix-cloud-connector/installation.html.
4. Download the VDA’s from https://apps.cloud.com/downloads which is only accessiable once your have sucessfully authenticated at https://citrix.cloud.com/.
5. A Windows Server 2012 R2 VM running at a min “Active Directory”, “DNS” and the “Citrix Cloud Connector” and one more VM optional only if you want to keep costs down but preferred to match a real-work scenario would be to have a second Windows Server 2012 R2 VM running the “Citrix Cloud Connector” so that you have a pair of connectors talking to Citrix Cloud.
6. A pair of Windows Server 2012 R2 one to be used for or as a +hosted shared server virtual desktop and the other to deliver virtual apps e.g Skype for Business 2015-16 HDX Optimised Doc’s – http://docs.citrix.com/en-us/hdx-optimization/2-1/hdx-realtime-optimization-pack-overview.html, video overview at – https://www.youtube.com/watch?v=IpOSi_FkA7c.
7. A Windows Server 2016 VM to be your second +hosted shared server virtual desktop (Preferred choice for me :-)) so you can demonstrate publishing virtual apps into both +virtual desktops and demonstrate Windows Server 2016 as a DaaS VD or just a show and tell back to your organisations management to begin thinking moving to Windows Server 2016 from 2008 R2 or 2012 R2.

Deploying your Citrix Cloud Connectors
1. Prior to starting your installation please be sure to switch “Enhanced Security Configuration (ESC)” off during the installation.
2. Right-click on the CC Connector and run as Administrator.
3. Enter in your Citrix Cloud Administrator access details and you’ll receive a list of available customer accounts in your case you should only have one so select it and continue.
4. The installation will install the required software components and prior to finishing it will perform “connectivity test” this will take up to 60 seconds.
5. Make some coffee or tea if you’re British or a British South African born while the Citrix Cloud Connector communicates with the Citrix CLoud control plane successfully registers.
6. Navigate to Citrix Cloud select from the menu bar in the top left-hand corner “Identity & Access Management” on the “Domains” tab you should now see your domain with a status of “Ready ” if you see amber anywhere this is because one of your connectors is not in a ready state or you only have 1x connector in your choosen resource location.
7. Don’t proceed until your connector(s) are in a Ready state in Citrix Cloud, this is very important!

Deploy your Virtual Apps & Desktops
1. At https://citrix.cloud.com/ select under “Services List” parallel to the “XenApp and XenDesktop Service” click on “Manage” blue button. Note that you can also get to mgmt consoles by clicking the menu icon top left-hand corner and from the list select the service that you wish to administer e.g XAD Service.
2. You’ll now be redirected to https://apps.cloud.com/ and scroll to the bottom of the webpage to identify what your cloud hosted StoreFront server address is e.g https://tttemea10.xendesktop.net/Citrix/StoreWeb/, right click and say open in a new tab.
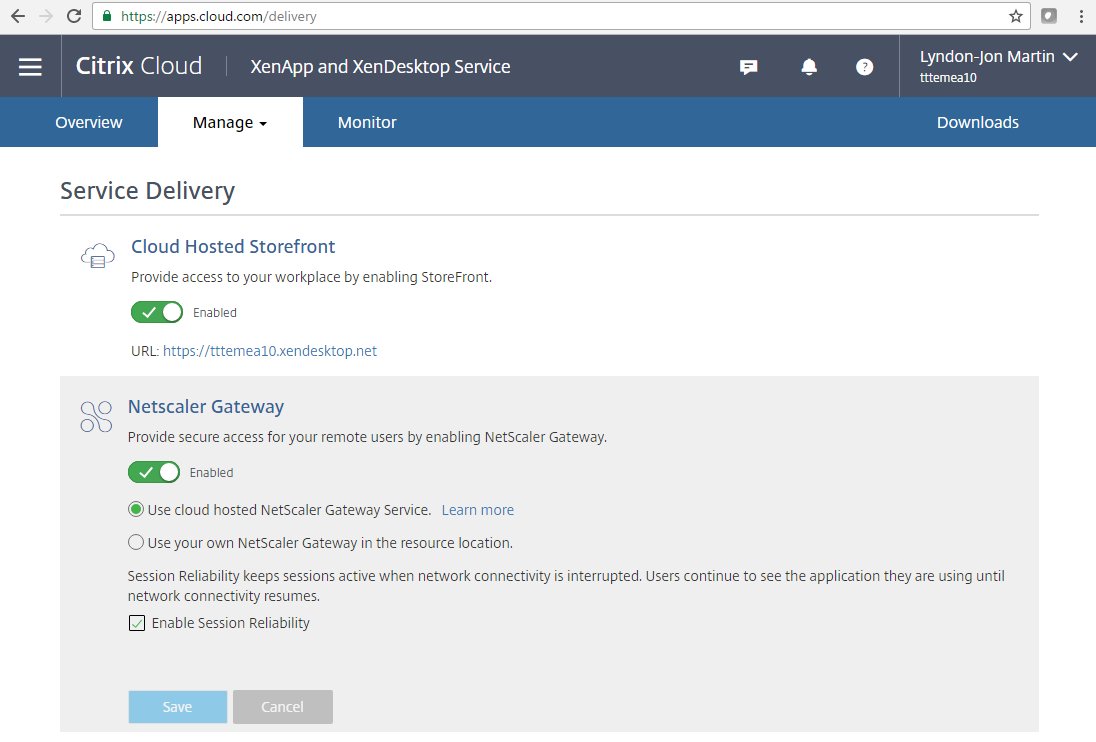
3. Now click on the downwards arrow on “Manage” and you’ll see two options e.g “Service Creation” and “Service Delivery”. Please click on Service Delivery which should take you to https://apps.cloud.com/delivery and you’ll see the below available options. Simply toggle to select your preferred delivery options for delivery of your virtual apps & desktops choosing in this case to utilise the Citrix Cloud – XAD Service cloud hosted StoreFront and or NetScaler Gateway Service. I will follow-up with another blog post in the future covering off deploying this PoC BUT using StoreFront and NetScaler (Unified) Gateway in your chosen “resource location” BUT for now I am keeping it clean and simple. Please verify that your toggle’s match what you see in the below image prior to proceeding (Also see the 3rd tip!!!). If want to use StoreFront – http://docs.citrix.com/en-us/citrix-cloud/xenapp-and-xendesktop-service/setting-up-storefront.html and NetScaler – http://docs.citrix.com/en-us/citrix-cloud/xenapp-and-xendesktop-service/getting-started.html#par_anchortitle_1403 in your resource location the read the provided links above.


TIP/HINT 1: You can choose to toggle off “Session Reliability”.
TIP/HINT 2: Where you configure the XAD Controller point this to the Citrix Cloud Connector.
TIP/HINT 3: The NetScaler Gateway Service is sold separately from the XAD Service as of 2017 Q1 ref – https://www.citrix.com/products/citrix-cloud/subscriptions.html

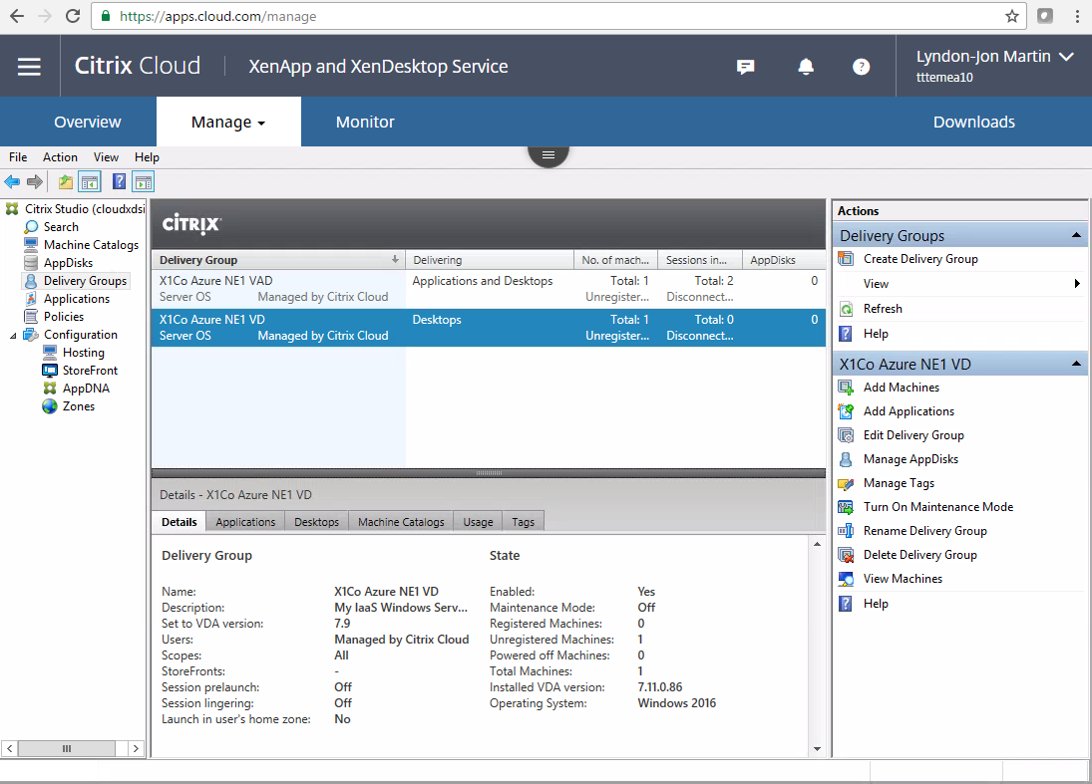
4. Now click on the downwards arrow on “Manage” and now please click on Service Creation which should take you to https://apps.cloud.com/manage you’ll notice a spinning icon in the middle of your screen for a few seconds and then your securely hardened Studio console will be avaiable to you published using the latest HTML5 Receiver which includes auto screen resizing dynamically (change the browser window size :-)), copy and paste.
5. Create your “Machine Catalog(s)” as per normal if your unsure then follow the steps as outlined at http://docs.citrix.com/en-us/xenapp-and-xendesktop/7-11/install-configure/machine-catalogs-create.html then return back to Citrix Cloud published Studio. Create three machine catalog’s if following the blog post 1x machine catalog for virtual apps powered by Win Srv 2012 R2, 2x virtual desktops one powered by Win Server 2012 R2 and one by 2016. Once you have created your machine catalog’s then check that the VM within each “Machine Catalog(s)” have a successful Registered State if the VM(s) in your each catalog(s) don’t register then review my quick troubleshooting guidance below at the end of this blog article.
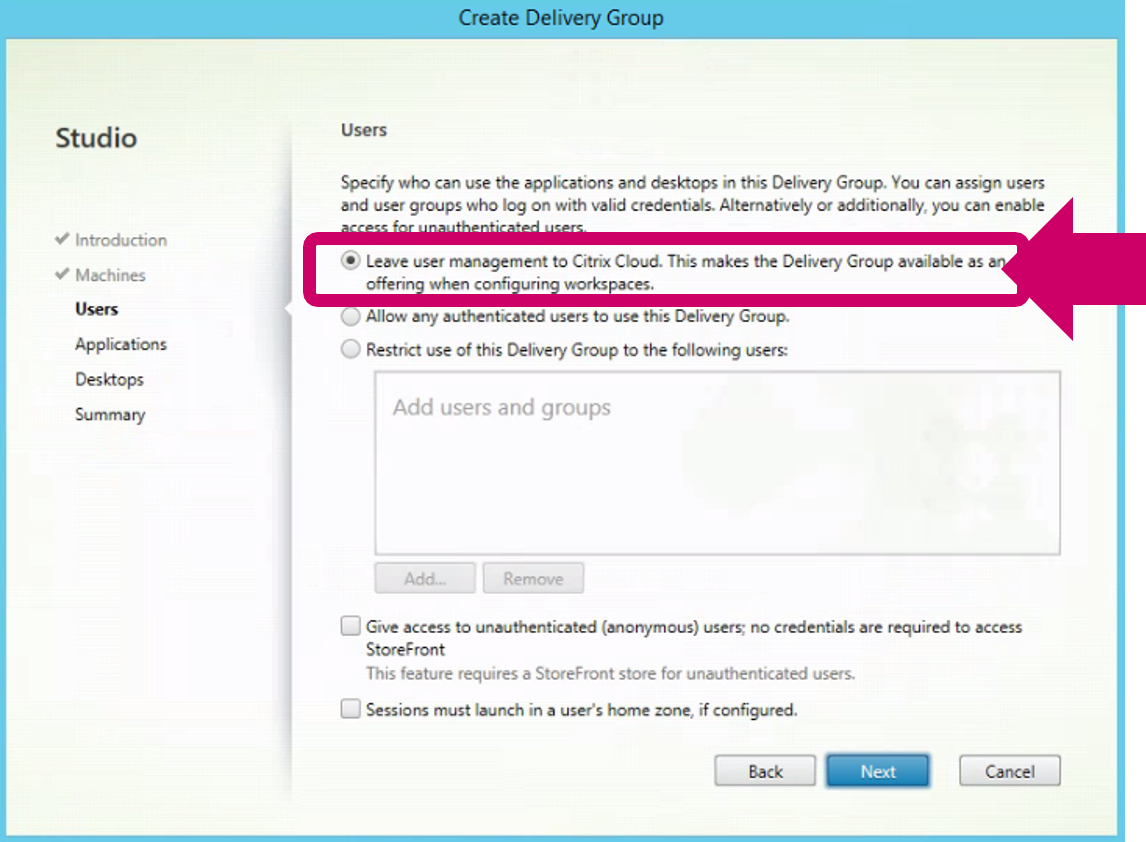
6. Next create a “Delivery Group” almost like normal once agian if your are unsure the how-to is avaiable at – http://docs.citrix.com/en-us/xenapp-and-xendesktop/7-11/install-configure/delivery-groups-create.html remeber agin if following this blog post 1x delivery group for virtual apps powered by Win Srv 2012 R2 and 2x delivery groups for virtual desktops powered by Win Server 2012 R2 and 2016 BUT there is one very important exception which is that once you select the machines and you get to the user section be very sure to select “⚹Leave user management to Citrix Cloud. This makes the Delivery Group available as an offering when configuring your Citrix Cloud Workspaces.”http://docs.citrix.com/en-us/citrix-cloud/overview/get-started/creating-and-publishing-a-workspace.html.


6. Now that you have created a Machine Catalog, Delivery Group you need to assign users to these resources so click the menu icon in the top left-hand corner and select “Workspaces“. You’ll see “My First Workspace” just ignore it for now and select the “+ Workspaces” icon it’s large you just cannot miss it! Note that workspaces are now referred service offerings which you assign to users from your Library – http://docs.citrix.com/en-us/citrix-cloud/overview/get-started/assigning-users-to-offerings-using-library.html.
7. Enter in a name for your workspace e.g PoC Workspace.
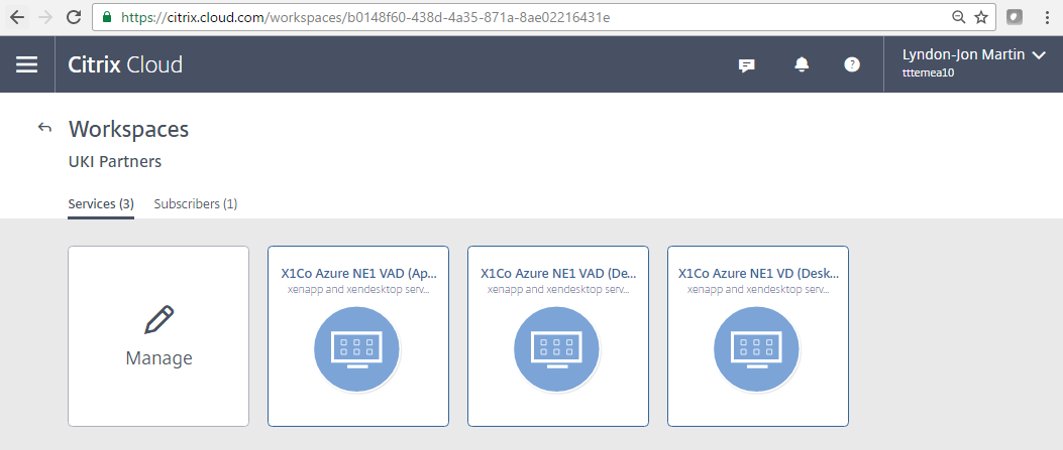
8. Select “✎ Manage” under your Workspace name and now from the available “Citrix Cloud Services” list select the “XenApp and XenDesktop Service” and you’ll see your delivery group(s) dependant if you completely followed this blog post on the right-hand side so simply select your virtual apps and virtual desktops that you wish to publish to this workspace, it’s your choice but in this PoC we’ll be selecting all avaiable delivery groups to delivery virtual apps & desktops. Once selected click on “Update Workspace” blue button above.
9. Your workspace now contains virtual apps & desktops that can be consumed by subscribers e.g users.
10. Now that you have created your first Workspace e.g PoC Workspace in Citrix Cloud using the XenApp & XenDesktop Service all that is left to do is to add users BUT in a Citrix Cloud world they are known as “subscribers“!
11. Select your e.g PoC Workspace once more and click on “Subscribers” tab and you’ll see a domain list below on your left-hand side so select your “domain” and to your right you’ll see an input field type in your subscriber’s username e.g lynd which will then query your AD via the Citrix Cloud connector securely and it will find and return your user(s) e.g lyndon-jon@x1co.eu and once it is listed select the user(s) from your query and they will be added to the list below, now repeat the process to add all other test/poc subscribers or AD test/poc security groups to your e.g PoC Workspace and then click on the “Update Workspace” blue button above to save the subscribers to this workspace.


TIP/HINT: You can also select AD Security Groups not just AD users.

Initial Test
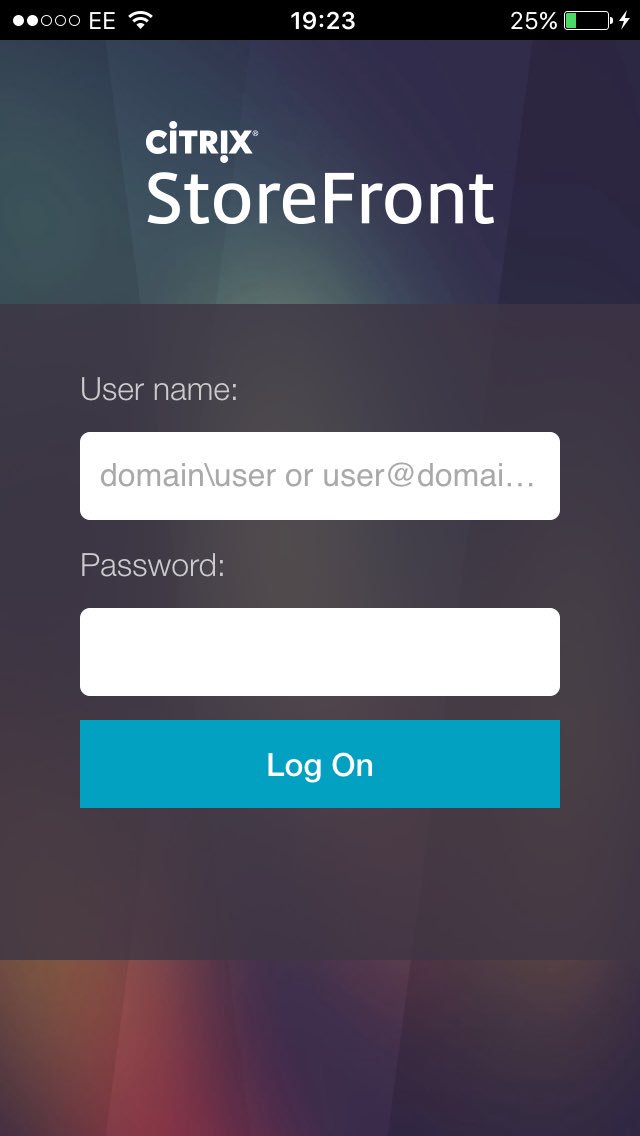
Your users/subscribers should now be able to login to the Cloud hosted StoreFront available at e.g https://YOURCUSTOMERNAME.xendesktop.net using an HTML5 internet browser or Citrix Receiver.

HDX Policies
Please assign your policies as you prefer to users, delivery groups e.t.c. You’ll also notice that I have not applied a FPS limit to every policy only the ones that are balanced as most often these need to adjusted to be fit for purpose for standard office workers to enable user density gains on the backend and bandwidth savings while maintaining a decent and good UX. My personal preference is “HDX Adaptive Display v2“.

HDX Adaptive Display v2 HDX Adaptive Display v2 (Balanced) Thinwire Compatible Mode Thinwire Compatible Mode (Balanced) H.264
1.”Use video codec for compression” then select the option to be “For actively changing regions 1.”Use video codec for compression” then select  “For actively changing regions
2. “Preferred color depth for simple graphics” then select “16 bits per pixel” and also try 24.
1.”Use video codec for compression” then select the option to be “Do not use video codec 1.”Use video codec for compression” then select the option to be “Do not use video codec
2. “Preferred color depth for simple graphics” then select “16 bits per pixel” and also try 24.
3. “Frames Per Second” then enter in a value of “25-30“.
1.”Use video codec for compression” then select the option to be “For the entire screen
2. “Frames Per Second” then enter in a value of “30” (Optional)
My personal preferred choice My 2nd personal preferred choice

Advanced Remote Access using a NetScaler in your Resource Location with(out) StoreFront
The following has been tested using the latest NS firmware 11.1 available in the Azure marketplace as of 05/03/2017.

1. Login to NetScaler admin WebUI using the following firmware 11.1.x.n
2. Check that your appliance is correctly licensed.
3. Select the “Unified Gateway” wizard.
4. Enter in your assigned VIP (private IP addr or in Azure NSIP:8443) and enter in a vServer friendly name e.g myUG
5. Select to “Install Cert” a valid public CA signed cert either *.pfx vs. *.pem.
6. Configure LDAP either use an exciting or add a new server for LDAP auth and choose the “Server Logon Name Attribute” as userPrincipalName .
7. Select “Portal Theme” and select “RfWebUI”
8. Now under the under “Applications” select and add “XenApp/XenDesktop” and now enter in your resource location or Cloud-Hosted StoreFront “FQDN” and select “Test Connection” which should retrieve and auto configure the required settings and thereafter a green bar will appear if successful if not then manually configured based upon the following guidance below.

– Enter in “Site Path” e.g /Citrix/StoreWeb/
– Enter in your Sign Sign-on Domain e.g x1co.eu
– Enter in “Store Name” e.g Store
– Enter in “Secure Ticket Authority (STA) Server” which will be the Citrix Cloud Connector IP addr
– StoreFront server IP Addr:

Option 1 – If using the cloud-hosted StoreFront FQDN e.g https://*.xendesktop.net then please use the IP addr of the Citrix Cloud Connector in your resource location.
Option 2 – If using a StoreFront server in the resource location please use its IP addr.

9. Do not configure a “Xen Farm” please just select and “Continue” and complete steps to finish the Wizard.
10. The dashboard overview of “Unified Gateway” should indicate all up and green.

Remote PowerShell SDK for the XenApp and XenDesktop Service
Coming but have a read of – http://docs.citrix.com/en-us/citrix-cloud/xenapp-and-xendesktop-service/remote-powershell-sdk.html in the intermin.

Troubleshooting Guidance
VDA Registration Issue
1. Make sure that forward and reverse DNS is setup correctly for the VDA’s and the CC Connectors.
2. Check that the following Citrix Cloud services “Citrix Remote Broker Provider” and “Citrix Cloud Agent System, Logger & WatchDog“are successfully started on your Citrix Cloud Connector(s) VM instances.
3. Ensure that HTTPS/443 is NOT disabled outbound on any of your CC Connectors either via the Windows Firewall or your hardware or virtual f/w ACL’s.

Deploying XenApp 7.x in AWS EC2

The following content is a brief and unofficial prerequisites guide to setup, configure and test delivering virtual apps and desktops powered by XenApp 7.8 in AWS EC2 prior to deploying in a PoC, Pilot or Production environment by the author of this entry. The views, opinions and concepts expressed are those by the author of this entry only and do not necessary conform to industry descriptions or best practises. The views expressed here are my own and do not necessarily reflect the views of Citrix.

Shortened Names
AMAZON WEB SERVICES – aws
SECRUITY GROUPS – sg
ELASTIC COMPUTE CLOUD – ec2
HYBRID CLOUD PROVISIONING – hcp
XENAPP – xa
XENDESKTOP – xd
XENAPP/XENDESKTOP – xad
VIRTUAL DELIVERY AGENT – vda
HIGH DEFINITION EXPERIENCE – hdx
INDEPENDENT COMPUTING ARCHITECTURE – ica
FEATURE PACK – fp
EXPERIENCE 1st – x1
VIRTUAL DESKTOP – vd
VIRTUAL APPS – va
INFRASTRUCTURE AS A SERVICE – iaas
CITRIX WORKSPACE CLOUD – cwc
CITRIX LIFECYCLE MANAGEMENT – clm
THINWIRE COMPATIBLE MODE – tcm also known as ecm

Experience Deploying My 1st Virtual Desktop & Apps in AWS
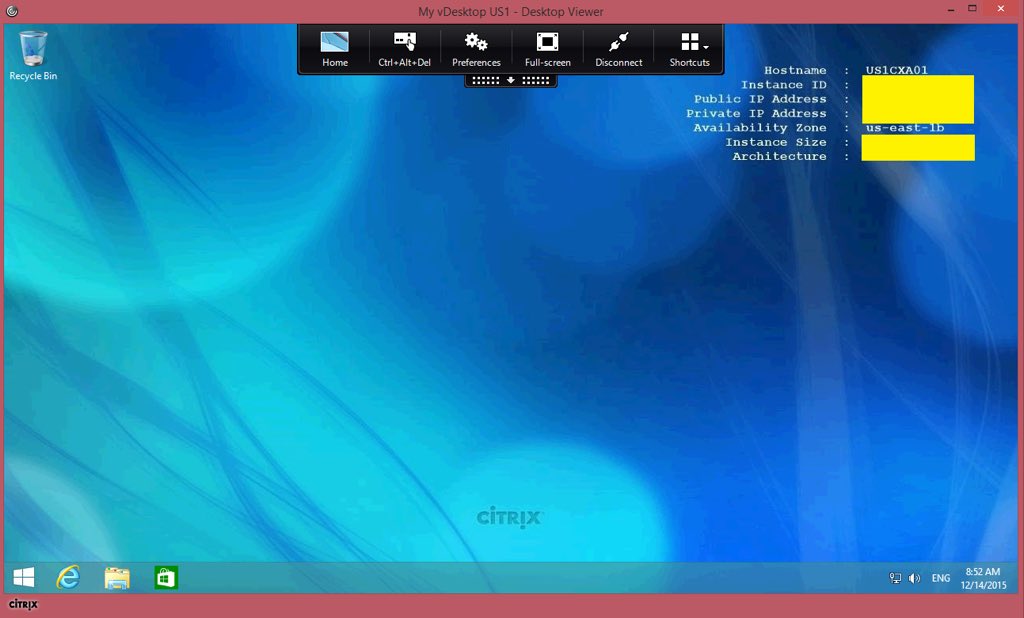
The following screenshot is of a virtual desktop (Windows Server 2012 R2 powered by XenApp 7.8) hosted in AWS EC2 located in N.Virginia, US delivered Windows 8.1 (Yes I know I need to get to Win 10 :-)) laptop running Citrix Receiver Windows 4.4 in London, England with the HDX Thinwire Compatible Mode graphics mode configured with a Preferred Color Depth set to 16-Bit and the performance is very good considering what Ive configured I then adjusted my HDX policies to then switch to HDX SuperCodec (H.264) the UX gets even better providing an even closer HD local like experience in my personal view only so give it ago for yourself.

The HDX policies overview is documented below so for now back to my experience deploying XenApp 7.8 on AWS.

It was substantially easier than I anticipated or even expected as the AWS documentation is easy to understand I believe however that maybe due to the fact I used to previously work for a Managed Services ISP in City of London so many concepts related to Managed Hosting, IaaS, Private and Hybrid Cloud come quiet naturally to me.

Thinwire+ (Thinwire Compatible Mode) 16-Bit Preferred Graphics

Supercodec (H.264)

Introduction to Provisioning XenApp Workloads on AWS EC2
Citrix has had the capability to deploy virtual applications and desktops powered by XenApp 6-7.x.n for quiet sometime utilising the traditional Manual CTX SysAdmin approach then Citrix introduced a concept entitled Hybrid Cloud Provisioning (HCP) under the unified FMA architecture for XAD some time ago which allows CTX SysAdmins the capability to expand there existing Citrix workloads e.g virtual apps and desktops (server based only) to IaaS providers e.g AWS or often generically referred to as the Cloud by adding in a secure new hosting connection within Studio for AWS the requirements include providing the Connection URL, API key and Secret key from your AWS EC2 account ref – http://docs.citrix.com/en-us/xenapp-and-xendesktop/7-6/xad-connections.html. You can utilise this exact same concept to provision XenApp based workloads from within a AWS EC2 XenApp 7.x FMA Site as described in detail in the following deployment guide entitled “Deploy XenApp 7.5 and 7.6 and XenDesktop 7.5 and 7.6 with Amazon VPC” available at – http://support.citrix.com/article/CTX140427. Finally if I have not explained well enough what hybrid cloud provisioning actually is powered by XenApp 7.x then this short and simple YouTube video from Citrix below should hopefully re-enforce your understanding of HCP.

You can still utilise hybrid cloud provisioning within XenApp 7.8 today and Citrix continues to evolve with its next generation cloud 1st approach of provisioning of Citrix workloads within IaaS, Private and Hybrid clouds with Citrix Workspace Cloud (CWC) its now known as Citrix Cloud. How does it work? Once more there is a fantastic YouTube video which demonstrates setting up, configuring, publishing and delivering a Windows virtual application utilising CWC by one of Citrix’s CTO its well worth watching!

Finally you can utilise Citrix Lifecycle Management (CLM) to automate the deployment and auto scaling of your Citrix workloads on AWS EC2, however this topic is currently not in scope for this blog article however I may update this blog article in the future to include provisioning XenApp on AWS EC2 powered by Citrix Lifecycle Management (CLM).

Pre-requisites & System Requirements for Deploying a XA 7.8 PoC in AWS EC2 (Draft + The Basic’s Only)
0. Check that your XAD license entitlement is correct at – https://www.citrix.com/go/products/xendesktop/feature-matrix.html to provision XenApp workloads on AWS EC2. As of writing and publishing this blog article you require XenApp or XenDesktop Enterprise or above licensing in order to provision workloads on AWS and also Azure.
1. You need an AWS account, Credit card
2. Choose your EC2 region e.g N.Virgina
3. Create your “Security Groups” which acts as a virtual firewall for ICA 1494, 2598 Session Reliability, HTTPS 443, RDS 3389 (SysAdmin access)
4. Lunch an single instance from the EC2 dashboard under “Create Instance” this will be your mgmt. VM
5. Decrypt the passwd & login your mgmt. VM install your require roles e.g AD, DNS as a min requirement for XA 7.x
6. Lunch another single instance from the EC2 dashboard under “Create Instance” this will be your XA PoC VM
7. Download the media from Citrix.com and any FP’s and install all the components onto your XA PoC VM (Studio, Director, Controller, MS SQL Express, StoreFront, License server)
7. Install the latest VDA (existing connections) once ready launch Studio and create your Site, configure your machine catalogue and delivery groups.
8. Modify SFS default.ica file to include your external static IP and check your Windows f/w rules to ensure 1494 is correctly configured to allow traversing NAT’s
9. Navigate to https://AWS-XA-PoC-VM/Citrix/StoreWeb/ and login as a domain admin or user and launch a virtual app and or desktop.
10. Shutdown and turn off your VM’s within your AWS VPC when you are finished with your tests to ensure that your cost(s) are kept to a minimum.

Tuning Your AWS EC2 Virtual Apps & Desktop’s
1. Configuring TCM or ECM is very well documented at the following web links at – http://docs.citrix.com/en-us/xenapp-and-xendesktop/7-8/hdx/thinwire-compatibility-mode.html, https://www.citrix.com/blogs/2015/10/23/thinwire-compatibility-tuning-lowering-your-bandwidth-even-further/ however I have also listed in table format below what polices you need to select and then apply to your test domain users or group (preferred).

Begin with the following HDX policies listed below to enable TCM/ECM/Thinwire+/Thinwire Compatible Mode and be sure to check out CTX202687 described below in-line with the Very High Definition Experience HDX Policy template.

Policy Name Default Value Comment
Preferred color depth for simple graphics 24 bits per pixel Legacy Mode
Target frame rate 30 fps Legacy Mode
Use video codec for compression Do not use Video codec Force ECM on explicitly by turning H.264 off (Testing)

2. Configuring the super codec (H.264) is actually very easy select the Very High Definition Experience form the HDX templates in Studio and create a policy from it applying again to your test security group (preferred) or domain users it’s your choice. Please note that this policy will enable H.264 however it will default to TCM if you connect from a device that does not support H.264.
3. Finally for all those advanced CTX consultants and SysAdmins out there check the following CTX article – http://support.citrix.com/article/CTX202687 entitled “HDX Graphics Modes – Which Policies Apply to DCR/Thinwire/H.264 – An Overview for XenDesktop/XenApp 7.6 FP3” which documents each policy for each HDX encoding or graphics mode supporter by XAD 7.8

HDX RealTime Optimization Pack 2.0 for Skype for Business with XenApp/XenDesktop

The following content is a brief and unofficial prerequisites guide to setup, configure and test HDX RealTime Optimization Pack 2.0 with XAD 7.7+ prior to deploying in a PoC, Pilot or Production environment by the author of this entry. The views, opinions and concepts expressed are those by the author of this entry only and do not necessary conform to industry descriptions or best practises.

Shortened Names
XENAPP XENDESKTOP – xad
REALTIME MEDIA ENGINE – rtme
REALTIME CONNECTOR – rtc
USER INTERFACE – ui
UNIFIED COMMUNICATION – uc
HIGH DEFEINTION EXPERIENCE – hdx
SKYPE FOR BUSINESS – skype4b

What is HDX RealTime?
It’s a component of the Citrix HDX technology stack aimed at enhancing the UX for UC e.g Lync, Skype for Business. To better understand implementing Unified Communications with XenApp and XenDesktop check out- https://www.citrix.com/content/dam/citrix/en_us/documents/products-solutions/unified-communications-with-xendesktop-solutions-overview.pdf for an introduction overview. If you aren’t familiar with HDX technologies then perhaps its best to review the HDX introduction whitepaper entitled “HDX technologies for optimizing the virtualization experience” available at – https://www.citrix.com/content/dam/citrix/en_us/documents/products-solutions/citrix-hdx-technologies.pdf prior to proceeding with the implementing of the HDX RealTime Optimization Pack within your Citrix environment.

What’s New
1: Native Skype for Business 2015 UI supported.
2: Authentication and SIP signalling handled exclusively by the Skype for Business client
3: Fallback mode is controlled by a registry entry at the following location “Key: HKLM\Software\Citrix\HDXRTConnector or HKCU\Software\Citrix\HDXRTConnector Value: DWORD DisableFallback” but please ref to – http://docs.citrix.com/en-us/hdx-optimization/2-0/about.html for what value needs to be inserted and be sure to read the Registry WaRniNg notification.
3: Improved audio-video quality (resilience to packet loss, echo cancelation)
4: Call and video call buttons added to the contact card
5: Automatically join meeting audio controls
6: Adheres to the Skype for Business Server settings surrounding making audio, video calls from endpoints.
7: Web proxy support with limitation as described at – http://docs.citrix.com/en-us/hdx-optimization/2-0/hdx-realtime-optimization-pack-about.html#par_richtext_3
8: ….*

A full and detailed list* is available at – http://docs.citrix.com/en-us/hdx-optimization/2-0/about.html and a technical key features overview is available at – http://docs.citrix.com/en-us/hdx-optimization/2-0/hdx-realtime-optimization-pack-about.html#par_richtext_1 covering support codecs, resolutions, webcams and limitations within this release.

Example of an Offloaded Skype for Business 2015 Published Citrix Virtual Desktop
The below is an example of the HDX Optimization Pack 2.0 implemented with Skype for Business 2015 client using and the latest Citrix Receiver and HDX RealTime media engine on my end-point which is a Dell Latitude E6420 running Windows 8.1. My initial test results within my IaaS home lab have been very good and I’m currently doing more testing with a few colleagues and will update this blog update as when/how time permitting with the feedback and results.

An Introduction & System Requirements (Basic’s)
The Citrix HDX RealTime Optimization Pack consists of client and server component’s and requires the following system requirements between Citrix
Receiver for Windows 4.x; Receiver for Mac 12.x; Receiver for Linux 13.x; Skype for Business 2015 Server, Business Online or Lync 2013 Server; XenDesktop 7, 7.5, 7.6 Feature Pack 1, Feature Pack 2, and Feature Pack 3. XenDesktop 7.7; ◦XenApp 6.0, 6.5, 6.5 Feature Pack 1, and 6.5 Feature Pack 2 and Feature Pack 3 , XenApp 7.5, 7.6 Feature Pack 1, Feature Pack 2, and Feature Pack 3, XenApp 7.7 with a full detailed list and overview available at – http://docs.citrix.com/en-us/hdx-optimization/2-0/hdx-realtime-optimization-pack-system-requirements.html.

Why Use The Citrix HDX RealTime Optimization Pack for Lync Performance Comparison

What XAD Licensing
Please refer to the XAD features list – https://www.citrix.com/go/products/xendesktop/feature-matrix.html to identity what XAD edition is required in order to utilise the HDX Optimization Pack.

Client Side
The Citrix HDX RealTime Media Engine is a component that integrates within the Citrix Receiver thus providing a wide range of support device types (Windows, Mac and Linux) and offloading capabilities thus improving the UX for end-users while also improving bandwidth consumption and the density of XenApp (RDS) workloads.

Server Side
The Citrix HDX RealTime Connector (RTC) is installed alongside the Microsoft Skype for Business within a virtual desktop which allows for communication (signalling) through an Citrix ICA virtual channel between the virtual desktop and the users end-point running Citrix Receiver (RTME).

Skype for Business and Lync Delivery Feature Matrix
http://support.citrix.com/article/CTX200279

Download, Installation & Troubleshooting Overview
You can download from – http://docs.citrix.com/en-us/hdx-optimization/2-0/hdx-realtime-optimization-pack-download.html for both XenApp and XenDesktop. You can find a Basic installation overview of your chosen end-point(s) at – http://docs.citrix.com/en-us/hdx-optimization/2-0/hdx-realtime-install.html and you can utilise the following deployment guide entitled “Delivering Microsoft Skype for Business and Lync to XenApp and XenDesktop Users” available at – https://www.citrix.com/content/dam/citrix/en_us/documents/products-solutions/delivering-microsoft-lync-to-xenapp-and-xendesktop-users.pdf.

If you have any issues POST your deployment initially first verify that the RealTime Connector connectivity status which should state Connected indicating that there is a connection over the ICA virtual channel and that both client and server side components match. For a more in-depth view and images alongs with other useful troubleshooting info please check out –
http://docs.citrix.com/en-us/hdx-optimization/2-0/hdx-realtime-optimization-pack-troubleshooting.html
and if not appears to help be sure to read the limitations node in eDocs and the feature matrix as described earlier in this blog article.

Skype for Business Broadcast Series
I’d suggested that you begin with watching the SfB Video Broadcast: Ep 9. VDI archive from the Skype for Business YouTUBE channel at – https://www.youtube.com/channel/UCfL-WUXlvFjLsUs4UCpPrsA before watching the rest of the broadcast recordings in the archive if your looking to understand more about deploying Skype for Business on XenApp, XenDesktop with the HDX Optimisation Pack 2.0.

What’s new with XenApp/XenDesktop 7.6 Feature Pack (FP3)

The following content is a brief and unofficial prerequisites guide to setup, configure and test XenApp, XenDesktop FP3 prior to deploying in a PoC, Pilot or Production environment by the author of this entry. The views, opinions and concepts expressed are those by the author of this entry only and do not necessary conform to industry descriptions or best practises.

Shortened Names
XENAPP – xa
XENDESKTOP – xd
XENAPP/XENDESKTOP – xad
VIRTUAL DELIVERY AGENT – vda
HIGH DEFINITION EXPERIENCE – hdx
EXPERIENCE 1st – x1
STOREFRONT SERVER – sfs
FEATURE PACK – fp
THINWIRE PLUS – thinwire +
THINWIRE COMPATIBLE – thinwire c
USER EXPERIENCE – ux

What is new in FP3?
0: ++An absolutely MUST read entitled “HDX Graphics Modes – Which Policies Apply to DCR/Thinwire/H.264 – An Overview for XenDesktop/XenApp 7.6 FP3” which is available at – http://support.citrix.com/article/CTX202687 prior to implementing any of the new graphics mode/encoder(s) within XAD 7.6 FP3.
1: Support for Windows 10 Enterprise Edition, in the Standard VDA for Windows Desktop OSes.
2: HDX Broadcast updates include the following:

Framehawk (Admin guide – http://docs.citrix.com/content/dam/docs/en-us/xenapp-xendesktop/xenapp-xendesktop-7-6/downloads/Framehawk%20Administration%20Guide.pdf) virtual display channel is integrated into the standalone VDA package.
Thinwire Compatible Modehttp://docs.citrix.com/en-us/xenapp-and-xendesktop/7-6/xad-hdx-landing/thinwire-compatibility-mode.html also referred to as Thinwire +/Plus is the very latest encoder to deliver a fantastic and rich X1 UX for virtual apps and desktops delivered from Windows Server 2012 R2, Windows 8.1 and 10 powered by XAD 7.6 FP3. To learn more about check out – https://www.citrix.com/blogs/2015/10/09/a-big-leap-in-ica-protocol-innovation-for-citrix/. Set the “Use video codec for compression” to “Do not use” which will force the use of Thinwire Compatibility Mode by default for user ICA/HDX sessions on XAD 7.6 FP3.

HDX Framehawk Performance in XenApp and XenDesktop 7.6 FP3

3: ++Updated Studio built-in policies ref – http://docs.citrix.com/en-us/xenapp-and-xendesktop/7-6/xad-policies-article/xad-policies-templates.html which include the following:

– Very High Definition User Experience+
– High Server Scalability *+
– High Server Scalability-Legacy OS **
– Optimized for WAN *+
– Optimized for WAN-Legacy OS **
– Security and Control

+ New or adjusted to meet today’s new requirements
* Windows 8.1-10, Windows Server 2012 R2
** Windows 7, Windows Server 2008 R2

4: Support for signature devices (Wacom) and drawing tablets which can be applied by adding the following USB device policy settings ref – http://docs.citrix.com/en-us/xenapp-and-xendesktop/7-6/xad-policies-article/xad-policies-settings-wrapper/xad-policies-settings-ica/xad-policies-settings-usb.html.
5: The HDX 3D Pro VDA used to deliver HDX Rich Graphical apps now supports full-screen apps including 3D and gaming apps within single monitor for ICA sessions.
x: For a full and compete list with accurate descriptions and overviews please check out – http://docs.citrix.com/en-us/xenapp-and-xendesktop/7-6/xad-whats-new.html.

What’s new with StoreFront 3.0.1?
This release contains a number of fixed issues ref – http://docs.citrix.com/en-us/storefront/3/sf-about-30/fixed-issues.html including support for TLS 1.0-1. Please beware that SSL 3.0 is NOT supported and Citrix strongly recommends that you do not use it.

XenApp 7.6 XenDesktop 7.6 including Feature Pack (FP) 1

The following content is a brief and unofficial prerequisites guide to setup, configure and test XenApp 7.6, XernDesktop 7.6 prior to deploying in a PoC, Pilot or Production environment by the author of this entry. The views, opinions and concepts expressed are those by the author of this entry only and do not necessary conform to industry descriptions or best practises.

Shortened Names
XENAPP – xa
XENDESKTOP – xd
VIRTUAL DELIVERY AGENT – vda
LIGHT WEIGHT DIRECTORY PROTOCOL – ldap
ACTIVE DIRECTORY – ad
CERTIFICATE SIGNING REQUEST – csr
CONNECTION LEASING – cl
FULLY QUALIFIED DOMAIN NAME – fqdn
RECEIVER FOR WEB – rfw
CERTIFICATE AUTHORITY – ca
STOREFRONT SERVICES – sfs
PUBLIC KEY INFRASTRUCTURE – pki
NETSCALER GATEWAY – nsg
SECURE TICKET AUTHORITY – sta
DOMAIN NAME SERVER – dns
DYNAMIC HOST CONFIGURATION PROTOCOL – dhcp
FEATURE PACK – fp

What’s New now with Feature Pack 1 (FP1)
0: If you are new to XenDesktop 7.x, XenApp & XenDesktop 7.5, 7.6 then I would suggest that you begin by reading and reviewing the Technical Overview of XAD 7.6 – http://support.citrix.com/proddocs/topic/xenapp-xendesktop-76/xad-architecture-article.html and follow on by understanding the System Requirements for XAD 7.6 at – http://support.citrix.com/proddocs/topic/xenapp-xendesktop-76/xad-system-requirements-76.html.
1: XenApp – http://www.citrix.com/products/xenapp/whats-new.html.

2: XenDesktop – http://www.citrix.com/products/xendesktop/whats-new.html. 3: How to setup and configure session pre-launch and lingers for XAD 7.6 – http://support.citrix.com/proddocs/topic/xenapp-xendesktop-76/xad-dg-manage-sessions.html#xad-dg-manage-sessions__prelaunch-linger including a video from Citrix TV is embedded below. 4: Connection Leasing (Previously or rather similar to Local Host Cache (LHC) under XenApp 6.x and downwards) provides the ability to allow end-users within your organisation the ability to continue to access Citrix published desktops, applications even if your MS SQL highly available database is offline using the new feature in XAD 7.6. Please note that you should always still have a H/A SQL database environment in-place and connection leasing does require the 7.6 VDA. For more information please read and review – http://support.citrix.com/proddocs/topic/xenapp-xendesktop-76/xad-connection-leasing.html#xad-connection-leasing. 5: How-to perform a XenApp 6.5 migration – http://support.citrix.com/proddocs/topic/xenapp-xendesktop-76/xad-xamigrate.html#xad-xamigrate and the general eDocs node that covers off migrations from previous versions of XenApp 6.x and XenDesktop 4.x, 5.x are covered at – http://support.citrix.com/proddocs/topic/xenapp-xendesktop-76/xad-upgrade-existing-environment.html. 6: Overview & Understanding High Definition eXperience (HDX) under XAD 7.6 including Flash and USB/Drive redirection, GPU Sharing and Network traffic priorities – http://support.citrix.com/proddocs/topic/xenapp-xendesktop-76/xad-hdx-landing.html. 7: For a complete and full list of what’s new in XenApp 7.6 and XenDesktop 7.6 take a look at – http://support.citrix.com/proddocs/topic/xenapp-xendesktop-76/xad-whats-new.html. 8: What’s new in the XAD 7.6 FP1? Check out http://support.citrix.com/proddocs/topic/xenapp-xendesktop-76/xad-whats-new-7-6fp1.html for a list of the full details. I’ve provided summary below of what it includes: – Session Recording which/was formerly Smart Auditor. – Updated Citrix Licensing. – Updated Director which includes enable/disable session recording for the detail check out http://support.citrix.com/article/CTX142260. – HDX Real-Time Optimization Pack 1.7 for Microsoft Lync 2013 the details here at – http://support.citrix.com/proddocs/topic/hdx-realtime-optimization-pack-17/lync-realtime-optimization-pack-17.html. Detailed How-to Upgrade to Citrix Receiver 4.2.x.n 1: Learn what is required in order to perform an upgrade of your existing Citrix Receiver 3.4 implementation to to 4.2.100 by download this handy and useful PDF best practises guide at – http://docs.citrix.com/content/dam/en-us/receiver/windows/4-2/downloads/Receiver_for_Windows_4.2_Upgrade_Best_Practice_Guide.pdf. 2: It is also worth mentioning that the current new Citrix Receiver for Windows 4.2.x.n now supports TLS 1.1, 1.2, Start menu integration & shortcut management, USB 3.0 and so much more please check out – http://support.citrix.com/proddocs/topic/receiver-windows-42/receiver-windows-42-about.html#receiver-windows-42-about for more information so upgrading does and will provide numerous useful benefits for CTX SysAdmins and there end-users. Upgrading & Migration
1: XenApp 7.5 Migration Guide – http://www.citrix.com/content/dam/citrix/en_us/documents/products-solutions/xenapp-75-migration-guide.pdf.
2: Upgrading & Migration Microsite for XenApp 6.x to XenApp 7.5 – http://www.citrix.com/products/xenapp/tech-info/upgrade.html.
3: Introduction to XenApp 7.6 Upgrade Planning recorded GoToWebcast from 07/102014 available at – https://citrix.webcasts.com/viewer/event.jsp?ei=1040823. If you would any overview please read the orginal events web page at – http://www.citrix.com/events/introduction-to-xenapp-76-upgrade-planning.html. Citrix Education
1: CXA-104 Citrix XenApp 7.6: Overview – – http://training.citrix.com/mod/ctxcatalog/course.php?id=925. 2: CXA-105 Getting Started with Citrix XenApp and XenDesktop 7.6 – http://training.citrix.com/mod/ctxcatalog/course.php?id=973 3: CXA-208 Moving to XenApp 7.6 – http://training.citrix.com/mod/ctxcatalog/course.php?id=1096. 4: CXD-105 Citrix XenApp and XenDesktop Help Desk Support – http://training.citrix.com/mod/ctxcatalog/course.php?id=1011. GUI Installation & Overview for XenApp 7.6, XenDesktop 7.6
1: XenApp 7.6 Reviewers Guide provides a simple installation overview which can be downloaded at https://www.citrix.com/content/dam/citrix/en_us/documents/oth/xenapp-reviewers-guide.pdf and the XenDesktop 7.6 equivalent can be found at – https://www.citrix.com/content/dam/citrix/en_us/documents/products-solutions/xendesktop-reviewers-guide.pdf. Unattended Installation of XAD 7.6 Infrastructure Components & The VDA
1: The installation executable is located at x64\XenDesktop Setup\XenDesktopServerSetup.exe within the installation media path. The below is an example and simply replace x with mounted ISO, CD/DVD drive letter or the UNC path to the XAD7.5-6 installation media. If you do not include the /xenapp switch it will automatically install XenDesktop.

x:\x64\XenDesktop Setup\XenDesktopServerSetup.exe /xenapp /components controller,desktopstudio /configure_firewall

2: Sample installation code to insert into a batch script from Citrix eDocs that will install the VDA on Desktop OS as a master image and it will include Citrix Receiver.


x:\x64\XenDesktop Setup\XenDesktopVdaSetup.exe /quiet /components
vda,plugins /controllers “Contr-Main.mydomain.local” /enable_hdx_ports /optimize
/masterimage /baseimage /enable_remote_assistance

If you are looking for how-to install the VDA for groups of machines in AD the please checkout this eDocs node the batch script that will allow you to install/configure or even remove the VDA – http://support.citrix.com/proddocs/topic/xenapp-xendesktop-76/xad-install-vda-adscript.html.
3: For more detailed information check out – http://support.citrix.com/proddocs/topic/xenapp-xendesktop-76/xad-install-command.html.

High-Definition user eXperience (HDX) 1: So what is HDX? That’s a very good question an introduction whitepaper to your questions can be found at – http://www.citrix.com/content/dam/citrix/en_us/documents/products-solutions/citrix-hdx-technologies.pdf. 2: Now that you’ve read through the whitepaper you will want to begin configuring and testing some of the HDX policies in Studio to test out HDX capabilities. Start with reading through the HDX eDocs node at – http://support.citrix.com/proddocs/topic/xenapp-xendesktop-76/xad-hdx-landing.html. If your more interested in HDX 3D Pro which leverages GPU cards installed on workstations, servers within the data centre then I would suggest to start by reviewing – http://support.citrix.com/proddocs/topic/xenapp-xendesktop-76/xad-hdx3dpro-intro.html. For a visual aid surrounding of how GPU technologies with work XenApp & XenDesktop take a look at how GPU pass-through works at – http://www.nvidia.com/object/xenapp.html for with XenApp and for a vGPU works for XenDesktop check out – http://www.nvidia.com/object/virtual-gpus.html. 3: High Definition User Experience template policy in Studio explained and feedback requested – http://blogs.citrix.com/2014/11/13/citrix-studio-templates-help-needed-out-of-the-box-configuration-for-xendesktop-and-xenapp/. Citrix Unveils New Version of Market Leading Third-Generation Unified Platform for Application and Desktop Virtualization
http://www.citrix.com/news/announcements/aug-2014/citrix-unveils-new-version-of-market-leading-third-generation-un.html Citrix Offers Technology Preview of Linux Virtual Apps and Desktops Delivered from XenApp and XenDesktop

http://www.citrix.com/news/announcements/aug-2014/citrix-offers-technology-preview-of-linux-virtual-apps-and-deskt.html Deploying Unified Communications (UC) Lync 2010/2013 1: Lync Feature Matrix is available at – http://support.citrix.com/article/CTX200279 which is very useful for understanding what is and what isn’t supported and whether you need to deploy either the HDX Optimisation Pack of the Microsoft VDI Plug-in. 2: Delivery options for deploying Microsoft Lync for XenApp 7.6 or XenDesktop 7.6 explained in detail at – http://blogs.citrix.com/2014/10/23/delivering-lync-from-xenapp-and-xendesktop/. I’ve summarised your options below: – Generic HDX Realtime * Pure ICA/HDX between two end-points and the infrastructure. – HDX RealTime Optimization Pack for Lync® * Optimised softphone with offloading of the media engine by Citrix Note: 1.6 is for Lync 2010 and 1.7 is for Lync 2013 check out 1.7 – http://support.citrix.com/proddocs/topic/hdx-realtime-optimization-pack-17/hdx-realtime-optimization-pack-about-17.html which is compatible with Lync Server 2013, Lync Server 2010, and Lync Online (Office 365). – Microsoft® Lync® VDI Plug-in * Optimised softphone with offloading of the media engine by Microsoft check out the CTX article for a how-to at – http://support.citrix.com/article/CTX138408. – Local App Access utilises a * XAD policy applied to users to utilise the locally installed Lync app over published Lync app from XenApp. If you want to under more about how-to enable this XAD feature please review – http://support.citrix.com/proddocs/topic/xenapp-xendesktop-76/xad-laa-intro.html. * Please refer to eDocs or CTX200279 3: UC with XenApp and XenDesktop Solutions Brief – https://www.citrix.com/content/dam/citrix/en_us/documents/products-solutions/unified-communications-with-xendesktop-solutions-overview.pdf.

XenDesktop 7

The following content is a brief and unofficial prerequisites guide to setup, configure and test XenDesktop 7 prior to deploying in a PoC, Pilot or Production environment by the author of this entry. The views, opinions and concepts expressed are those by the author of this entry only and do not necessary conform to industry descriptions or best practises.

Shortened Names
REMOTE DESKTOP SERVICES – rds
VIRTUAL DESKTOP INFRASTRUCTURE – vdi
VIRTUAL DELIVERY CONTROLLER – vda
VIRTUAL GRAPHICS PROCESSING UNIT – vgpu
SERVICE LOCATION – srv

What is and does it do?
Citrix XenDesktop 7 allows you to deliver Remote Desktop Services (RDS), Virtual Desktop Infrastructure (VDI) workloads and secure remote access to an existing PC estate by installing the Virtual Delivery Agent (VDA) into those existing PC’s. All this capability is enabled from one single common architecture – FlexCast Management Architecture (FMA). If you are a Citrix XenApp 5.0, 6.5 Administrator I would encourage you to read through the following Citrix eDoc article – http://support.citrix.com/proddocs/topic/xendesktop-7/cds-overview-info-previous-xa-customers.html and follow on with this free Citrix 2 hour long course covering XenDesktop 7 weather your sales, pre-sales, sysadmin or engineer its useful in getting your mindset ready for XenDesktop 7 – http://training.citrix.com/mod/ctxcatalog/course.php?id=595.

Citrix TV & YouTube Videos To Watch
SYN320: XenDesktop 7: What You Should Know About FlexCast Management and XenApp Migration
http://www.citrix.com/tv/#videos/8493.
Citrix XenDesktop 7 3D Pro Demonstration – http://www.citrix.com/tv/#videos/9008.
XenDesktop 7 Masterclass – http://www.youtube.com/watch?v=XSFJ0xx7ztY.

XenDesktop 7 Handbook
Check out the blog article announcement – http://blogs.citrix.com/2013/10/10/new-xendesktop-7-handbook-published. You download the XenDesktop 7 Handbook directly at – http://support.citrix.com/article/CTX139331 and the XenDesktop 5.x Handbook at – http://support.citrix.com/article/CTX136546.

Components of XenDesktop 7 Explained
1: Studio is allows you to design and build your RDS, VDI workloads.
2: Director allows you to support and monitor your organisations XenDesktop 7 virtual machines, user sessions via MS RemoteAssistance, historical trending & metrics, network analytic’s if you have a NetScaler.
3: Delivery Controller is responsible for brokering the connections to your servers (ICA/RDS), virtual machines (VDI) or existing workstation PC’s.
4: Citrix Licensing Server is responsible for checking in/out of your FlexCast licenses. XenDesktop 7 requires CLS 11.11.
5: StoreFront provides users with a self-serve AppStore to tab to click to add your Windows hosted apps, hosted shared desktops (Windows Server 2008 R2) or VDI desktops (Windows 7,8).
6: Machine Creation Services (MCS) is built into XenDesktop 7 which enables as allows you to provision virtual machines from your master VM images. All you need to do to configure it is to input either XenServer, Hyper-V (Requires SCVMM) or ESX (Remember to trust the root certificate) hypervisor FQDN and the access details.
7: Provisioning Services (PVS)
8: User Profile Manager 5 (UPM) is built into XenDesktop 7 and provide Citrix’s profile management solution.
9: MS SQL is required to store configuration information and details about your XenDesktop 7 site. MS SQL express, standard, enterprise and data center* editions are supported and for H/A configuration options please visit this eDocs article at – *http://support.citrix.com/proddocs/topic/xendesktop-7/cds-sys-requirements.html.
10: Virtual Delivery Agent (VDA) is responsible for delivering a hosted shared desktop, windows hosted app and VDI desktop to users brokered via the Delivery Controller.

What Editions Are Available? VDI, App (XenApp capabilities e.g delivery of RDS workloads) , Enterprise and Platinum. To compare the feature sets of edition please check out – http://www.citrix.com/go/products/xendesktop/feature-matrix.html. At the time of writing this post you are required to login to Citrix.com with your access details.

Setup & Configure nVidia GRID VIRTUAL GPU (vGPU) on Citrix XenDesktop 7.1
To learn how-to setup and configure a test demo or PoC environment to leverage the vGPU capabilities of XenServer 6.2 and XenDesktop 7.1 Tech Preview check out – http://www.nvidia.co.uk/object/grid-virtual-gpus-uk.html. You can download the XenDesktop 7.1 Tech Preview at – and the system requirements can be found at – http://support.citrix.com/proddocs/topic/xendesktop/cds-xendesktop-71-landing-page.htm and the HDX system requirements please check out – http://support.citrix.com/proddocs/topic/xendesktop-71/hdx-enhance-ux-xd.html.

NVidia Resources
XenApp 6.5 GPU Sharing – http://www.nvidia.co.uk/object/grid-xenapp-uk.html.
XenDesktop vGPU – http://www.nvidia.co.uk/object/grid-xen-desktop-uk.html.

Multi-Site Configurations & High Availability
Coming soon! I will cover multiple data centres and sites and how-to enable and ensure H/A access to your published resources if you lost/lose communication with your XenDesktop 7 delivery controller(s) and the pitfalls. I would strongly recommend your environment is N+1 and with VM’s common these days setting and configuring an N+1 environment should be best practise for H/A, business continuity and DR.

How-to Enable Local App Access
Coming soon! However in the mean time please refer to http://support.citrix.com/proddocs/topic/xendesktop-7/laa-configure-enable.html#laa-enable.dita.

XenDesktop Introduction Training Course CXD-102
Citrix training offers a 2 hour introduction course to XenDesktop 7 for free. The course is available at – http://training.citrix.com/mod/ctxcatalog/course.php?id=595.

Howto Configure Email Based Discovery& Why It’s Important
Configuration of email based discovery using SRV records is simple and greatly enhances the users login experiences as they all know there email addr and domain password much like logging into Facebook, Twitter e.t.c so offering the same login user experience weather users are in or outside or the organisation means they don’t need to remember logging in with the following format domain\username and domain password they can simple use there corporate email addr and domain password.

There is a great Citrix blog article that covers covers configuration of e-mail based discovery in and outside of your organisation leveraging a NetScaler Gateway check out – http://blogs.citrix.com/2013/04/01/configuring-email-based-account-discovery-for-citrix-receiver/.

The process below is for configuration of SRV records within a trusted corporate environment. If you would like to know more about what else you can configure in terms of SRV records check out – http://en.wikipedia.org/wiki/SRV_record, http://technet.microsoft.com/en-us/library/cc961719.aspx (A Windows 2000 article but will get you thinking if your new to SRV records) and howto add other resources records into your organisations DNS – http://technet.microsoft.com/en-us/library/cc772362.aspx.

1: Launch your Microsoft DNS management console
2: Right click on your organisations Forward Lookup Zone that contains the StoreFront FQDN
3: Click “Other New Records”
4: Scroll down and select “Service Locaiton (SRV)” and click “Create Record”
5: Your organisations domain should already be pre-populated e.g citrix.lab or axendatacentre.com
6: Type in “_citrixreceiver” in the Service feild
7: Type in “_tcp” in the Protocol field
8: Type in “443” in the Port number field or 80 if you don’t use 443 internally
9: Type in “storefront.domain” in the Hosting offering this service e.g storefront.axendatacentre.com or storefront.axendc.local
10: Save/Commit the changes and close the current active window in DNS
11: Navigate to physical or virtual machine install and launch Citrix Receiver when prompted enter in your email addr and password when prompted.

Troubleshooting
Open up a Windows Command prompt and execute these two commands below and for more information in validating your SRV records check out – http://support.microsoft.com/kb/816587.

1: Type in “ipconfig /flushdns”
2: Type in “nslookup”
3: Type in “set type=srv”
4: Type in “_citrixreceiver._tcp.domain” e.g _citrixreceiver._tcp.axendatacentre.com

Microsoft Windows Server 2012 R2 & Windows 8 Support
http://blogs.citrix.com/2013/10/08/citrix-xendesktop-with-flexcast-management-architecture-adds-support-for-windows-server-2012-r2-and-windows-8-1/.

More coming soon!
In the mean time check out https://www.citrix.com/products/xendesktop/overview.html and Design Guide: Mobilising Windows Apps (Requires Form Input From Citrix)