Category Archives: XenApp

XenApp Essentials Services Understood powered by Citrix Cloud

The following content is a brief and unofficial prerequisites guide to setup, configure and test delivering virtual apps from the Microsoft Azure Marketplace powered by the Citrix Cloud XenApp Essentials Service prior to deploying in a PoC, Pilot or Production environment by the author of this entry. The views, opinions and concepts expressed are those by the author of this entry only and do not necessarily conform to industry descriptions or best practises. The views expressed here are my own and do not necessarily reflect the views of Citrix.

Shortened Names
XENAPP – xa
XENDESKTOP – xd
XENAPP/XENDESKTOP – xad
MACHINE CREATION SERVICES – mcs
AZURE REMOTEAPP – ara
XENAPP ESSENTIALS SERVICE – xes
HIGH DEFINITION EXPERIENCE – hdx
REMOTE DESKTOP SERVICES – rds

What is it?
It is a replacement for the deprecated Microsoft Azure RemoteApp (ARA) – https://blogs.technet.microsoft.com/enterprisemobility/2016/08/12/application-remoting-and-the-cloud/ (“…Support existing Azure RemoteApp customers on the service through August 31st, 2017..“) which provides simplicitic beauty of Microsoft Azure RemoteApp now with the “Secure by Design” enterprise security methodology, platform scalability with FMA in 7.x and HDX virtual app delivery protocol capabilities & power of Citrix XenApp.

ARA brought Remote Desktop Services (RDS) capabiltiies from a multi private cloud deployments on Windows Server to Azure with non-persistent RDS/RDP sessions delivered from the Microsoft Azure Cloud only! The XA Essentials Service is only available from Microsoft Azure Marketplace hosted on Azure and only supports the delivery of Windows apps delivery from Windows Server 2012 R2, 2016 prepared Templates or Bring Your Own Templates (BYOT) uploaded. Citrix has prepared a full FAQ available at – https://www.citrix.com/global-partners/microsoft/resources/xenapp-essentials-faq.html

Overviews & Demonstrations
Introducing XenApp Essentials Service is a demonstration of the Service by Citrix.

Extend the Microsoft RDS platform in Azure through Citrix solutions was a presentation at Microsoft Ignite 2016.

What Feature’s Are Available?
The following feature matrix compares XenApp, XenDesktop Platinum vs. XenApp & XenDesktop Service vs. Azure Marketplace XenApp Essentials vs. Azure Marketplace XenDesktop Essentials
https://www.citrix.com/content/dam/citrix/en_us/documents/reference-material/xa-xd-deployment-options-feat-comp-matrix.pdf.

High Level Getting Started, System Requirements & Pre-requistes
1. You’ll need an Azure subscription with a resource group defined with a virtual network.
2. Define your preferred Azure region which you can ref from – https://azure.microsoft.com/en-gb/regions/.
3. Decide on your AD stratergy which can be Active Directory sat in the Azure resource location using a min A3 Standard VM instance for AD or you can utilise “Azure Active Directory Domain Services” and eDocs suggested that you review – https://docs.microsoft.com/en-us/azure/active-directory-domain-services/#main prior to implementing AAD for the XA Essentials Services vs. traditional AD.
4. Define your preferred OS strategy for the service which currently supports server OSes for Windows Server 2012 R2 or 2016 and you’ll need to define master image stratergy e.g BYO image or a Citrix prepared image for the service! Notes: “(a)BYO with your own Server OS template including apps + licenses for those apps or choose Citrix prepared templates with Apps. (b)RDS CALS w/SA to Azure or purchase RDS SALs.
5. Customer owned Azure Subscription as is responsible for per monthly IaaS consumption costs e.g compute, network, bandwidth & storage
6. Only MCS based provisioning is support for public (Iaas) clouds and for this Service hosted by Microsoft Azure.
7. Subscribe to XenApp Essentials Service through Azure Marketplace at – https://azuremarketplace.microsoft.com/en-us/marketplace/apps/Citrix.XenAppEssentials?tab=Overview.
8. Connect your Azure subscription to Control Plane operated by Citrix Cloud. Citrix Cloud controls customer Azure subscription via Citrix Cloud Connectors to provide capabilities to manage, provision and monitor your XenApp servers which will deliver your HDX virtual apps

Deploying your Virtual Apps (Draft!!!)
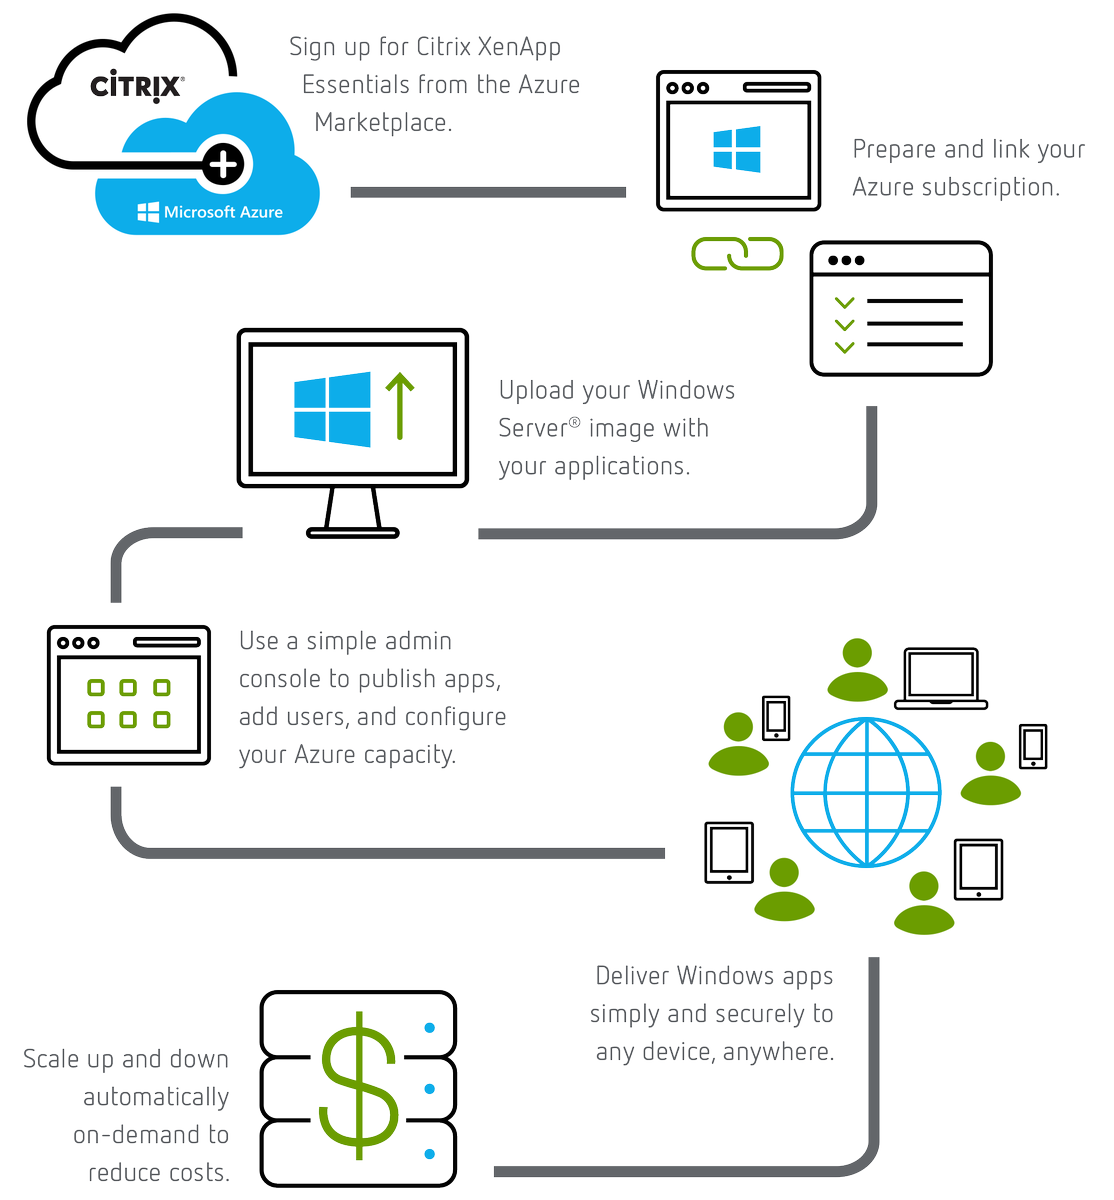
The above is an graphic from the official XA Essentials Service documentation from Citrix eDocs at – http://docs.citrix.com/en-us/citrix-cloud/xenapp-and-xendesktop-service/xenapp-essentials.html and the below is my personal text based step by step summary explaining how to get started with the XA Essential Service powered by Citrix Cloud and Microsoft Azure based upon the Ignite session at – https://www.youtube.com/embed/Ck0mtVXqOuM. Please note that these steps can change as the service is delivered from Citrix Cloud which is a secure SaaS style evergreen control plane – http://docs.citrix.com/en-us/citrix-cloud/overview/about.html.

1. Before you begin you will requires a subscription to XenApp Essentials Service from
2. Azure Marketplace + Server Images + RDS CALS w/SA
3. Create app collection similar to ARA
4. Create a name
5. Domain Joined (Popular) or Non-Domain Joined (TBC)
6. Link Azure subscription to XAE and select Resource Group, Virtual Networks & Subnet
7. Enter in Domain details which include Domain name, OU, Srv acct + passed
8. Select template image Citrix provided or your OWN
9. Select capacity and mange costs  by selecting instance type and power settings scheme (saver logoff after 10min; standard after 1hr; performance after 4hrs or always on i.e do not perform any power mgmt
10. Enter in # of users concurrent and you’ll receive an estimate cost calculator prior to provisioning to understand the costs based on 40hr usage per month
Summary and the deploy
11. Time access is short as CC will provision your instances in your subscription
12. Select app collection click Apps tab then select apps to publish
13. Select users tab and search domain by user or group 
14. Return to Manage home and you’ll see that your app collection is now ready with a green tick
15. Select app collection and you’ll see the StoreFront URL to send to users
16. Users login with domain\user + passed
17. Users are now able to launch there HDX virtual apps secured by there organisations Cloud-hosted StoreFront FQDN which provides secure remote access via the NetScaler Gateway Service also review caveats re bandwidth through-puts below.

Caveats, Current Known Issues with the Service
The list of current know issues one are my ones to pay attention to most as of 04/04/2017 and a full list is available at http://docs.citrix.com/en-us/citrix-cloud/xenapp-and-xendesktop-service/xenapp-essentials.html so please check and read them all!

1. Live.com accounts cannot be used for authenticaiton
2. Users cannot launch and app if an existing RDS session is present on the XA VDA worker.
3. Machine catalogue failures may occur if deploying a VM instance size in a region that does not support that instance type any more.
4. A premium storage account is not supported see “Prepare Your Azure Subscription
5. Each end-user is limited to 1-GB outbound data transfer per month but you can increase the limit via by acquiring a 25 GB add-on via the Azure Marketplace see “StoreFront and NetScaler Gateway in XenApp Essentials Service
6. See eDocs for more…

My New Secure Workspace Ready in less than 15 min the #CitrixLife

The views expressed here are my own and do not necessarily reflect the views of Citrix.

Overview
Today I received my new Mac, yes I’ve decided to move from a PC to a Mac for various reasons (those whom know me are probably going really!?) but I still have a Windows 10 tablet PC which I use regually at home, but most importantly my Windows 10 Citrix issued virtual desktop powered by XenDesktop (Citrix on Citrix) follows me anywhere with Citrix Receiver or the HTML5 Citrix Receiver!

I didn’t even turn on my old PC I just started working within less than 15 min from my new MacBook connected to my Win10 VD via Receiver and i’ll just sort out what I need locally like Reflector, NAMP e.t.c over the weekend as its a busy week post our local partner event Citrix Partner Accelerator.

What Did I Do?
1. Unboxed my new Macbook
2. Plugged in the power and pushed the power button its been a while since I’ve heard that CHIME 🙂
3. Completed Apples on-boarding process including setting up iCloud including connecting to the Citrix employee Wi-Fi from our London, Paddington offices check it out at – https://twitter.com/CitrixUK/status/834742107055259650
4. Next I opened Safari and navigated to http://receiver.citrix.com and it auto detected for me that I am connecting from a Mac and presented me with a download link to Receiver for Mac 12.4.
5. Once downloaded I installed it simple!
6. Opened Citrix Receiver and i entered in my addr which then prompted me for my Citrix employee username, passwd and 2FA Token
7. BOOM Receiver synced all my virtual apps & desktops that I had previously selected on other device(s) within a few moments of signing in
8. I clicked on my Windows 10 Virtual Desktop powered by XenDesktop and my new mobile #SecureWorkspace is ready to go within less than 15 minutes!

What’s New in XenApp & XenDesktop 7.13

The following content is a brief and unofficial prerequisites guide to setup, configure and test delivering virtual apps and desktops powered by XenApp & XenDesktop 7.13 prior to deploying in a PoC, Pilot or Production environment by the author of this entry. The views, opinions and concepts expressed are those by the author of this entry only and do not necessarily conform to industry descriptions or best practises. The views expressed here are my own and do not necessarily reflect the views of Citrix.

Shortened Names
SECURITY ASSERTION MARKUP LANGUAGE – saml
LOCAL HOST CACHE – lhc
XENAPP – xa
XENDESKTOP – xd
XENAPP/XENDESKTOP – xad
WINDOWS – win
VIRTUAL DELIVERY AGENT – vda
HIGH DEFINITION EXPERIENCE – hdx
VIRTUAL DESKTOP – vd
CUSTOMER EXPERIENCE IMPROVEMENT PROGRAM – ceip
VIRTUAL APPS – va
DATA TRANSPORT LAYER – edt
FIREWALL – f/w
ACCESS CONTROL LISTS – acl
ADVANCED MICRO DEVICE – amd

What’s New
A full and complete list of what’s new is avaiable at – http://docs.citrix.com/en-us/xenapp-and-xendesktop/7-13/whats-new.html. I’ll start with one of my Citrix passions which is any and everything surrounding HDX technologies.

1. HDX Adaptive Transport is disabled by default in XAD 7.13* also referred to as EDT is a new HDX graphics mode that utilises both the UDP and TCP protocols with a fallback to TCP where UDP isn’t available. The HDX engineering team have engineered this new Citrix protocol called Enlightened Data Transport (EDT) which utilises the existing Citrix ports 1494 (ICA/HDX) and 2598 (Session Reliability) for both TCP and now new UDP so f/w ACL changes are near enough straight forward. To test this new graphics mode internally:

– Configure the ACL between your test end-point and through your internal network (over a VPN) VM running the 7.13 VDA to allow UDP and TCP for 1494, 2598
– Your test VM instance could be running in Azure (connected on-prem via a VPN) or on XenServer 7.1 and remember must be running the latest desktop or server VDA
– Your test end-point must be running the following min Citrix Receiver versions for Windows 4.7, Mac 12.4 and for iOS 7.2
– *In Studio create a machine catalogue, delivery group or use an existing one with your VDA upgraded from e.g 7.12 to 7.13 and then create a new HDX policy e.g HDX-TestofEDT and select the following HDX policy entitled “” and choose “Preferred“.

2. AMD Multiuser GPU (MxGPU e.g GPU Virtualization works with vSphere only) on the AMD FirePro S-series server cards for HDX 3D Pro workloads only e.g Desktop OSes ref – http://docs.citrix.com/en-us/xenapp-and-xendesktop/7-13/hdx/gpu-acceleration-desktop.html+ with support for up to 6 monitors, custom blanking & resolution, high frame rate and only GPU Pass-through is supported on the following hypervisors XenServer and Hyper-V. For further details please ref to the AMD website at – http://www.amd.com/en-us/solutions/professional/virtualization.

3. Intel Iris Pro (5-6th Gen Intel Xeon Processor E3) graphics processors supports H.264 h/w encoding for virtual apps & desktops, HDX 3D Pro support for up to 3x monitors (Ref to install options+), custom blanking & resolution, high frame rate. For further details and compatible Intel processors ref to – http://www.intel.com/content/www/us/en/servers/data-center-graphics.html

4. Other HDX enhancements include:

– Bidirectional content redirection – http://docs.citrix.com/en-us/xenapp-and-xendesktop/7-13/policies/reference/ica-policy-settings/bidirectional-content-redirection.html
– Wacom tablets improvements & connection methods – http://docs.citrix.com/en-us/xenapp-and-xendesktop/7-13/hdx/usb.html and also see http://docs.citrix.com/en-us/xenapp-and-xendesktop/7-13/policies/reference/ica-policy-settings/usb-devices-policy-settings.html
– File copying performance enhancements for client drive mapping

5. StoreFront 3.9 support for the following below and for a closer look check out the following CTX blog article – https://www.citrix.com/blogs/2017/02/24/whats-new-in-storefront-3-9/

– HDX Adaptive Display
– CEIP automatic enrollment by default. To disable please ref to http://docs.citrix.com/en-us/storefront/3-9/install-standard.html#par_anchortitle_8ea6
– Importing of NUG configurations (ZIP file or via PowerShell) into StoreFront to setup through the XAD Wizard using the latest NetScaler UG 11.1.51.21+ ref – http://docs.citrix.com/en-us/storefront/3-9/integrate-with-netscaler-and-netscaler-gateway/import-netscaler-gateway.html to reduce and avoid misconfigurations.
– Not new but if you’re looking to security harden your StoreFront standalone or cluster ref to – http://docs.citrix.com/en-us/storefront/3-9/secure.html
– SAML auth through against your preferred Store with NetScaler Unified Gateway configured as your IdP – http://docs.citrix.com/en-us/storefront/3-9/configure-authentication-and-delegation/configure-authentication-service.html#par_anchortitle_d712

5. The Connection Quality Indicator is not part of the XAD 7.13 release but an invaluable Citrix tool for Citrix SysAdmins check out its capabilities at – https://www.citrix.com/blogs/2017/02/22/citrix-connection-is-slow-not-really/ and you can download it from – https://support.citrix.com/article/CTX220774 and it also inclues group policies for better SysAdmin controls to enable or disable the tool which is supported from XAD 7.6 LTSR and upwards ref the CTX220774 article. The below image is taken from a Window 10 virtual desktop powered by XenDesktop 7.x.

6. Linux Seamless published applications from a Linux supported OS using the 7.13 VDA – http://docs.citrix.com/en-us/linux-virtual-delivery-agent/7-13/whats-new.html and also please read the publishing apps for Linux at – http://docs.citrix.com/en-us/linux-virtual-delivery-agent/1-4/suse/configuring/publish-apps.html for advanced tips and guidance on seamless mode vs. window manger configuration.
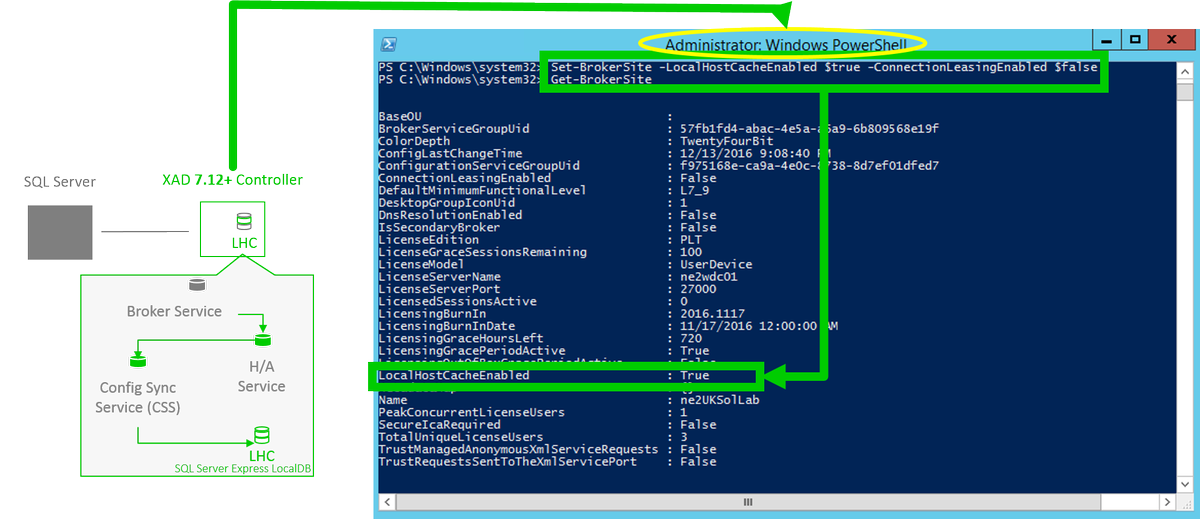
7. LHC in 7.13 introduces a new support feature for brokering operations for Citrix Cloud when the internet connection between the Citrix Cloud Connector and the Citrix Cloud control plane at – https://citrix.cloud.com/ is in a failed state or unavailable due to an ISP outage. You can also force an outage following the documentation available at – http://docs.citrix.com/en-us/xenapp-and-xendesktop/7-13/manage-deployment/local-host-cache.html++ by creating and manually modifying the following registry entry “HKLM\Software\Citrix\DesktopServer\LHC with entry of OutageModeForced” set to the value in the documentation++ to force an outage for testing and or evaluation purposes prior to implmenting Local Host Cache. I’ve embedded below a simple architectural recap of LHC introdcued in XAD 7.12 and you can read in more depth detail about Local Host Cache from a previous blog post available at – http://axendatacentre.com/blog/2016/12/13/whats-new-in-xenapp-xendesktop-7-12/.

Finally LHC still provides support for brokering operations for traditional XAD Controller Site Database on-prem ref ++. I’d also recommend that you watch this TechTalks To Go covering LHC in XAD 7.12 release.

8. Provisioning Services 7.13 now supports Linux streaming and a brand new caching technique only available and supported on XenServer 7.1 called PVS-Accelerator. Check the following YouTube video from Citrix entitled “Introducing PVS-Accelerator, only available with XenServer!” via https://twitter.com/juancitrix/status/835202277317148672.

9. HDX Thinwire enhancements in 7.13 have resulted in up to 60% bandwidth savings. Take a look at the following CTX blog post at – https://www.citrix.com/blogs/2017/01/11/hdx-next-cuts-bandwidth-by-up-to-60-yes-sixty-percent/ which has some great high level LoginVSI 4.1.6 graphics comparing Thinwire in 7.12 vs. 7.13 on Windows Server 2012 R2 and 2016.
10. AppDNA what’s new ref – http://docs.citrix.com/en-us/dna/7-13/whats-new.html now includes support for Windows 10 Anniversary Update (AU) and now defaultor analysis and reporting, Secure Web reports and finally improved importing to process to analysis OSes and apps. There are a few more to be sure to check out the whats news!

Deploying XenApp 7.13 for Evaluation & Testing Purposes
The fastest way to deploy and test the latest new features from Citrix XA 7.13 release with little to no effort is to deploy the “Citrix XenApp 7.13 Trial” from Microsoft Azure available and accessiable at – https://azuremarketplace.microsoft.com/en-us/marketplace/apps/citrix.citrix-xa?tab=Overview.

Removed from XenApp and XenDesktop 7.13
Please be sure to read and review the complete removed features and future removal features within XAD 7.x platform topics on Azure Classic, AppDisks, Desktop OS support and supported HDX Graphics Modes e.t.c –
https://docs.citrix.com/en-us/xenapp-and-xendesktop/7-13/whats-new/removed-features.html.

Viso Stencils from Citrix’s Ask the Architect – https://twitter.com/djfeller for XenApp and XenDesktop 7.13.


Image credit: https://twitter.com/djfeller/status/836557405173477376

https://virtualfeller.com/2017/02/28/visioxenappxendesktop713/

Deploying & Understanding the NetScaler Gateway Service from Citrix Cloud

The following content is a brief and unofficial prerequisites guide to better understand NetScaler Gateway Service from Citrix Cloud test delivering virtual apps and desktops powered by XenApp & XenDesktop Service prior to deploying in a PoC, Pilot or Production environment by the author of this entry. The views, opinions and concepts expressed are those by the author of this entry only and do not necessarily conform to industry descriptions or best practises. The views expressed here are my own and do not necessarily reflect the views of Citrix.

Shortened Names
NETSCALER GATEWAY SERVICE – nsg service or ngs
CITRIX CLOUD CONNECTOR – connector
NETSCALER – ns
HIGH-AVAILABILITY – h/a
XENAPP – xa
XENDESKTOP – xd
XENAPP/XENDESKTOP – xad
VIRTUAL DELIVERY AGENT – vda
HIGH DEFINITION EXPERIENCE – hdx
CITRIX CLOUD – cc
INFRASTRUCTURE AS A SERVICE – iaas
VIRTUAL APPLIANCE – vpx
USER EXPERIENCE – ux
ICA PROXY – hdx proxy

Introduction & Overview
The NetScaler Gateway Service is a simple, clean. effortless and but most importantly a powerful way to demonstrate the power of Citrix Cloud by providing secure remote access to your HDX virtual apps and desktops from your resources location over the internet (https) securely. While this service is very very powerful & simple to implement and use, you should under the keep in-mind that NS VPX/MPX/SDX is fully featured vs. the NSG Service which is focused on delivery of HDX virtual apps & desktops! So in summary when implementing service undering what is right vs. relevant for the customer needs and requirements is very important. Finally you can read more about the service and its benefits at https://www.citrix.com/products/citrix-cloud/services.html.

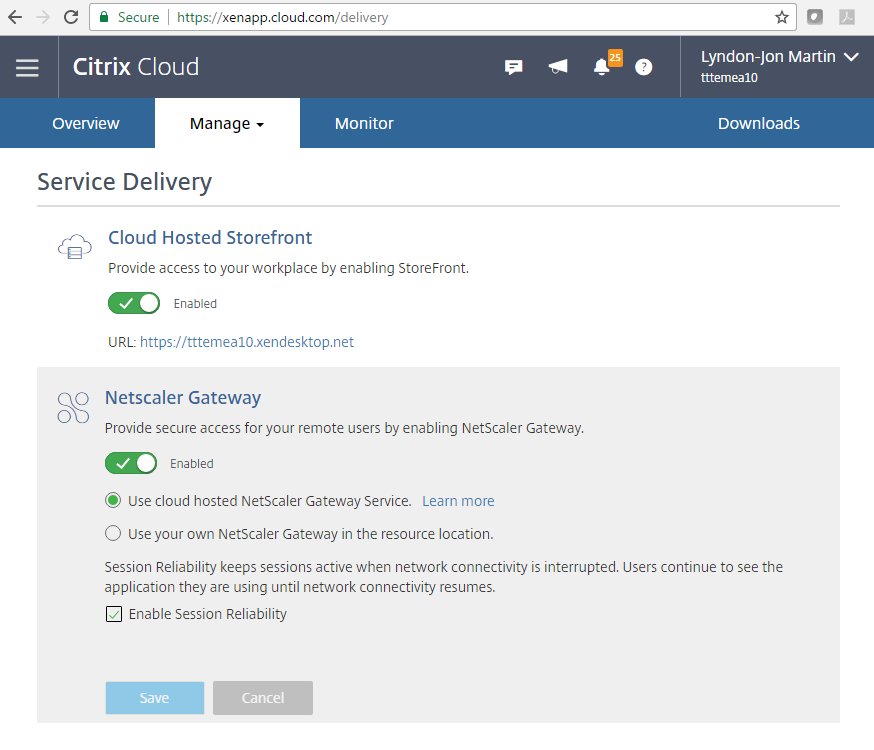
+Enabling the NetScaler Gateway Service
1. Login to https://citrix.cloud.com
2. Select to Manage your XAD Service which will take you to https://xenapp.cloud.com/.
3. Select from the drop down menu “Service Delivery” which is beneath the top menu item displayed “Service Creation
4. Now Select to toggle “ON” and choose to use the NSG service (preferred for blog article only) or your own NetScaler (Unified) Gateway at your resource location and if you enable to the NSG Service you can choose to check the session reliability (2598) checkbox.

The UX
Users connect to https://.xendesktop.net and then login using there AD UPN domain credentials e.g lyndon-jon@x1co.eu and the user’s credentials are encrypted through-out the login process. User’s can equally choose between using a full Citrix Receiver (HDX Optimisation Pack 2.x.n for offloading Skype for Business 2015-2016) vs. HTML5 Receiver (HTML5 compliant internet browser) experience by selecting their username in the top right hand corner and selecting to “Change Receiver” to their preferred choice of Receiver. It also important to set the correct +HDX Policy to get the best UX that is good and balanced (backend vs. network vs. client connected device) so I’d suggest that you implement HDX Adaptive Display v2 by selecting the following policy entitled “Use video codec for compression” and select the following option “For actively changing regions” and thereafter tweak the frame rate and adjust the Thinwire color depth support as described at http://docs.citrix.com/en-us/xenapp-and-xendesktop/7-12/whats-new.html#par_anchortitle_59c9 and you can also read more about benefits and a YouTUBE demostration on HDX Adaptive Display v2 at the following blog article I wrote in 2016 at – http://axendatacentre.com/blog/2016/10/01/foractivelychangingregions/.

HDX Traffic flow of the NSG Service
Please note that traffic flow is based upon the diagram avaiable at – http://docs.citrix.com/en-us/citrix-cloud/xenapp-and-xendesktop-service/netscaler-gateway-as-a-service.html as of Jan 2017.

1. User MUST login into cloud hosted StoreFront e.g https://.xendesktop.net. There credentials are securely handled please refer to – http://docs.citrix.com/en-us/citrix-cloud/xenapp-and-xendesktop-service/technical-security-overview.html to understand the traffic follow.
2. Once the user has authenticated successfully he/she can select to launch a virtual app or desktop.
3. User connects to the NSG Service powered by Citrix Cloud
4. Traffic is securely brokered to the Connector in your resource location that is severing up the user’s selected virtual app or desktop or both from the server or desktop VDA.

Tech Overview of the NSG Service
1. The Citrix Cloud NetScaler Cloud Gateway service on your Connector allows and provides the secure remote access feature of the NSG Service from your chosen resource location. I have written a blog article about the Connector services and leading best practises which you can read at – http://axendatacentre.com/blog/2017/01/27/understanding-the-citrix-cloud-its-services-architecture-connectors/.
2. To ensure high availability you should always deploy at a min a pair of Connectors within your resource location and increase the compute capacity of your Connectors as user demand increases initially and thereafter deploy another Connector based upon usage of service.
3. *To use the NSG Service you MUST configure to use the cloud-hosted StoreFront provided by Citrix Cloud under “Service Delivery” tab at https://xenapp.cloud.com/delivery.
4. The NSG Service only supports HDX Traffic only and the service is currently only available on Eastern, Western coasts within the USA and in Europe so for those users accessing virtual apps and desktops via the NSG Service outside of these geos or not in close proximity to an entry point will experience higher latency so tweak your HDX policy(s)+ accordingly or deploy a NS VPX in your resource location.
5. ICA files are STA signed the below example is a small snippet from my own PoC and testing*. I have also intentionally scrammed some of the unreliable text to :-).

Sample ICA file
My Azure vDesktop $S19-38]
Address=;40;CWSSTA;9D09CE5552BDE4581E888CD87EEEEFC
AutologonAllowed=ON
BrowserProtocol=HTTPonTCP
CGPSecurityTicket=On
ClearPassword=5FFE184444B0A0
ClientAudio=On
ConnectionBar=1
DesiredColor=8
DesiredHRES=4294967295
DesiredVRES=4294967295
DesktopRestartAllowed=1
Domain=\78034E8888586B61

The NSG Service currently does not support and or is limited as of writing this blog article in Jan 2017 and based upon the embedded Twitter image – http://docs.citrix.com/en-us/citrix-cloud/xenapp-and-xendesktop-service/netscaler-gateway-as-a-service.html. Finally please remember that Citrix Cloud is consistently been updated and upgraded with new feature so please please refer to the online documentation and the service overview of Citrix Cloud even a day after posting the blog article as it may become out of date! You’ve been warned!

6. No support for Unified experiences (e.g Branding with your logo, colour scheme).
7. No support for Two Factor Authentication.
8. No support for authentication via outbound proxies for access outside of the resource location over the internet.

Citrix Cloud – NetScaler Gateway Service (NGS) Offering
You can find out more about the NGS subscription options which is avaiable at – https://www.citrix.com/products/citrix-cloud/subscriptions.html#tab-41499 and the service overview at – https://www.citrix.com/products/citrix-cloud/services.html#tab-23235

Understanding XenApp & XenDesktop 7.12 and What’s New

The following content is a brief and unofficial prerequisites guide to setup, configure and test delivering virtual apps and desktops powered by XenApp & XenDesktop 7.12 prior to deploying in a PoC, Pilot or Production environment by the author of this entry. The views, opinions and concepts expressed are those by the author of this entry only and do not necessarily conform to industry descriptions or best practises. The views expressed here are my own and do not necessarily reflect the views of Citrix.

Shortened Names
LOCAL HOST CACHE – lhc
XENAPP – xa
XENDESKTOP – xd
XENAPP/XENDESKTOP – xad
VIRTUAL DELIVERY AGENT – vda
HIGH DEFINITION EXPERIENCE – hdx
FLEXCAST MANAGEMENT ARCHITECTURE – fma
EXPERIENCE 1st – x1
INTERNAL – int
VIRTUAL DESKTOP – vd
VIRTUAL APPS – va
DATA TRANSPORT LAYER – edt

What’s New XenApp/XenDesktop 7.12
1. Yes it’s now avaiable & back “Local Host Cache” or LHC as it was most commonly reffered to previously and its back now within XAD 7.x Flexcast Mangagment Architecture (FMA) platform and everything you need to know is avaiable at – http://docs.citrix.com/en-us/xenapp-and-xendesktop/7-12/manage-deployment/local-host-cache.html* & https://www.citrix.com/blogs/2016/12/07/local-host-cache-for-fma/ but a few note worth points to mention below followed by an overview of LHC vs. Connection Leasing by a Citrix XenApp & XenDesktop PM Craig. I have also embedded a how-to enable below along with a basic and brief architectural overview of LHC in XAD 7.12 which is powered by FMA and not IMA which is for anything XA 6.5 and below.

N.B LHC is disabled by default to enable it open up PowerShell in Admin mode or launching a PowerShell session using Studio and enter in the following “Set-BrokerSite -LocalHostCacheEnabled $true -ConnectionLeasingEnabled $false” once the command completes execute the following cmdlet “Get-BrokerSite” and check that the following value of “LocalHostCacheEnabled” is set to “True“. Note that CL is now also disabled and both CL and LHC should not be running simultaneously together as this is not supported.
– VDAs re-register with the elected XAD controller (broker)
– Support for up to 5K VDA’s
– LHC services “High Availability Service” performs shadow copy of the control info that the XAD Controller requires and the “Configuration Sync Service” will sync control info/data.
– Adequately size your XAD controllers correctly to account for the compute load required during an outage, please ref to the “RAM size” and “CPU core and socket configuration” sections under “Design considerations and requirements” at LHC documentation at – *.
– LHC utilises Microsoft SQL Server Express LocalDB and is auto installed when you install the XAD 7.12 controller and is installed regardless of weather LHC it enabled or not.
– Local Host Cache is enabled if connection leasing was disabled before the upgrade vs. Local Host Cache is disabled if connection leasing was enabled before the upgrade.
– To force an outage to test LHC in your home lab or organisations test/uat environment on the XAD controller open regedit as a Admin navigate to HKLM\Software\Citrix\DesktopServer\LHC” thereafter create a registry key “OutageModeForced” and set the value to 1 to force an outage mode once you have completed your tests then revert the value to 0. I would suggest prior to attempting to perform this test place a load with a few test by active users for Server VDA based workloads (XenApp) to best understand how LHC works in a failure scenario.

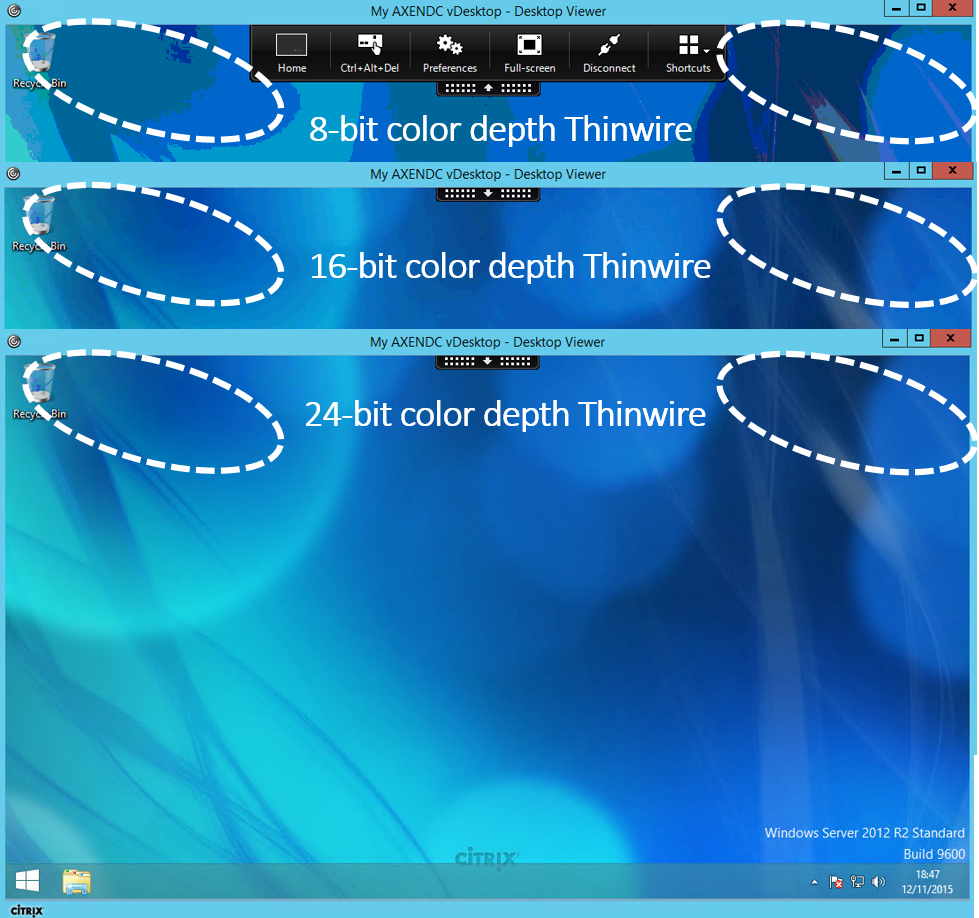
2. Thinwire Compatible Mode 8-bit color depth support (7.12 VDA only otherwise fallback to 24-bit by default) which is configured by select the following HDX policies.

– “ Use video codec for compression” and ref to http://docs.citrix.com/en-us/xenapp-and-xendesktop/7-12/policies/reference/ica-policy-settings/graphics-policy-settings.html#par_richtext_bc19 for a list of avaiable configurations please note that if configured for the entire screen then 8-bit is NOT SUPPORTED!
– “Preferred color depth for simple graphics” and select the “8-bit” value

3. HTML5 video redirection is now available for INT web sites (disabled by default) and can be enabled by configuring the “Windows Media Redirection” by referring to http://docs.citrix.com/en-us/xenapp-and-xendesktop/7-12/policies/reference/ica-policy-settings/multimedia-policy-settings.html#par_richtext_5 and you also need require to add the following “JavaScript files are located in %Program Files%/Citrix/ICA Service/HTML5 Video of the VDA installer to your website” a sample external test web page can be found at the “HDX HTML5 video redirection test page at – https://www.citrix.com/virtualization/hdx/html5-redirect.html
4. Azure Hybrid Use Benefits support e.g enable or disable support for the Azure Hybrid Use Benefits (HUB).
5. Record sessions based on client IP addr or range, TLS 1.2 encryption during data transfer and finally highlight idle periods in Player
6. NetScaler UG now supports H/A of HDX Framehawk – http://docs.citrix.com/en-us/xenapp-and-xendesktop/7-12/hdx/framehawk.html with supported NS firmware builds for Framehawk which include 11.0.62 & 11.0.64.34 (+ preffered).
7. HDX Enlightened Data Transport (for evaluation only) or “EDT” – http://docs.citrix.com/en-us/xenapp-and-xendesktop/7-12/policies/reference/ica-policy-settings.html.

Very High Level Overview*

Adaptive Display
EDT
(Evaluation Only)
TCP
UDP
High Defintion eXperience (HDX 

– Only VDA’s configured with IPv4 addressing is supported
– Requirements XAD +VDA 7.12, StoreFront 3.8
UDP setup on 1494 and 2598 on the VDA remember this is typically TCP but now must also be for UDP
– Enable policy setting “HDX Enlightened Data Transport“. Remember its DISABLED by default and you can setup 3x values “Preferred” UDP data transport is used where possible with a fallback to TCP, “Diagnostic mode” forces a UDP data transports with a fallback to TCP & “Off meaning TCP is used & does’nt affect HDX RealTime”
– If you are evaluating this then please refer to the “Tech Preview of New Adaptive Transport in 7.12” forum at – http://discussions.citrix.com/forum/1663-tech-preview-of-new-adaptive-transport-in-712/
– Note when testing directly from eDoc’s “the new data transport layer (“EDT”) is allowed by default in Citrix Receiver for Windows, however, by default, it will only attempt to use EDT if the setting in the ICA file for HDXoverUDP is Preferred or On” also please ref to the notes relating to Receiver on Mac’s

You can learn more about this evaluation by reading the following blog posts – https://www.citrix.com/blogs/2016/12/14/overcoming-latency-to-serve-a-global-user-population/* and https://www.citrix.com/blogs/2016/12/08/take-a-look-under-the-hood-of-next-generation-hdx/ by Citrix’s HDX PM Derek.

8. You can very easily setup and try XenApp 7.12 in Microsoft Azure today via Azure Marketplace by searching for “XenApp 7.12” or click the following link – https://azure.microsoft.com/en-gb/marketplace/partners/citrix/citrix-xacitrix-xa-trial/ after signing into the Azure Portal at – https://portal.azure.com/.
9. Tagging with “App Groups” now provides the ability to a tag a VM(s) so that when published virtual apps in Application Group or virtual desktops in a Delivery Group are restricted to launch from VM(s) that have been tagged.

10. Advanced Reboot Schedules

11. In StoreFront 3.8 you can create multiple IIS sites and thereafter use the following PoSH cmdlet below to create a StoreFront deployment within your own IIS sites – http://docs.citrix.com/en-us/storefront/3-8/plan.html. What does this actually mean? You can host multiple RfW sites (stores) with each having its own domain name. In order to create your custom websites in IIS for your Stores and ReceiverforWeb firstly open up PowerShell using Studio (Simple way) then close Studio. Next you MUST ensure that NO other StoreFront MMC snap-in consoles are open within your StoreFront cluster and also on the individual Windows server (minimised) that you are setting up IIS sites. StoreFront will disable the mgmt console and displays a message. TIP: To learn how-to setup IIS sites/website please visit – https://support.microsoft.com/en-gb/kb/323972

– From your open PowerShell window enter in the following which will create a custom IIS site/website for virtual apps and one for virtual desktops
– Type “Add-STFDeployment -SiteID 1 -HostBaseURL “https://www.storefront.app.com”” (Virtual apps)
– Type “Add-STFDeployment -SiteID 2 -HostBaseURL “https://www.storefront.desktop.com”” (Virtual desktops)
– Type exit and close the Powershell window prior to opening up Studio or a StoreFront MMC snap-in on any server in the StoreFront cluster

12. Although this one is not strictly new to StoreFront 3.8 and XenApp/XenDesktop 7.12 its often an overlooked feature (For CTX SysAdmins) which is the ability to securely export and then re-import your entire StoreFront configuration including using PoSH credentials for (de)encryption of the backup configuration. To learn more please check out – http://docs.citrix.com/en-us/storefront/3-8/export-import-storefront-config.html and use the feature prior to any StoreFront upgrades or migrations.

Deprecation Forecast
I would strongly recommend that you review and understand the Deprecation forecast announcements made during the XenApp/XenDesktop 7.12 release which is avaiable at – http://docs.citrix.com/en-us/xenapp-and-xendesktop/7-12/whats-new.html#par_anchortitle_5da8.

Top 10 Suggested Unified Experience Tips for Citrix Users 2016

The views expressed here are my own and do not necessarily reflect the views of Citrix.

Shortened Names
XENDESKTOP – xd
VIRTUAL DELIVERY AGENT – vda
HIGH DEFINITION EXPERIENCE – hdx
EXPERIENCE 1st – x1
XENAPP – xa
VIRTUAL DESKTOP – vd
THINWIRE COMPATIBLE MODE – tcm also known as ecm or thinwire+
SELF-SERVICE PASSWORD RESET – sspr
VIRTUAL GPU – vgpu
PROOF OF CONCEPT – poc

Suggested Top 10 for 2016
This is numbered 1 through 10 but in reality is in no particular order!

1. E-mail discovery for Citrix Receiver using DNS SRV records – http://docs.citrix.com/en-us/receiver/windows/4-3/receiver-windows-install-wrapper/receiver-windows-cfg-command-line-42.html internally and externally on the Gateway – http://docs.citrix.com/en-us/netscaler-gateway/10-1/ng-xa-xd-integration-edocs-landing/ng-clg-integration-wrapper-con/ng-clg-session-policies-overview-con/ng-clg-storefront-policies-con/ng-clg-storefront-email-discovery-tsk.html.
2. Implement SplitDNS or more technically correct “split-horizon DNS” – https://en.m.wikipedia.org/wiki/Split-horizon_DNS my favourite personally over email based discovery :-)!
3. Brand your NetScalers (Unified) Gateway – http://docs.citrix.com/en-us/netscaler-gateway/11-1/vpn-user-config/custom-portal.html and App Store (StoreFront) – http://docs.citrix.com/en-us/storefront/3-7/manage-citrix-receiver-for-web-site/unified-receiver-experience.html to match and keep it clear, clean and simple!

4. Implement HDX Adaptive Display v2 available in 7.11+ – http://docs.citrix.com/en-us/xenapp-and-xendesktop/7-11/policies/reference/ica-policy-settings/graphics-policy-settings.html as your default Graphics Mode and if you can’t then Thinwire Compatible Mode – http://docs.citrix.com/en-us/xenapp-and-xendesktop/7-11/hdx/thinwire.html.

5. If using Skype for Business 2015 or 2016 implement the HDX RealTime Optimisation Pack 2.x.n http://docs.citrix.com/en-us/hdx-optimization/2-1/hdx-realtime-optimization-pack-overview.html to offload the video/audio to the local end-points (Windows, Mac and Linux) saving on backend compute and density loss for XenApp.*

6. Implement domain pass-through for internal users – http://docs.citrix.com/en-us/storefront/3-7/plan/user-authentication.html.
7. Deploy the (latest) HTML5 Receiver for remote access – http://docs.citrix.com/en-us/receiver/html5/2-2/user-experience.html.

8. When using Citrix Receiver for Windows (with HDX engine 14.4), the GPU can be used for H.264 decoding wherever it is available at the client – http://docs.citrix.com/en-us/receiver/windows/4-5/improve.html.
9. Deploy Self-Service Password Reset (SSPR) – http://docs.citrix.com/en-us/self-service-password-reset/1-0.html.

10. The most difficult to justify probably re the cost(s) but assigning a low end vGPU GRID profile or utilising the Intel Iris Pro Graphics with XenServer 7 to provide enough/suitable GPU capacity to all virtual apps & desktops (oldISH and modern) provides a much better experience so setup a PoC to see and try if for yourself and finally NVidia now supports H.264 offloading onto there GRID Cards in 7.11 🙂 – http://docs.citrix.com/en-us/xenapp-and-xendesktop/7-11/whats-new.html#par_anchortitle_59c9.

Front XenApp 7.11+ in Azure with NetScaler (Unified) Gateway 11.x.n

The following content is a brief and unofficial overview of how-to front your virtual apps & desktops powered by XenApp 7.11 with NetScaler 11.x.n using Microsoft Azure (ARM). The views, opinions and concepts expressed are those by the author of this entry only and do not necessarily conform to industry descriptions, best practises. The views expressed here are my own and do not necessarily reflect the views of Citrix.

Shortened Names
XENAPP – xa
XENSERVER – xs
XENDESKTOP – xd
XENAPP/XENDESKTOP – xad
VIRTUAL DELIVERY AGENT – vda
HIGH DEFINITION EXPERIENCE – hdx
INDEPENDENT COMPUTING ARCHITECTURE – ica
NETSCALER – ns
NETSCALER UNIFIED GATEWAY – nsug
AZURE RESOURCE MANAGER – arm
IDENTITY ACCESS & MANAGEMENT – iam
MULTI-FACTOR AUTHENTICATION – mfa
SECURITY ASSERTION MARKUP LANGUAGE – saml

Why this Blog Article?
I’ve had a lot of cloud 1st strategy conversations with IT Pro’s, Citrix SysAdmins & organisations alike recently so I thought everyone whom is searching for how-to front XenApp with an Azure NetScaler could benefit from this blog post :-). This blog post covers a how-to even with NetScaler in single IP mode to achieving https://FQDN (Image 2) for the gateway vs. https://FQDN:8443 (Image 1) when deploying NetScaler in Azure (ARM).

Deploying NetScaler 11.x.n using Azure Resource Manager (ARM)
1. Login to https://portal.azure.com
2. I presume that you have setup a your network, IAM if not refer to https://azure.microsoft.com/en-gb/get-started/ for getting started how-to from Microsoft.
3. Click on + New in the top left of the ARM web ui and type in NetScaler and select NetScaler VPX Bring Your Own License or for a quick review check out – https://azure.microsoft.com/en-gb/marketplace/partners/citrix/netscalervpx110-6531/.
4. Click Create
5. Enter in a name for your NS virtual appliance e.g ne1nug01 and select the VM disk type
5. Enter in a username and choose auth to be either SSH public key or Password I choose password to access the NS Admin WebUI for simplicity of all readers of this blog.
6. Select your chosen of default Subscription if you have more than one and then select your existing Resource Group where you XenApp 7.11+ environment and XenApp 7.11+ VDA Workers and your mgmt. VM running AD/DNS server resides. Remember I am keeping this simple as it’s intended for PoC’s only!
7. Continue to select your chosen Azure instance for NetScaler I choose DS2_V2 Standard which consists of 2 Cores, 7GB of RAM.
8. Select your storage account, virtual network & subnet e.t.c and high availability set then click Select to continue.
9. Review your purchase of NetScaler and then click Ok to purchase and Azure will begin building your NetScaler VPX in your Azure chosen subscription which will take no more typically than 10 minutes.

Setting up & Licensing your NetScaler on Azure
Firstly be aware that when deploying a NetScaler instance on Azure for virtual apps & desktops you’ll be setting up NetScaler to run in single IP mode (YES!) which means that you’re connecting to internal TRU resources on the NetScalers IP addr (NSIP) but you connect using different ports e.g ICA Proxy on 8443 so lets begin with the setup.

1. Login into your NetScaler using the NS Admin Web UI do not provide a SubnetIP Addr (SNIP) just select Do It Later and proceed with the initial setup as per normal.
2. Now that you have setup your NetScaler you need to license it so remain logged into and open a new tab in your browser of choice and Google “Citrix Eval Store” or save this link – http://store.citrix.com/store/citrix/en_US/cat/ThemeID.33753000/categoryID.63401700
3. Select under Networking -> NetScaler ADC
4. Next select the following model “VPX” select variation e.g “Platinum 1000” select duration e.g “90 Days”.
5. Complete the onscreen process note that you will require a .Citrix.com account or you need to create an account.
6. Once you receive an e-mail with your key/code head over to at https://www.citrix.com/account/toolbox/manage-licenses/allocate.html or goto and select find and allocate your licenses or look for the licensing button (link) and select it.
7. If your key/code it not visible select “Don’t see your product?” in text in/around the top right-hand side. A pop-up appears now enter in the code provided on e-mail from the Citrix Eval Store e.g “CTX34-XXXXX-XXXXX-XXXXX-XXXXX” and continue.
8. You will need to enter in the Host Id of your NetScaler it can be found once logged in using the NS Admin Web UI “NetScaler -> System -> System Information” then look under the heading “Hardware Information” and you find “Host Id” copy and paste it into the required field and then download the license file.
9. In the NS Admin Web UI click the cog icon top right then select licensing and upload the license and select to reboot the NS to apply the license.
10. Log back in and enable the features that you require e.g right click on the “NetScaler Gateway” and select “enable” e.t.c

Setup Type Choice 8443 Default without an Azure L/B for XenApp using the XenApp/XenDesktop Wizard
Now that you have setup NetScaler within your Azure subscription in your chosen region you’re ready to begin setting up NetScaler to front virtual apps & desktops (Server OS 2012 R2 or 2016) powered by XenApp 7.11+.

Sample Text Based Diagram

User Azure NetScaler StoreFront XenApp
https://FQDN:8443/ Accepts requests from Azure to NSIP on https://8443 (Single IP Mode) Accepts requests on the Gateway & Call-back FQDN on https://FQDN:8443 Accepts & launches user’s virtual app(s) & desktop(s) as requested

1. Login to your NetScaler VPX click “Settings -> Licensing” now check that License type is Platinum and Model ID 1000
2. Select the XenApp/XenDesktop wizard and review the prerequisites carefully prior to continuing BUT in summary you’ll need an SSL Cert, LDAP service account + details, XenApp 7.11+ environment with StoreFront.
3. Enter in the static IP addr assigned by Azure or OTHER METHOD of your NetScaler VPX YES that’s right!
4. IMPORTANT STEP: Change the default port of 443 to 8443 on the Gateway IP addr
5. Set Up the rest of the XAD wizard as normal
6. IMPORTANT STEP: Setup StoreFront to allow remote access however the configured default gateway and Call-back FQDN addresses MUST include 8443 e.g https://go.x1co.eu:8443 instead of just https://go.x1co.eu
7. Setup external DNS entries e.g go.x1co.eu to point to your NetScalers static IP addr found in the Azure ARM Web UI and once you have verified it is functioning correctly using a shell (IPCONFIG /FLUSH after settin-up the DNS entries waiting 10-15 min depednant upon your ISP) the open up an internet browser and type in e.g https://go.x1co.eu:8443 and dont forget the :8443 at the end of the FQDN.
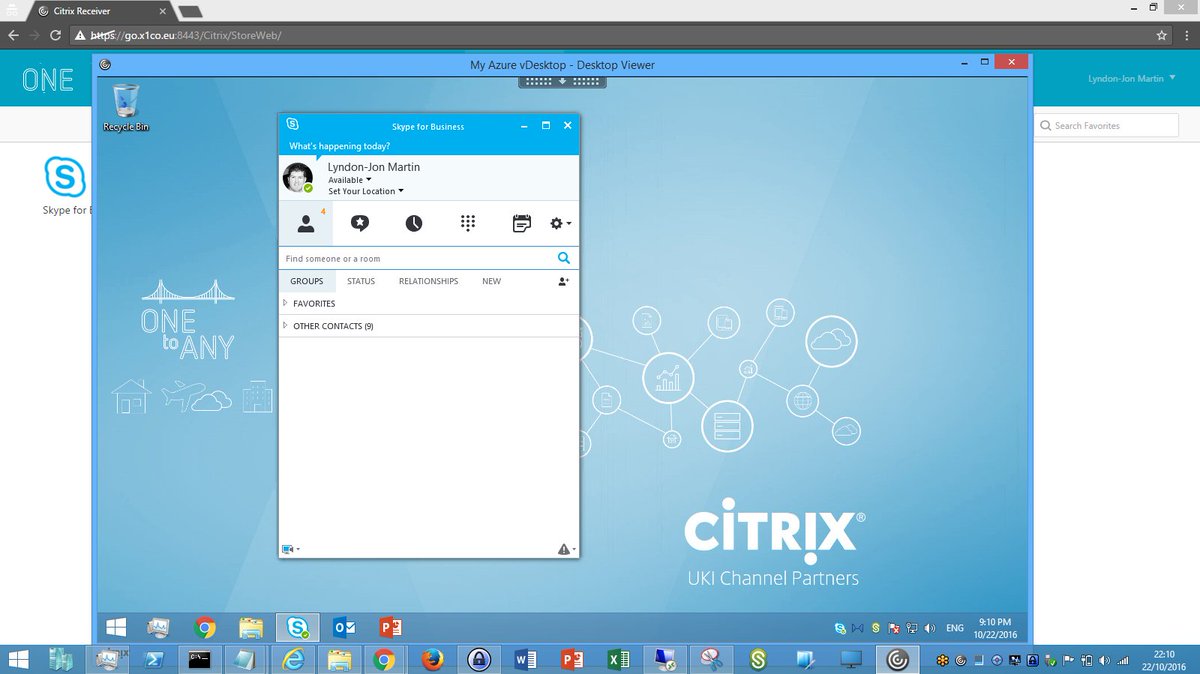
8. Attempt to login either using sAMAccountName e.g username or userPrincipalname e.g username@x1co.eu and then you should be able to successfully login and launch your virtual apps & desktop as per the below image.

Image 1


Setup Type 443 for XenApp using an Azure Load-Balancer & the NetScaler XenApp/XenDesktop Wizard

Sample Text Based Diagram

User Azure Azure Load-Balancer NetScaler StoreFront XenApp
https://FQDN/ https received request and forwarded to NetScaler on https://FQDN:8443

Accepts requests from Azure L/B on https://FQDN fwd to NSIP on https://8443 (Single IP Mode) Accepts requests on the Gateway from HTTPS://FQDN but the Call-back FQDN is on https://FQDN:8443 Accepts & launches user’s virtual app(s) & desktop(s) as requested
https://FQDN ↔ AzureL/B ↔ NetScaler:8443 NetScaler https://FQDN:8443 ↔https://FQDN StoreFront StoreFront Call-back https://FQDN:8443
StoreFront configured NetScaler Gateway https://FQDN

1. If you are choosing this option as your preferred lets hope then complete steps 1-5 and also step 7 to save you time!
2. IMPORTANT STEP: Setup StoreFront to allow remote access however the configured default gateway MUST BE e.g https://go.x1co.eu NOTICE NO :8433 YES not :8443 here. Now on the call-back FQDN addresses YOU MUST include 8443 e.g https://go.x1co.eu:8443 instead of just https://go.x1co.eu otherwise fronting NS with an Azure L/B to acheive HTTPS://FQDN for the XAD Gateway (ICA Proxy) will NOT WORK!!!!
3. Now switch to the Azure ARM Web UI. You should probably read the following useful resources – https://azure.microsoft.com/en-gb/documentation/articles/load-balancer-overview/ and for PowerShell creation check out – https://azure.microsoft.com/en-gb/documentation/articles/load-balancer-get-started-internet-arm-ps/ for any Citrix consultants out there.
4. Azure Load-balancer and click on the “+” at the top and provide a “Name” and for the type choose “Pubic” and select your Azure “Subscription” “Existing Resource Group” and its location (Same as NetScaler deployed instance) then click “Create”
5. Now it will list the available public IP addr just select the “+”
6. Enter in a name and choose your assignment choice “Dynamic” vs. “Static” and click OK.
7. Azure will then provision your Azure L/B (Wait….Maybe coffee or tea break?)
8. Once created select your Azure L/B
9. Select “Backend Pools” enter in a name then choose your availability set and then your VM’s or VM e.g NetScaler. Azure will then provision your Azure L/B with a backend pool (Wait….)
10. Select “Frontend IP Pool” click “+” enter in a name then choose your IP addr e.g NetScaler VM and then enter in a name (all names should differ makes identification easier so a good naming convention helps 🙂 now) and choose your assignment choice “Dynamic” vs. “Static” and click OK (Updating….)
11. IMPORTANT STEP: Select “Inbound NAT Rules” select the resource from your Frontend IP Pool list from the previous point (10). Select the service “HTTPS” and port to be 443 then select the target “NetScaler VM” and then vErY iMpOrtAnt select under “Port Mapping -> Custom” and in the “Target Port enter in 8443” and click save. (Wait…)
12: Now navigate to https://FQDN and attempt to login either using either sAMAccountName e.g username or userPrincipalname e.g username@x1co.eu and thereafter you should be able to successfully launch your virtual apps & desktop published by XenApp 7.11+. The below image represents the end goal when fronting an Azure NetScaler in Single IP Mode with an Azure Load-Balancer as per the below image.

NetScaler VPX in Azure Deployment Guide
http://docs.citrix.com/content/dam/docs/en-us/workspace-cloud/downloads/NetScaler-VPX-in-AZURE-Deployment-Guide.pdf

Advanced Setup & Configuration
The following how-to’s are from a 2016 Citrix Technology Advocates (CTA) – https://www.citrix.com/blogs/2016/05/23/expanding-recognition-for-community-contributors-citrix-technology-advocates/ Dave Bretty – http://bretty.me.uk/ which covers off how-to setup and configure FAS, NetScaler SAML/ADFS Proxy, Azure MFA and much more, so follow the links in order listed below.

1. http://bretty.me.uk/putting-it-all-together-citrix-xendesktop-adfs-azure-mfa-netscaler-unified-gateway-and-citrix-fas-part-1/
2. http://bretty.me.uk/putting-it-all-together-citrix-xendesktop-adfs-azure-mfa-netscaler-unified-gateway-and-citrix-fas-part-2/
3. http://bretty.me.uk/putting-it-all-together-citrix-xendesktop-adfs-azure-mfa-netscaler-unified-gateway-and-citrix-fas-part-3/
4. http://bretty.me.uk/putting-it-all-together-citrix-xendesktop-adfs-azure-mfa-netscaler-unified-gateway-and-citrix-fas-part-4/
5. http://bretty.me.uk/putting-it-all-together-citrix-xendesktop-adfs-azure-mfa-netscaler-unified-gateway-and-citrix-fas-part-5/
6. http://bretty.me.uk/putting-it-all-together-citrix-xendesktop-adfs-azure-mfa-netscaler-unified-gateway-and-citrix-fas-part-6/

What’s New and Understanding Citrix XenApp & XenDesktop 7.11 (Seven 11)

The following content is a brief and unofficial prerequisites guide to setup, configure and test delivering virtual apps and desktops powered by XenApp & XenDesktop 7.11 (Seven 11) prior to deploying in a PoC, Pilot or Production environment by the author of this entry. The views, opinions and concepts expressed are those by the author of this entry only and do not necessarily conform to industry descriptions or best practises.

Shortened Names
XENAPP – xa
XENDESKTOP – xd
XENAPP/XENDESKTOP – xad
VIRTUAL DELIVERY AGENT – vda
HIGH DEFINITION EXPERIENCE – hdx
INDEPENDENT COMPUTING ARCHITECTURE – ica
EXPERIENCE 1st – x1
VIRTUAL DESKTOP – vd
VIRTUAL APPS – va
THINWIRE COMPATIBLE MODE – tcm also known as ecm or thinwire+
UNIVERSAL WINDOWS PLATFORM – uwp
FEDERAL INFORMATION PROCESSING STANDARD – fips
SELF-SERVICE PASSWORD RESET – sspr
PROVISIONING SERVER – pvs
MACHINE CREATION SERVICES – mcs
AZURE RESOURCE MANAGER – arm

What’s New
1. XAD 7.11 infrastructure support on Windows Server 2016 for the Controller, StoreFront, Studio, Director, Server VDA, Session Recording Server & Agent, Universal Print Server.
2. Self-Service Password Reset 1.0 (SSPR) is now part of the StoreFront 3.7 & XAD 7.11 (Platinum feature) release and can be installed on Windows Server 2008 R2, 2012 R2 and 2016* and allows users to unlock or reset their AD passwords through a series of questions. For a detailed overview please read the CTX blog entitled “StoreFront 3.7 has been released!“- https://www.citrix.com/blogs/2016/09/14/storefront-3-7-has-been-released/

3. SQL Server 2014 Express is still installed by default when installing the XAD Controller which became the default in XAD 7.9 release ref – http://docs.citrix.com/en-us/xenapp-and-xendesktop/7-9/whats-new.html#par_anchortitle_ddbe so be aware of the installation behavioural changes for SQL and SQL Server 2016 is now supported ref –http://docs.citrix.com/en-us/xenapp-and-xendesktop/7-11/system-requirements.html#par_anchortitle_384a and for a full list of the supported databases for XAD please refer to http://support.citrix.com/article/CTX114501 which contains and up to date tablised view of XAD versions vs. SQL versions and which are and are’nt supported! Finally DB sizing can be found by referring to the LTSR release of XAD 7.6 at – http://docs.citrix.com/en-us/categories/solution_content/implementation_guides/database-sizing-guidance-for-xendesktop-7-6.html which has great guidance on database sizing for XAD 7.6+.

4. Publish URL’s, documents and media files from network shares (WAHOO!) is now available on as part of the XAD 7.11 release. It currently only supports publishing of content via PoSH cmdlets and all the examples can be found and a detaied overview of the feature is avaiable at – http://docs.citrix.com/en-us/xenapp-and-xendesktop/7-11/install-configure/publish-content.html*.

Example Publishing a Word Document from Citrix eDoc’s*
New-BrokerApplication -Name ReadMe -PublishedName”ReadMe Document” -ApplicationType PublishedContent -CommandLineExecutable \\MyFolderShare\Documents\ReadMe.doc -DesktopGroup Content

5. Use of System Center Virtual Machine Manager to provision VMs used to create AppDisks. If you are unfamiliar with AppDisks the following YouTube video from the Citrix channel demonstrates how’s setup, create and assign your AppDisks to users virtual desktops. There is also a fantastic AppDisks FAQ avaiable at – http://docs.citrix.com/content/dam/docs/en-us/xenapp-xendesktop/xenapp-xendesktop-7-8/downloads/AppDisk%20FAQ.pdf

6. Installation behavioural changes for CIS programs entitled “Citrix Customer Experience Improvement Program (CEIP)” and “Citrix Call Home“. For more information please refer to and read – http://docs.citrix.com/en-us/xenapp-and-xendesktop/7-11/manage-deployment/cis.html.
7. New HDX enhancements include:

– A new HDX policy setting combining Thinwire Compatible Mode (ECM) and H.264 can be enabled by selecting the following policy Use video codec for compression and select For actively changing regions. If you do not then the default HDX graphics mode is used which is Use video codec for compression Use video codec when preferred. For a more detailed overview please check out – http://docs.citrix.com/en-us/xenapp-and-xendesktop/7-11/policies/reference/ica-policy-settings/graphics-policy-settings.html.
– Up to 5% bandwidth reduction with the new behavioural enhancements for video content with Thinwire and requires XAD 7.11 with either Windows Receiver 4.5 or Linux 13.4.
– Support for USB generic mass storage devices for XenApp
TWAIN 2.0 scanning protocol support with Windows Receiver 4.5+
– New behavioural changes for the optimisation of client USB devices – http://docs.citrix.com/en-us/xenapp-and-xendesktop/7-11/policies/reference/ica-policy-settings/usb-devices-policy-settings.html
– Support for publishing universal apps for Windows 10, Server 2016 using the Microsoft Universal Windows Platform (UWP).
– Support for H.264 hardware encoding with supported nVidia GPU cards (NVENC hardware encoding – https://developer.nvidia.com/nvidia-video-codec-sdk) and also to read the following entitled “Better Together: Citrix XenDesktop 7.11 + NVIDIA GRID” from – https://blogs.nvidia.com/blog/2016/09/14/citrix-xendesktop-nvidia-grid/!
Default VDA policy settings for XAD 7.11 – http://docs.citrix.com/en-us/xenapp-and-xendesktop/7-11/policies/policies-default-settings.html

8. StoreFront 3.7 includes SSRP 1.0 as mentioned above in point 2., UI support for small form factor devices improving the user’s overall experience when you configur the unified Citrix Receiver experience on StoreFront against your Store(s) which can be configured by reffering to – http://docs.citrix.com/en-us/storefront/3-7/manage-citrix-receiver-for-web-site/unified-receiver-experience.html so when connecting to from e.g Safari on an iPhone your end-users experience is way better try for yourself! Finally a great new addition or rather enhancement to Zones in StoreFront 3.7 & XAD 7.11 is that now client location based zone preference passes the zone information to the controller (required configuration – http://docs.citrix.com/en-us/xenapp-and-xendesktop/7-11/manage-deployment/zones.html#par_anchortitle_1db7) which in turn utilises this information to select the more appropriate workstation/server VDA’s that are closest in proximity to the user so when connecting to virtual apps & desktops there receive the best rich HD experience possible.
9. Windows Server 2016 analysis and reporting including Expanded security analysis with AppDNA 7.11 – http://docs.citrix.com/en-us/dna/7-11/whats-new.html.
10. Automate Director notifications with Citrix Octoblu – http://docs.citrix.com/en-us/xenapp-and-xendesktop/7-11/director/alerts-notifications.html#par_anchortitle_1d19. For a detailed overview and look at this integration be sure to read the blog post – http://horacegoesskiing.com/index.php/2016/09/16/using-xenappxendesktop-7-11-alert-policies-with-octoblu/.
11. Support for Windows Server 2016 as a server and a target platform for PVS 7.11 including an enhanced diagnostic model so much more so be sure to review the PVS 7.11 online documentation at – http://docs.citrix.com/en-us/provisioning/7-11.html.
12. Citrix XenApp and XenDesktop 7.6 FIPS 140-2 Sample Deployments (Technically NOT new but very useful for Citrix customers and partners alike) – http://docs.citrix.com/content/dam/docs/en-us/categories/public-sector/downloads/Citrix%20XenApp%207.6%20and%20XenDesktop%207.6%20FIPS%20140-2%20Sample%20Deployments.pdf
13. Provisioning Citrix workloads in Microsoft Azure using ARM is now available. For a detailed how-to read – http://docs.citrix.com/en-us/xenapp-and-xendesktop/7-11/install-configure/install-prepare/azure-rm.html but before deploying your VM’s be sure to read the following whitepaper entitled “The scalability and economics of delivering Citrix XenApp services from Microsoft Azure” available from – https://www.citrix.com/content/dam/citrix/en_us/documents/white-paper/xa711-scalability-azure-rm.pdf. To get started with deploying and using XenApp 7.x in Azure take a look at deploying the XenApp Trial in the Azure Marketplace at – https://azure.microsoft.com/en-gb/marketplace/partners/citrix/citrix-xacitrix-xa-trial/ which will be you a complete XA 7.x enviromnent in Azure along with StoreFront, NetScaler and 2x VM’s to deliver a server virtual desktop and the other for delivery of just virtual apps.
14. Citrix Receiver 7.1 is ready for iOS 10 – https://www.citrix.com/blogs/2016/09/15/citrix-receiver-ready-for-ios-10/.
15. Finally be sure to check out and be aware of the list of known issues with XAD 7.11 release at – http://docs.citrix.com/en-us/xenapp-and-xendesktop/7-11/whats-new/known-issues.html

* Microsoft Windows Server 2016 is currently still in TP and is not officially released as of writing this blog post.

For a completely detailed summary of what is avaiable in XAD 7.11 (Seven 11) check out – http://docs.citrix.com/en-us/xenapp-and-xendesktop/7-11/whats-new.html.

XenApp and XenDesktop 7.x.n (As of this blog post its 7.11) Features
https://www.citrix.com/go/products/xendesktop/feature-matrix.html

Quick upgrade guide to XenApp 7.11 and XenDesktop 7.11 by #Citrix #CTP @ervik
http://www.ervik.as/quick-upgrade-guide-to-xenapp-7-11-and-xendesktop-7-11/

Upgrading My Azure XAD 7.9 environment to XAD 7.11
Coming…

Installing a XAD 7.11 PoC environment on Azure
I have testing installing XAD 7.11 (Seven 11) onto Windows Server 2016 Technical Preview 5 or TP5 on Azure via the Azure Market Place – https://azure.microsoft.com/en-us/marketplace/?term=Windows+Server+2016+TP5. The CLEAN installation that I performed did not have any issues or errors however the when creating the machine catalog for Windows Server 2016 TP5 even installing the Server DVA 7.11 it will revert to recommended VDA release of 7.8 only so you have been warned!

Once Microsoft releases Windows Server 2016 officially I will follow-up with an overview of setting up and configuring XAD 7.11 on Windows Server 2016 hosted on Microsoft Azure.

Scheduled & Coming…

What’s new in XenApp & XenDesktop 7.9

The following content is a brief and unofficial prerequisites guide to setup, configure and test delivering virtual apps and desktops powered by XenApp & XenDesktop 7.9 prior to deploying in a PoC, Pilot or Production environment by the author of this entry. The views, opinions and concepts expressed are those by the author of this entry only and do not necessarily conform to industry descriptions or best practises.

Shortened Names
XENAPP – xa
XENDESKTOP – xd
XENAPP/XENDESKTOP – xad
VIRTUAL DELIVERY AGENT – vda
HIGH DEFINITION EXPERIENCE – hdx
INDEPENDENT COMPUTING ARCHITECTURE – ica
EXPERIENCE 1st – x1
VIRTUAL DESKTOP – vd
VIRTUAL APPS – va
THINWIRE COMPATIBLE MODE – tcm also known as ecm or thinwire+

What’s New THAT You Probably Missed!
So firstly I thought I’d start with what consultants, IT Professionals and most importantly CTX SysAdmins been an ex-one myself may miss with the latest XenApp & XenDesktop 7.9 release and then cover the what’s new e.g most commonly known as a blog article up.

1 – Windows 10 support under the XAD 7.6 Long Term Service Release (LTSRP) – https://www.citrix.com/blogs/2016/06/13/a-sneak-peek-behind-the-scenes-of-the-long-term-service-release-ltsr/ but the detail about been compliant is avaiable at the following CTX article titled “CTX205549 XenApp and XenDesktop Servicing Options (LTSR) FAQ” – http://support.citrix.com/article/CTX205549 and then search for How do I get a Windows 10 VDA that is 7.6 LTSR compliant? on the web page. The following Citrix LTSR Assistant tool note its “Tech Preview – v1.0.0.32” but has been updated as of 10 June 2016 and can be downloaded at – http://support.citrix.com/article/CTX209577 but its NOT recommended when using with a production enviroment so against your UAT enviroment to ensure that your actual Citrix XAD PROD enviroment is XAD 7.6 LTSR compliant. For more in-depth information check out – http://docs.citrix.com/en-us/xenapp-and-xendesktop/7-6-long-term-service-release/xad-whats-new.html which provides a link to the Windows 10 statement for CTX205549.
2 – Support for Windows 10 in the HDX 3D Pro VDA
3 – Federated Authentication Service or FAS leverages a MS CA to dynamically issue certs to logon users as if they where using a smart card and extends Citrix authentication capabilities is must read for any real (CTX) SysAdmin and security experts – http://docs.citrix.com/en-us/xenapp-and-xendesktop/7-9/secure/federated-authentication-service.html.
4 – New default HDX graphics behaviour within XAD 7.9 is to support the use of Thinwire Compatible Mode or more commonly referred to as Thinwire+ and then to utilise “Use video codec for compression” when preferred e.g when playing a video which makes alot of sense to me so I am very happy to see this new default behaviours kudos to the HDX engineers that would on HDX Graphics Modes! Great job again 🙂
5 – HDX 3D Pro support for Intel CPUs with Intel Iris Pro graphics 5th & 6th Generation check out the following eDoc article for the full details – http://docs.citrix.com/en-us/xenapp-and-xendesktop/7-9/hdx/gpu-acceleration-desktop.html. For a good overview and demonstration of this new GPU support for XAD 7.9 powered by XenServer 7.0 yes that is correct XenServer 7.0 watch the following YouTube clip. Also please be sure to check out the latest XenServer 7.0 documentation at – http://docs.citrix.com/en-us/xenserver/xenserver-7-0.html there is some seriously new very cool stuff which I will cover in another up and comming Blog article time permitting between work and family life.

6 – The HTML5 Receiver 2.0 introduces a enhanced floating toolbar and you can now control its behaviour by completely hiding it or an individual icon only so check out the how-to at – http://docs.citrix.com/en-us/receiver/html5/2-0/about-this-release.html and after that it descirbes the new Client side appswitcher feature which also means CTX SysAdmins dont have to install the Client side appswitcher seperately on your VDAs.
7 – The following guides are for XAD 7.6+ and onwards although not actually classed as NEW they are often missed I find:

– Implementation and Configuration Guides – http://docs.citrix.com/en-us/categories/solution_content/implementation_guides.html
– Design Guides – http://docs.citrix.com/en-us/categories/solution_content/design_guides.html
– Reference Architectures – http://docs.citrix.com/en-us/categories/solution_content/reference-architectures.html

8 – Securing your StoreFront deployment is a must read in my person view – http://docs.citrix.com/en-us/storefront/3-6/secure.html. AppDNA now also introduces a compliance module – http://docs.citrix.com/en-us/dna/7-9/whats-new.html which helps SysAdmins identity if any apps that are due to be rolled out into your virtual app eco-system may introduce secuirty vulnerabilities or more importantly risk(s).
9 – Provisioning nVidia vGPU enabled XenDesktop machines powered by GRID K1 and K2 cards – http://docs.citrix.com/en-us/provisioning/7-9/xendesktop-setup-wizard-vgpu.html.
10 – Finally you should be aware of the new installation & upgrade default behaviour changes for XAD 7.9 so be sure to read/review the full and complete list of whats new at – http://docs.citrix.com/en-us/xenapp-and-xendesktop/7-9/whats-new.html.

Deploying a PoC with the Citrix Workspace Cloud (CWC) Apps & Desktop Service now Citrix Cloud XenApp and XenDesktop Service (Draft)

The following content is a brief and unofficial prerequisites guide to setup, configure and test delivering virtual apps and desktops powered by Citrix Workspace Cloud (CWC) – App’s & Desktop Service with a AWS EC2 resource location prior to deploying in a PoC, Pilot or Production environment by the author of this entry. The views, opinions and concepts expressed are those by the author of this entry only and do not necessary conform to industry descriptions or best practises. The views expressed here are my own and do not necessarily reflect the views of Citrix.

Shortened Names
AMAZON WEB SERVICES – aws
SECURITY GROUPS – sg
ELASTIC COMPUTE CLOUD – ec2
HYBRID CLOUD PROVISIONING – hcp
XENAPP – xa
XENDESKTOP – xd
XENAPP/XENDESKTOP – xad
VIRTUAL DELIVERY AGENT – vda
HIGH DEFINITION EXPERIENCE – hdx
INDEPENDENT COMPUTING ARCHITECTURE – ica
CITRIX WORKSPACE CLOUD CONNECTOR – cwc connector/agent
EXPERIENCE 1st – x1
VIRTUAL DESKTOP – vd
VIRTUAL APPS – va
INFRASTRUCTURE AS A SERVICE – iaas
CITRIX WORKSPACE CLOUD – cwc
CITRIX LIFECYCLE MANAGE

Video Citrix Workspace Cloud: How It Works

PoC Introduction & Overview (This is a Public Draft Blog Article & May Contain Some Errors)
In this particular instance I will be deploying a Citrix Workspace Cloud (CWC) PoC using the Apps & Desktop service which is Citrix online service and is essentially made up of five compoments in my personal view these are people (Users, Consultants & SysAdmins), the Control Plane which is hosted by Citrix and is high available and accessible at – https://workspace.cloud.com/, Resource Locations which could be private, public (IaaS) or hybrid clouds which host and run your actual CItrix workloads e.g servers or desktops OSes with the VDA’s installed and optionally StoreFront and or NetScaler Unified Gateway, Receiver for access to your published virtual apps & desktops and finally the CWC connector which makes everything just work safe & securely.

Please note that I will update this blog post with a how-to re deploying NS for remote access from AWS EC2.

Datasheet for Citrix Workspace Cloud
https://www.citrix.com/content/dam/citrix/en_us/documents/products-solutions/explore-workspace-cloud-take-a-test-drive-or-trial.pdf

What you need
For this PoC I may refer to AWS and XenServer concepts as my home lab is deployed in a Hybrid Cloud model e.g some of my Citrix workloads are in hosted in AWS EC2 (N.Virgina) while others are running on a XenServer 6.5 SP1+ host at my house in London. You don’t have to use AWS like I am for your PoC you could use any IaaS provider e.g Azure, Rackspace, Peer1 or even on-prem with your own host(s) running XenServer, Hyper-V and of course vSphere :-).

1 – CWC trial account entitling you to the CWC Apps & Desktop Service and Identity & Access Management e.g for adding users from your domain and to download the CWC Connector.
2 – Your resource location of choice mine is AWS from here on in through-out this blog article.
3 – 1x Windows Server 2012 R2 I’ll call this VM WDC01 running AD, DNS at a minimum and the Citrix Receiver (http://receiver.citrix.com), CWC Connector downloaded on the desktop (explained later).
4 – 1x Windows Server 2012 R2 domain joined and I’ll call this VM CXA01 with the latest XA 7.8+ Server VDA (https://www.citrix.com/downloads.html which requires a valid Citrix.com customer/partner account with access details ) downloaded.
5 – AWS security groups (on-prem f/w ACL) to allow outbound traffic on TCP 443 (HTTPS) to the Internet, allow HTTPS/ICA/HDX/RDS traffic including HDX RealTime ports for audio and video between all VM’s within your chosen network.
6 – Some suggested test application examples could be Microsoft’s Office 2016 or OpenOffice, Notepad ++, The Gimp, Autodesk Viewer. WaRnInG!!! Disclaimer – Please refer to the ISV’s EULA for terms of usage prior to downloading, installing, configuring and publishing virtual apps to test and play with!.
7 – *Create friendly DNS entries to be used later for WDC01 e.g DNS entry of cwccontroller.axendatacentre.com or your could stick with host name.domainname format it’s your choice. Note: Be sure to setup and configure not just fwd. but also reverse DNS within resolution/look-up!

Setting up your Resource Location
1 – Login as the Domain Admin on WDC01 and navigate to https://workspace.cloud.com and sign in with your trial access details provided by Citrix.
2 – Select from the list on the very TOP left-hand corner Identity & Access Management next click the plus/+ sign and follow the onscreen prompts to download the CWC Connector/agent.
3 – Before installing the CWC Connector/Agent please be sure to read the following documenation – http://docs.citrix.com/en-us/workspace-cloud/workspace-cloud/what-is-a-workspace-cloud-connector-/workspace-cloud-connector-technical-details.html. Once downloaded double click on the CWC Connector/agent and when prompted enter in your CWC trial access details and the installation will complete successfully if the access details provided are correct and if 443 HTTPS is enable outbound to the Internet from WDC01 to https://workspace.cloud.com.
4 – Take a short 1-3 min comfort break then refresh your web page for https://workspace.cloud.com and navigate back to Identity & Access Management and you should see your domain appear within the list, then you may proceed. If you don’t check your firewall ACL’s locally on the Windows server or virtual f/w at the edge of your VPC network and also check your AWS Security Groups are setup correctly to allow in/outbound access on HTTPS/443.

Note: If you turn off WDC01 you’ll receive and error at this page and manage & monitor tabs within the Apps & Desktop Service are NOT accessible until access is restored! Likewise if you only have 1x CWC Connector/agent then you may see an amber warning under domain within Identity & Access Management as you only have 1x CWC Connector/agent and it suggested even for a PoC to install 2x instead of 1x.

5 – Login as a Domain Admin on CXA01 and mount the XA 7.8+ VDA media by right clicking and left clicking on Mount then navigate to Windows Explorer and double click on D drive that has recently mounted with the XA 7.8 installation media and then proceed to select to install the Server VDA from the splash screen or if your downloaded the Server VDA *.exe (suggested & recommended) from Citrix.com then double click to install the VDA. In each case you’ll require 2x reboots as per normal like on-prem installations however now on CXA01 there is one exception at the controller step type in cwccontroller.axendatacente.com* or the hostname.domainname for WDC01 (Point to the CWC Connector/agent that you previously installed) and then continue with installation and once the installation is completed on CXA01, then verify that the VDA has registered and is communicating with WDC01 e.g cwccontroller.axendatacentre.com by reviewing CWC service or the event logs within Computer Management. Tip: Install to enabling remote connections initially to get your head around how the CWC Apps & Desktop Service actually works.
6 – You’ve now successfully completed setting up your XenApp worker for your chosen resource location in my case it’s an AWS EC2 located out of N.Virginia. If your curious about the CWC connector there is a tech overview avaiable at – http://docs.citrix.com/en-us/workspace-cloud/workspace-cloud/what-is-a-workspace-cloud-connector-/workspace-cloud-connector-technical-details.html be sure to review it.
7 – Now we need to continue with creating a machine catalog, delivery group in the hosted Studio and obviously publishing your virtual apps & desktop (server based).

Create a Machine Catalogue and Delivery Groups to publish Virtual apps & desktops
1 – Now go back to the homepage at https://workspace.cloud.com and to the right of the Apps & Desktop Service click “Manage” to launch the management interface which provides you with an Overview page (Scroll to the bottom to find out your cloud hosted StoreFront address. Tip: If you get an red bar with an error message check that your CWC Connector/agent at your resource location is up and available and showing as green for your domain at the Identity & Access Management tab!.
2 – Scroll to bottom of the overview web page to find out exactly what your cloud hosted StoreFront addr is. It should follow the following format https://{TENANT NAME}.xendesktop.net/Citrix/StoreWeb/. Right click on it to open a new tab and to remain at https://apps.cloud.com/. You should be able to login using your test AD security group. Tip: You won’t see any published virtual apps or desktops currently as you have not created a machine catalogue or delivery group.
3 – Go back to the Manage Apps & Desktops Service web page and click Manage or Monitor this will embed a custom, hardened published app version of Studio or Director using the HTML5 Receiver so please ensure that you are utilising an HTML5 compliant internet browser that supports the HTML5 Receiver.
4 – Assuming you’ve clicked on Manage firstly navigate to Hosting Connections create a connection to your chosen resource location either on-prem or cloud (Private or Public) details for setting up hosting connections are available at – http://docs.citrix.com/en-us/xenapp-and-xendesktop/7-8/manage-deployment/connections.html. Once setup wait 1-2 min before proceeding you don’t have to by the way! I do.
5 – Click Machine Catalogue and create as per normal for detailed on how-to please refer to – http://docs.citrix.com/en-us/xenapp-and-xendesktop/7-8/install-configure/machine-catalogs-create.html. Tip: I’d suggest as its your first time using the CWC Apps and Desktop service create your machine catalogue with a single VM with the VDA installed to allow remote connections as described earlier to allow you to get around how the CWC Apps and Desktops Service actually works. You don’t have to either it’s your choice.
6 – Click Delivery Groups and create as per normal aswell and please refer to – http://docs.citrix.com/en-us/xenapp-and-xendesktop/7-8/install-configure/delivery-groups-create.html for guidance delivering virtual apps (Skype for Business 2015 also implment the HDX Optimisation Pack 2.0 check out – https://www.citrix.com/blogs/2016/01/12/citrix-and-microsoft-unveil-v2-solution-for-skype-for-business/ for more information) & desktops (Windows Server 2012 R2). TIP: The name you provide your Delivery Group filters through to the Workspaces at – https://workspace.cloud.com/workspaces and becomes the default name of your published virtual & desktops services that you will assign to your subscribers (users) workspace.
7 – You’ve now successfully setup a Machine Catalog and Delivery Group using the CWC Apps & Desktop Service to published a virtual apps & desktop, however prior to accessing your virtual apps & desktops you’ll need to create a Workspace and add subscribers (users) including which published resources your subscribers (users) are able to access otherwise they wont be able to login nor access any published resources.

You should have the Server VDA and CWC Connector now installed see the below example image below.

Create a Workspace to Delivery published virtual apps & desktops
1 – A workspace consists of a collection of services from CWC e.g Secure Documents (ShareFile), Apps & Desktop Service (XenApp/XenDesktop) and so forth that SysAdmins can combine together to form e.g a Pre-Sales workspace that may consist of a virtual apps e.g Skype for Business 2015 that is also offloaded with the HDX Optimisation Pack 2.0 – https://docs.citrix.com/en-us/hdx-optimization/2-0/hdx-realtime-optimization-pack-about.html and a virtual desktop e.g a dedicated Windows 10 or 2012 R2 desktop. A workspace also consists of subscribers (users) who access the workspace which contains published resources created by Citrix SysAdmins. Please ref to http://docs.citrix.com/en-us/workspace-cloud/workspace-cloud/get-started/creating-and-publishing-a-workspace.html which explains how-to create a workspace, define subscribers and published resources.
2 – Once you have created a Workspace and assigned subscribers, resources then users can login at https://{TENANT}.xendesktop.net/Citrix/StoreWeb/ from there resource location and gain access to there virtual apps & desktops.
3 – Managing your newly created Workspace is easy following this useful online document from eDocs – http://docs.citrix.com/en-us/workspace-cloud/workspace-cloud/get-started/manage-a-workspace.html.

Example of my virtual desktop (Server based) delivered by CWC using the XenApp 7.8 VDA. I also use the same theme for my complete XenApp 7.8 deployment in AWS yes I have both deployed and configured 🙂

A first for me
This is the first time I’ve written a blog post (primarily) completed in the air traveling from somewhere between London – England, Oslo – Norway and Stockholm – Sweden.

Disclaimer
This blog article should be considered to be a draft still and therefore may contain errors and I will be updating and adjusting it time permitting and adding in how-to front this CWC Apps & Desktop service deployment in my AWS EC2 resource location with NetScaler Unified Gateway – https://www.youtube.com/watch?v=qT739UoR8d0.